During the printing process, media, toner, and dust particles can accumulate inside the product. Over time, this buildup can cause print quality problems, such as toner specks or smearing, and paper jams. To correct and prevent these types of problems, you can clean the print cartridge area, pickup roller, and the printer media path.
HP LaserJet 1018, 1018s, 1020, and 1020 Plus Printers - Cleaning the Printer
Introduction
Cleaning the HP Printer
Use the steps in the following sections to clean the different parts and areas of the product.
Cleaning the outside of the printer
Clean the outside of the product with a clean, damp cloth when necessary.
caution:Do not use ammonia-based cleaners on or around the product.
Cleaning the print cartridge area and pickup roller
Follow these steps to clean the print cartridge area and pickup roller. Dirt or grime build up on the pickup roller can cause the paper to feed into the product incorrectly or not at all. Cleaning this area can improve the quality of printouts.
-
Press the Power button (
 ) to turn off the product.
-
Disconnect the power cord from the back of the product.Figure : Disconnect the power cord

-
Wait for the product to cool down.
-
Open the print cartridge door, and then remove the print cartridge.
caution:
To prevent damage to the print cartridge, minimize its exposure to direct light. Cover the print cartridge with a sheet of paper.Figure : Remove the print cartridge
-
With a dry, lint-free cloth, wipe any residue from the media path area and the print cartridge cavity.

-
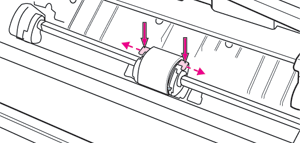
Find the pickup roller.
-
Pickup roller
Figure : Pickup roller
-
-
Release the small, white tabs on either side of the pickup roller, and then rotate the pickup roller toward the front of the product.Figure : Release the pickup roller tabs
-
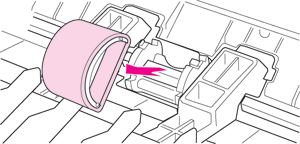
Gently pull the pickup roller up, and then out.Figure : Remove the pickup roller
-
Dab a lint-free cloth in rubbing alcohol (isopropyl alcohol), and then scrub the pickup roller.Figure : Rubbing alcohol and clean cloth

warning:
Rubbing alcohol is flammable. Keep the rubbing alcohol and cloth away from any open flame or heat source. Before you close the product, allow the rubbing alcohol to dry completely.note:
In certain areas of California, air pollution control regulations restrict the use of liquid Isopropyl Alcohol (IPA) as a cleaning agent. In those areas of California, please disregard the previous recommendations and use a dry, lint-free cloth. The cloth may be moistened with water if desired. -
Using a dry, lint-free cloth, wipe the pickup roller to remove loosened dirt.Figure : Wipe the pickup roller with a dry cloth

-
Allow the pickup roller to dry completely before you reinstall it in the product.
-
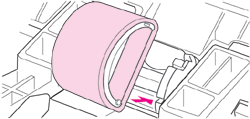
Position the pickup roller in the slot. The circular and rectangular slots on each side will prevent you from installing the roller incorrectly.Figure : Position the pickup roller
-
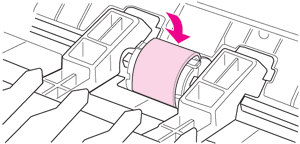
Rotate the top of the pickup roller away from you until both sides snap into place.Figure : Snap the roller into place
-
Reinstall the print cartridge, and then close the print cartridge door.Figure : Reinstall the print cartridge

-
Reconnect the power cord to the back of the product.Figure : Reconnect the power cord

-
Press the Power button () to turn on the product.
Cleaning the printer media path
If you are experiencing toner specks or dots on the printouts, you can use the HP LaserJet cleaning utility to remove excess media and toner particles that can accumulate on the fuser assembly and rollers. Cleaning the media path might extend the life of the printer.
Figure : Toner specks

note:For best results use a sheet of transparency. If you do not have any transparencies, you can use copier-grade paper, 70 to 90 g/m2 (18 to 24 lb), with a smooth surface.
-
Make sure that the printer is idle and the Ready light is on.
-
Load the transparency or paper in the input tray.
-
Print a cleaning page.
-
Access the product Properties dialog box.
-
Windows XP: Click Start, click Printer and Faxes, right-click HP LaserJet 10xx series, and then select Properties.
-
Windows Vista: Click the Windows icon (
 ), click Control Panel, click Hardware and Sound, click Printer, right-click HP LaserJet 10xx series, and then select Properties.
-
Windows 2000: Click Start, click Printer and Faxes, right-click HP LaserJet 10xx series, and then select Preferences.
-
-
Click the Configure tab.
-
In the Cleaning Page section, click Start.
-
Click OK to begin the cleaning.
-
note:The cleaning process takes approximately 3 minutes. The cleaning page will stop periodically during the cleaning process. Do not turn the printer off until the cleaning process has finished. You might need to repeat the cleaning process several times to thoroughly clean the printer.
Enter a topic to search our knowledge library
What can we help you with?

Need Help?