solution Contentsolution Content

Resolving a Paper Jam for HP Deskjet 1010 and Deskjet Ink Advantage 1010 Printer Series

Issue

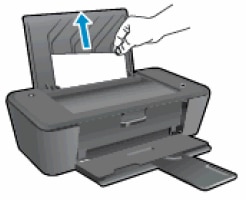
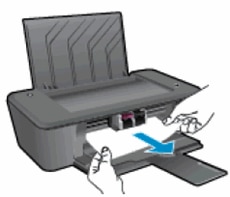
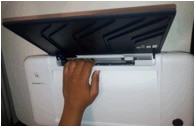
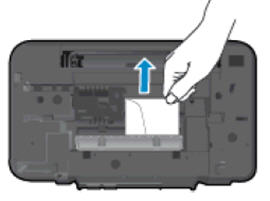
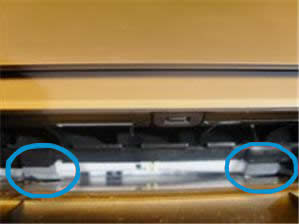
During printing, the printer stops feeding pages, and the Power button light might also blink fast.
note:
Paper jams can be real or false. The printer might report a paper jam even when there is no jammed paper. The following steps apply to both real and false paper jams.
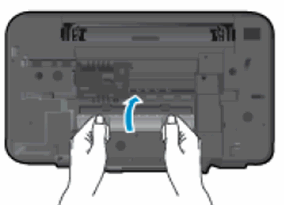
Important: You must follow these solutions in the order presented to resolve the issue. When one of the solutions resolves the issue, you can stop troubleshooting.

Solution one: Turn the printer off and on again

Follow these steps to restart the printer, and then try to print a test page.

Step one: Turn the printer off and on

  1. Turn off the printer.
  2. Wait 60 seconds.
  3. Turn on the printer.
    note:
    The printer might go through a warm-up period which can last up to one minute. Wait until the printer is idle and silent before continuing.

Step two: Print a Print Quality Report

Select your operating system, and then follow the steps to print a test page to make sure that the hardware functions correctly.
  • If these steps resolved the issue, and the test page prints, there is no need to continue troubleshooting.
  • If the issue persists, continue with the next solution.
  • If the test page does not print, continue with the next solution.

Solution two: Clear the paper jam from the printer

Follow these steps in the order presented to resolve the paper jam.

Step one: Remove any loose paper from the paper tray

  caution:
Do not remove jammed paper at this stage. Trying to clear jammed paper from the front of the printer can damage the print mechanism.
  1. Remove the paper from the input tray.
    Figure : Remove paper from the input tray
    Image: Remove paper from the input tray
  2. Remove the paper from the output tray.
    Figure : Remove paper from the output tray
    Image: Remove paper from the output tray

Step two: Clear the paper jam from the top of the printer

  1. Press the Power button to turn off the printer.
  2. Disconnect the USB cable from the rear of the printer.
  3. Disconnect the power cord from the rear of the printer.
      warning:
    You must disconnect the power cord before you reach inside the printer to avoid risk of injuries or electric shock.
  4. Look inside the input tray, and then remove any foreign materials such as paper clips, debris, or other objects that might have fallen inside.
    note:
    You might need a flashlight to illuminate the area.
    Figure : Look inside the input tray
    Image: Look inside the input tray.
  5. Use your fingers to move the pick mechanism located inside the input tray, and then remove any foreign objects or debris.
    Figure : Use your fingers to remove debris
    Image: Use your fingers to remove debris.
  6. If you did not find any debris, tilt the printer on its side, and then use your fingers to move the pick mechanism located inside the input tray, and then remove any foreign objects or debris you find. Debris might fall out of the printer.
      caution:
    Make sure that there are no foreign materials that remain inside the input tray as this could result in further paper jams or damage to the printer.
    Figure : Tilt the printer, and then remove any foreign objects or debris
    Image: Tilt the printer, and then remove any foreign objects or debris.
  7. Return the printer to its normal position.
  8. Check the output tray for any foreign materials, and then remove them if necessary.
  9. Reconnect the USB cable to the rear of the printer.
  10. Reconnect the power cord to the rear of the printer, and then press the Power button to turn on the printer.
  • If these steps resolved the issue, there is no need to continue troubleshooting.
  • If the issue persists, see the next step.

Step three: Clear the paper jam from the underside of the printer

  1. Press the Power button to turn off the printer.
  2. Disconnect the power cord from the rear of the printer.
  3. Turn the printer so that you can access its underside (base).
      caution:
    Do not turn the printer upside down because ink might leak from the cartridges.
    Figure : Tilt the printer
    Image: Tilt the printer.
  4. Press in the tabs on either side of the cleanout door, and then pull the door out to remove it.
    Figure : Open the cleanout door.
    Image: Open the cleanout door
  5. Gently remove any jammed paper from inside the printer.
    Figure : Remove any jammed paper
    Image: Remove any jammed paper from inside the printer.
      caution:
    Use both hands to pull any whole sheets of paper to avoid tearing them. If the paper tears when you remove it from the rollers, check the rollers and wheels for torn pieces of paper that might remain inside the printer. If pieces of paper remain in the printer, more paper jams can occur.
  6. Close the cleanout door. Gently push the door forward until it snaps into place.
    Figure : Reattach the cleanout door
    Image: Reattach the cleanout door
  7. Return the printer to its normal position.
  8. Reconnect the power cord to the rear of the printer.
  9. Press the Power button to turn on the printer.
  10. Check to see if the Power light is still blinking rapidly.

Step four: Clear the paper jam from inside the printer

  1. Open the cartridge access door, and then wait while the print carriage moves to the center of the cartridge access area.
  2. Disconnect the power cord from the rear of the printer.
      warning:
    You must disconnect the power cord to avoid an electrical shock when you move the carriage by hand.
  3. Slide the print carriage to the right
  4. Remove any paper from the cartridge access area.
    Figure : Remove paper from the cartridge access area
    Image: Remove paper from the cartridge access area
      caution:
    Use both hands to pull any whole sheets of paper to avoid tearing them. If the paper tears when you remove it from the rollers, check the rollers and wheels for torn pieces of paper that might remain inside the printer. If pieces of paper remain in the printer, more paper jams can occur.
  5. Reconnect the power cord to the rear of the printer.
  6. Press the Power button to turn on the printer.
  7. Check to see if the Power light is still blinking rapidly.
  • If these steps resolved the issue, there is no need to continue troubleshooting.
  • If the issue persists, see the next step.

Step five: Clear the paper jam from the front of the printer

  1. Gently pull the jammed paper toward you until the paper is removed from the printer.
    Figure : Pull jammed paper out of the front of the product
    Illustration of pulling jammed paper out of the input tray
      caution:
    Use both hands to pull any whole sheets of paper to avoid tearing them. If the paper tears when you remove it from the rollers, check the rollers and wheels for torn pieces of paper that might remain inside the printer. If pieces of paper remain in the printer, more paper jams can occur.
  2. Reconnect the power cord to the rear of the printer.
  3. Press the Power button to turn on the product.

Step six: Print a Print Quality Report

Print a test page to make sure that the hardware functions correctly.
  • If these steps resolved the issue, and the test page prints, there is no need to continue troubleshooting.
  • If the issue persists, continue with the next solution.
  • If the test page does not print, continue with the next solution.

Solution three: Make sure that the carriage can move freely

Follow these steps to make sure that the carriage moves freely across the width of the printer.

Step one: Check the carriage path for obstructions

  1. Press the Power button to turn on the printer, if it is not on already.
  2. Lower the output tray, if necessary, and then open the cartridge access door. The carriage moves to the center of the printer. Wait until the carriage is idle and silent.
    Figure : Open the cartridge access door
    Image: Open the cartridge access door
  3. Without turning off the printer, disconnect the power cord from the rear of the printer.
  4. Unplug the power cord from the power source or electrical outlet.
      warning:
    You must disconnect the power cord to avoid an electrical shock when you move the carriage by hand.
  5. Look inside the printer to see where the carriage is stuck, and then check for any torn paper or other objects that might be restricting the carriage. You might need a flashlight to illuminate areas for proper viewing.
  6. Remove any loose paper or obstructions you find.
      caution:
    Use both hands to pull any whole sheets of paper to avoid tearing them. If the paper tears when you remove it from the rollers, check the rollers and wheels for torn pieces of paper that might remain inside the printer. If pieces of paper remain in the printer, more paper jams can occur.
  7. Reach inside the printer through the cartridge access door, and then manually move the carriage.
    • If the carriage is stuck on the right side of the product, move the carriage to the left side of the product.
    • If the carriage is stuck on the left side of the product, move the carriage to the right side of the product.
    • If the carriage is stuck in the middle of the product, move the carriage to the right side of the product.
  8. Remove any loose paper or obstructions found.
  9. Make sure that the carriage can move freely across the width of the product. Firmly push the carriage to the left side of the product, and then to the right side.
  10. Close the cartridge access door.
    Figure : Close the cartridge access door
    Image: Close the cartridge access door.
  11. Reconnect the power cord to the rear of the printer.
  12. Plug the power cord back into the power source or electrical outlet.
  13. Press the Power button to turn on the printer.

Step two: Print a Print Quality Report

Print a test page to make sure that the hardware functions correctly.
  • If these steps resolved the issue, and the test page prints, there is no need to continue troubleshooting.
  • If the issue persists, continue with the next solution.
  • If the test page does not print, continue with the next solution.

Solution four: Clean the rollers

Dust, paper fiber, and other debris might accumulate on the paper feed rollers and cause paper jams and paper feed issues. Follow these steps to clean the paper pick rollers.

Step one: Clean the paper pick rollers

  1. Gather the following materials.
    • Long, dry cotton swabs
    • Clean sheets of paper
    • Distilled, filtered, or bottled water (tap water might contain contaminants that can damage the printer.)
  2. Press the Power button to turn off the printer.
  3. Disconnect the power cord from the rear of the printer.
  4. Raise the input tray.
    Figure : Raise the input tray
    Image: Raising the input tray
  5. Look down through the open input tray and find the gray paper pick rollers. You might need a flashlight to illuminate the area.
    Figure : Paper pick rollers
    Image: paper pick rollers
  6. Dampen a long cotton swab with bottled or distilled water, and then squeeze any excess water from the swab.
  7. Press the swab against the rollers and rotate them upward with your fingers. Apply a moderate amount of pressure to remove dust or dirt buildup.
  8. Allow the rollers to dry for 10 or 15 minutes.
  9. Reconnect the power cord to the rear of the printer.
  10. Press the Power button to turn on the printer.

Step two: Print a Print Quality Report

Print a test page to make sure that the hardware functions correctly.
  • If these steps resolved the issue, and the test page prints, there is no need to continue troubleshooting.
  • If the issue persists, continue with the next solution.
  • If the test page does not print, continue with the next solution.

Solution five: Reset the printer

Sometimes a paper jam error persists even though there is no jammed paper (false paper jam). Follow these steps to reset the HP printer, which might clear a false paper jam error.

Step one: Reset the printer

  1. With the printer turned on, disconnect the power cord from the rear of the printer.
  2. Unplug the power cord from the wall outlet.
  3. Wait at least 15 seconds.
  4. Plug the power cord back into the wall outlet.
  5. Reconnect the power cord to the printer.
  6. Turn the printer on.

Step two: Print a Printer Status Report

Print a test page to make sure that the hardware functions correctly.
  • If these steps resolved the issue, and the test page prints, you can stop troubleshooting.
  • If the test page prints successfully, but you continue to experience an issue with your printer, then the issue is not related to the hardware.
  • If the printer does not print a test page, there is an issue with the printer hardware. Continue to the next solution.

Solution six: Service the printer

Service or replace your HP product if the issue persists after completing all the preceding steps.
Go to Contact HP Customer Support to schedule a product repair or replacement. If you are in Asia Pacific, you will be directed to a local service center in your area.
To confirm your warranty status, go to HP Product Warranty Check. Repair fees might apply for out-of-warranty products.