solution Contentsolution Content

HP Officejet Pro 276dw Multifunction Printer Series - A 'Carriage Jam' Message Displays on the Printer Control Panel

Issue

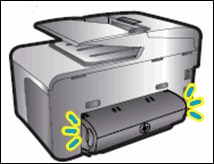
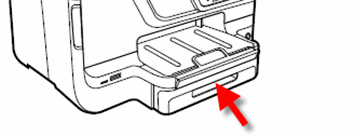
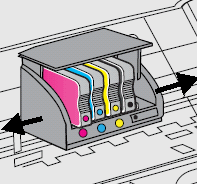
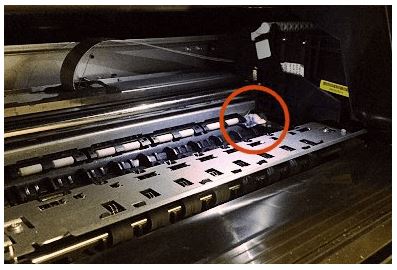
The message 'Carriage Jam' displays on the printer control panel. Printing stops and the carriage stalls.
Example message that does not include an error code
Carriage Jam
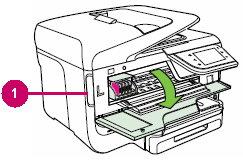
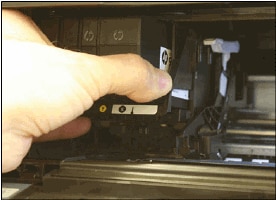
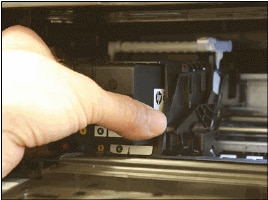
The print carriage cannot move. Open the ink cartridge access door, clear any paper jam or obstruction, and select OK.
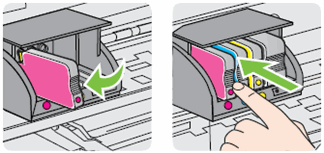
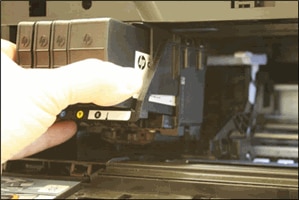
Important: You must follow these solutions in the order presented to resolve the issue unless the 'Carriage Jam' message is alternating with other error messages, such as 'Missing or damaged printhead'. If the messages are alternating, skip to the solution to remove the printhead.

Video of clearing a carriage jam

The following video demonstrates how to clear a carriage jam.
If you have trouble viewing the video or to view the video in a different size, click here to play the video on YouTube.

Solution one: Reset the printer

Follow these steps to reset the printer.

Step one: Reset the printer

Follow these steps to reset the printing mechanism.
  1. With the printer turned on, disconnect the power cord from the printer.
  2. Unplug the power cord from the power source.
  3. Wait 60 seconds.
  4. Reconnect the power cord to a wall outlet and to the printer.
    note:
    HP recommends plugging the printer directly into a wall outlet.
  • If these steps resolved the error message, continue with the next step.
  • If the error message persists, skip to the next solution.

Step two: Print a Printer Status Report

Printing a test page verifies that the hardware functions correctly.
  1. Load U.S. Letter or A4 size, unused, plain white paper into the input tray.
  2. On the control panel, touch the Right Arrow ().
  3. Touch Setup ().
  4. Touch the Down Arrow () to scroll to Reports.
  5. Touch Reports, and then touch Printer Status Report. The Printer Status Report prints.
  • If these steps resolved the issue, and the test page prints, there is no need to continue troubleshooting.
  • If the issue persists, continue with the next solution.
  • If the test page does not print, continue with the next solution.

Solution two: Clear any jammed paper

Jammed paper can cause the carriage to stall. Follow these steps to clear any jammed paper.

Step one: Remove any loose paper

Remove any loose sheets of paper from the input tray and the output tray.
  caution:
Do not remove jammed paper at this stage. Trying to clear jammed paper from the front of the product can damage theprint mechanism.

Step two: Clear any jammed paper from the rear of the printer

  1. Press the Power button to turn on the printer.
  2. Wait until the printer is idle and silent before you continue.
  3. While the printer is still on, disconnect the power cord from the rear of the printer.
      warning:
    You must disconnect the power cord before reaching inside the printer to avoid risk of injuries or electric shock.
  4. Turn the printer so that the rear of the printer faces you.
  5. Push in the buttons on both sides of the two-sided printing accessory (duplexer), and then pull out to remove the duplexer.
    note:
    Your printer might look slightly different than the one pictured, but the steps are the same.
      Image: Remove the duplexer.
    1. Press the buttons on the sides of the duplexer.
    2. Pull the duplexer out of the printer.
  6. Gently remove any jammed paper or bits of torn paper from the rollers inside the printer. Use both hands to pull any whole sheets of paper to avoid tearing them.
    Image: Remove the jammed paper.
  7. If the paper tears while you remove it from the rollers, more paper jams might occur. Check the rollers and wheels for torn pieces of paper that might remain inside the printer.
    Image: Remove bits of paper.
  8. If you do not see any jammed paper in the rear access area, press the tabs on the sides of the duplexer, and then lower the cover.
    Image: Press the tabs to open the duplexer.
  9. Gently remove any jammed paper from inside the duplexer.
  10. With the duplexer open, check the rollers. Note if any rollers are missing, do not roll freely, or are damaged. These conditions might mean the rollers are not feeding the paper correctly. In that case, replace the duplexer.
    Image: Duplexer internal rollers.
  11. Close the duplexer cover, and then reinsert the duplexer into the rear access area of the printer.
    Image: Insert the duplexer into rear access area.
  12. Push the duplexer in until it clicks into place.
    Image: Snap the duplexer into place.

Step three: Clear any jammed paper from Tray 1

If you cannot remove the paper jam from the rear of the printer, follow these steps to remove any jammed paper from Tray 1.
  1. Place your fingers in the slot on the front of Tray 1.
    Figure : Slot in the front of Tray 1
    Image: Slot in the front of Tray 1.
  2. Pull the tray toward you to remove it.
  3. Grasp any jammed paper from the bottom of the printer with both hands, and then pull the paper slowly but firmly toward you to remove it.
      caution:
    Remove paper from the tray as carefully as possible. If any torn pieces of paper remain inside the printer, more paper jams might to occur, and this could damage the print mechanism.
  4. Push the tray into the printer until the tray locks into place.
    Figure : Push Tray 1 into the printer
    Image: Push the tray into the printer.

Step four: Clear any jammed paper from Tray 2

note:
Tray 2 is an optional accessory. If you do not have Tray 2 installed, skip to the next step.
  1. Make sure that the printer is turned off and disconnected from the power source.
  2. Lift the printer from Tray 2, and then set it aside.
    Figure : Lift the printer from Tray 2
    Image: Lift the printer from Tray 2.
  3. Check the bottom of the printer for jammed paper.
  4. Remove any jammed paper from the bottom of the printer.
  5. Remove any jammed paper from Tray 2.
  6. Set the printer on top of Tray 2.
  7. Reconnect the power cord to the rear of the printer.

Step five: Clear any jammed paper from the output tray

  1. Check the output tray for jammed paper.
  2. Carefully remove any loose paper from the output tray.
  3. Gently remove any jammed paper or bits of torn paper from the output tray rollers. Use both hands to pull any whole sheets of paper to avoid tearing them.
      caution:
    If the paper tears while you remove it from the rollers, more paper jams might occur.
  4. Remove any bits of paper or torn pieces of paper from the output tray rollers.
  5. Press the Power button to turn on the printer.
    note:
    The printer might go through a warm-up period. The printer lights might flash and the carriage might move. Wait until the warm-up period finishes before you proceed.
  • If these steps resolved the error message, continue with the next step.
  • If the error message persists, skip to the next solution.

Step six: Print a Printer Status Report

Printing a test page verifies that the hardware functions correctly.
  • If these steps resolved the issue, and the test page prints, there is no need to continue troubleshooting.
  • If the issue persists, continue with the next solution.
  • If the test page does not print, continue with the next solution.

Solution three: Make sure that the carriage moves freely

Follow these steps to find the carriage, and then make sure that the carriage moves freely. Some steps require the use of a flashlight to identify any jammed paper in the carriage path.

Step one: Find the carriage with a flashlight

  1. Press the Power button to turn off the printer.
      warning:
    Do not reach into the cartridge access area when the printer is turned on or off, and is plugged into an electrical outlet.
  2. Disconnect the power cord from the rear of the printer.
  3. Place your fingers into the slot on the left side of the printer, and then pull to open the cartridge access door.
    Figure : The slot on the side of the printer
    Image: The slot on the side of the printer.
  4. Use a flashlight to find the carriage inside the printer.
    Figure : Use a flashlight
    Image: Use a flashlight
      warning:
    Do not try to move the carriage if it is docked all the way to the right side of the printer.

Step two: Make sure that the carriage moves freely

Follow the steps for the position of the carriage inside your printer.
  1. Keep the printer turned on.
  2. Place your fingers into the slot on the left side of the printer, and then pull to open the ink cartridge access door.
    Image: The slot on the side of the printer.
  3. Wait for the carriage to move to the left side of the carriage path.
  4. Disconnect the power cord from the rear of the printer.
      caution:
    Do not reach into the ink cartridge access area when the printer is plugged into an electrical outlet.
  5. Grasp the carriage, and then try to move the carriage to the right and to the left sides of the printer.
    Image: Move the carriage.
  6. Move the carriage to the far-left side of the printer.
    If the carriage does not move freely, apply minimal pressure to the right side of the carriage, and then push the carriage to the left. Do this only if the carriage is not docked in its station on the far-right side of the printer.
  7. Look for and remove any obstructions along the far-right side of the carriage path, such as paper or debris.
  8. Use a flashlight to check for torn pieces of paper that might remain inside the printer. If any torn pieces of paper remain inside the printer, more jams are likely to occur.
    Image: Check for paper jammed in the carriage path
  9. Move the carriage to the far-right side of the printer.
    If the carriage does not move freely, apply minimal pressure to the left side of the carriage, and then push the carriage to the right. Do this only if the carriage is not docked in its station on the far-right side of the printer.
  10. Look for and remove any obstructions along the far-left side of the carriage path, such as paper or debris.
  11. Close the ink cartridge access door.
  12. Reconnect the power cord to the rear of the printer, and then turn on the printer.
  13. Wait until the warm-up period finishes and your printer is idle and silent before you proceed.
  • If these steps resolved the error message, continue with the next step.
  • If the error message persists, skip to the next solution.
  1. Press the Power button to turn off the printer.
  2. Disconnect the power cord from the rear of the printer.
      caution:
    Do not reach into the ink cartridge access area when the printer is plugged into an electrical outlet.
  3. Place your fingers into the slot on the left side of the printer, and then pull to open the ink cartridge access door.
    Image: The slot on the side of the printer.
  4. Gently pull out any jammed or torn paper from inside the printer.
  5. Use a flashlight to check for torn pieces of paper that might remain inside the printer. If any torn pieces of paper remain inside the printer, more jams are likely to occur.
    Image: Check for paper jammed in the carriage path
  6. Close the ink cartridge access door.
  7. Reconnect the power cord to the rear of the printer, and then turn on the printer.
  8. Wait until the warm-up period finishes and your printer is idle and silent before you proceed.
  • If these steps resolved the error message, continue with the next step.
  • If the error message persists, skip to the next solution.

Step three: Print a Printer Status Report

Printing a test page verifies that the hardware functions correctly.
  • If these steps resolved the issue, and the test page prints, there is no need to continue troubleshooting. Reconnect the USB cable, and then try to print again.
  • If the issue persists, continue with the next solution.
  • If the test page does not print, continue with the next solution.

Solution four: Remove and then reinstall the cartridges

Improper placement or installation of the cartridges might cause the printer to indicate a carriage jam error. Follow these steps to remove and then reinstall the cartridges.
note:
If the 'Carriage Jam' message is alternating with other error messages, such as 'Missing or damaged printhead', skip to the solution to remove the printhead.
  caution:
Do not lift the latch handle on the carriage. Lifting the latch handle is not necessary to remove or insert cartridges. Lifting the latch handle causes the printhead or cartridges to be incorrectly seated which can damage the print mechanism and cause printing problems. If the latch handle is lifted, skip to the solution to remove the printhead.
Figure : Correct latch position to secure the printhead for printing
Image: Correct latch position to secure the printhead for printing.

Step one: Remove and reinstall the cartridges

  1. Press the Power button to turn on the printer, if it is not already on. Wait until the warm-up sequence finishes and your printer is quiet before you proceed.
  2. Place your fingers into the slot on the left side of the printer, and then pull to open the cartridge access door. Allow the carriage to move to the cartridge access area, and the carriage stops moving.
    Figure : The slot on the side of the printer
    Image: The slot on the side of the printer.
  3. Press in on the front of a cartridge to release it, and then pull it toward you to remove it from its slot. Repeat this step for each cartridge.
      caution:
    Do not leave the cartridges outside of the printer for anextended period. This can result in damage to both the printer and thecartridges.
    Figure : Remove the cartridges
    Image: Remove the cartridges.
  4. Check for and remove obstructions under and around the carriage.
  5. Slide the cartridge into its slot, and then gently push it forward until it clicks into place. Make sure that the colored dot on the cartridge label matches the colored dot on the slot.
    Figure : Insert the cartridge into its color-coded slot
    Image: Insert the cartridge into its color-coded slot.
    All cartridges must be seated correctly in the printhead assembly. If one cartridge sticks out farther than another, it is not installed correctly. Make sure that you push the cartridge forward into the printhead again until it clicks into place.
  6. Repeat these steps for the other cartridges.
  7. Close the cartridge access door.
  • If these steps resolved the error message, continue with the next step.
  • If the error message persists, skip to the next solution.

Step two: Print a Printer Status Report

Printing a test page verifies that the hardware functions correctly.
  • If these steps resolved the issue, and the test page prints, there is no need to continue troubleshooting.
  • If the issue persists, continue with the next solution.
  • If the test page does not print, continue with the next solution.

Solution five: Remove the printhead, and then inspect the carriage compartment where the printhead sits

Follow these steps to remove the printhead, and then inspect the carriage compartment where the printhead sits.

Step one: Remove the printhead

  1. Press the Power button to turn on the printer, if it is not already on. Wait until the warm-up period finishes and your printer is idle and silent before you proceed.
  2. Place your fingers into the slot on the left side of the printer, and then pull to open the cartridge access door. Allow the carriage to move to the cartridge access area, and the carriage stops moving.
    Figure : The slot on the side of the printer
    Image: The slot on the side of the printer.
  3. Disconnect the power cord from the rear of the printer. Unplugging the printer prevents the carriage from moving.
      warning:
    You must disconnect the power cord before reaching inside the printer to avoid risk of injuries or electric shock.
  4. Lift the carriage latch.
    Figure : Lift the carriage latch
    Image: Lift the carriage latch.
  5. Grasp the sides of the printhead, gently lift and remove the printhead from the carriage.
    note:
    Do not remove the cartridges from the printhead. You can safely remove the printhead with all of the cartridges inserted.
    Figure : Remove the printhead
    Image: Remove the printhead.
      caution:
    The nozzle area on the bottom of the printhead is fragile! Make sure that the bottom of the printhead does not bump or rub on the printer. Do not touch the nozzles or electrical contacts. Touching these areas can cause electrical failures or print quality problems.
      Figure : Nozzles and electrical contacts
      Image: Nozzles and electrical contacts
    1. Nozzles
    2. Electrical contacts
  6. Place the printhead assembly (with the cartridges still installed) upside down on a clean sheet of paper.
      caution:
    Do not leave the printhead assembly outside of the printer for an extended period. Doing so can result in damage to the printhead or the printer.
    Figure : Printhead upside down on a clean sheet of paper
    Image: Printhead upside down on a clean sheet of paper.

Step two: Inspect the carriage path where the printhead sits

Inside the printer, look for and remove any obstructions from the printhead compartment. If necessary, use a flashlight to thoroughly check for any obstructions.
Figure : Check for paper jammed in the carriage path
Image: Check for paper jammed in the carriage path

Step three: Insert the printhead, and then lower the carriage latch

  1. Grasp the sides of the printhead and turn it right side up with the nozzles facing down and the electrical contacts facing away from you.
  2. On the front of the printer, insert the printhead into the carriage, ensuring that the electrical contacts face the inside of the printer. As you guide the printhead into the carriage, it lowers into the carriage as it seats.
      caution:
    The nozzle area on the bottom of the printhead is fragile! Make sure that the bottom of the printhead does not bump or rub on the printer. Do not touch the nozzles or electrical contacts. Touching these areas can cause electrical failures or print quality problems.
    Figure : Insert the printhead
    Image: Insert the printhead.
  3. Gently rock the printhead to the left and right to make sure that the printhead fully seats in the carriage.
  4. Carefully lower the carriage latch to secure the printhead.
    Figure : Lower the carriage latch
    Image: Lower the carriage latch.
  5. Verify that the carriage latch is down.
      Figure : Carriage latch positions
      Image: Carriage latch positions.
    1. Carriage latch is up
    2. Carriage latch is down
  6. Close the cartridge access door.
  7. Reconnect the power cord to the rear of the printer.
  8. If the printer does not turn on by itself, press the Power button to turn it on.
    note:
    The printer might go through a warm-up period. The printer lights might flash, and the carriage might move.
  9. Wait until the warm-up period finishes and your printer is idle and silent before you proceed.
  • If these steps resolved the issue, skip to the step to remove and reinstall the cartridges.
  • If the issue persists, see the next step.

Step four: Reseat the printhead up to three times

Sometimes error messages persist after inserting the printhead. To clear any error messages, reseat the printhead up to three times.
Example error messages on the printer control panel
Problem with Ink System
Missing or failed printhead
Ink System Failure
Printer Failure
Carriage Jam
  • If these steps resolved the error message, continue with the next step.
  • If the error message persists, skip to the next solution.

Step five: Remove and reinstall the cartridges

If you already performed the previous solution to remove and reinstall the cartridges, skip to the next step to clean the printhead. If you skipped the previous solution to remove and reinstall the cartridges, follow these steps to verify that the cartridges are installed correctly.
  1. Press the Power button to turn on the printer, if it is not already on. Wait until the warm-up sequence finishes and your printer is quiet before you proceed.
  2. Place your fingers into the slot on the left side of the printer, and then pull to open the cartridge access door. Allow the carriage to move to the cartridge access area, and the carriage stops moving.
    Figure : The slot on the side of the printer
    Image: The slot on the side of the printer.
  3. Press in on the front of a cartridge to release it, and then pull it toward you to remove it from its slot. Repeat this step for each cartridge.
      caution:
    Do not leave the cartridges outside of the printer for anextended period. This can result in damage to both the printer and thecartridges.
    Figure : Remove the cartridges
    Image: Remove the cartridges.
  4. Check for and remove obstructions under and around the carriage.
  5. Slide the cartridge into its slot, and then gently push it forward until it clicks into place. Make sure that the colored dot on the cartridge label matches the colored dot on the slot.
    Figure : Insert the cartridge into its color-coded slot
    Image: Insert the cartridge into its color-coded slot.
    All cartridges must be seated correctly in the printhead assembly. If one cartridge sticks out farther than another, it is not installed correctly. Make sure that you push the cartridge forward into the printhead again until it clicks into place.
  6. Repeat these steps for the other cartridges.
  7. Close the cartridge access door.
  • If these steps resolved the error message, continue with the next step.
  • If the error message persists, skip to the next solution.

Step six: Use the automated tool to clean the printhead

  1. Load unused, plain white paper into the input tray.
  2. On the printer control panel, touch the Right Arrow () to display additional options.
  3. Touch Setup (), touch Tools, and then touch Clean Printhead.
  4. Wait until the printhead cleaning sequence completes and the report prints.

Step seven: Print a Printer Status Report

Printing a test page verifies that the hardware functions correctly.
  • If these steps resolved the issue, and the test page prints, there is no need to continue troubleshooting. Reconnect the USB cable, and then try to print again.
  • If the issue persists, continue with the next solution.
  • If the test page does not print, continue with the next solution.

Solution six: Service the printer

Service or replace your HP product if the issue persists after completing all the preceding steps.
Go to Contact HP Customer Support to schedule a product repair or replacement. If you are in Asia Pacific, you will be directed to a local service center in your area.
To confirm your warranty status, go to HP Product Warranty Check. Repair fees might apply for out-of-warranty products.