You can use an Android mobile device such as a smartphone or tablet to set up a wireless-capable printer on a wireless network. Simply install the HP Smart app on the phone or tablet and set up the printer's connection to the wireless network. After that, you can send print jobs from the Android mobile device when it is connected to the same wireless network as the printer.
HP LaserJet Pro - Use an Android mobile device to set up a wireless-capable printer on a wireless network
Introduction
Requirements
Before you begin, make sure you have the following requirements:
-
An active Internet connection and a wireless network
-
The wireless network password or key (if required by your network)
-
An HP LaserJet Pro wireless-enabled printer that has been set up and turned on
-
An Android phone or tablet that is connected to the wireless network
Video overview
In addition to the instructions provided in this document, you can view the following video of how to set up the printer on a wireless network using an Android mobile device:

How to Set Up an HP LaserJet Printer on a Wireless Network from an Android Mobile Device on the HP LaserJet Pro M304-M305, M404-M405, MFP M329, M428-M429, Color LaserJet Pro M454, MFP M479 Printers
Learn how to set up a wireless-enabled HP LaserJet printer on a wireless network from an Android mobile device.
Step one: Restore the printer network settings
Restore the printer network settings back to factory defaults. Follow the steps for your control panel type:
IMPORTANT: If you previously connected a USB cable or Ethernet cable to your printer, disconnect it now.
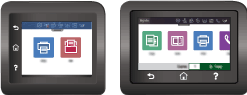
Touchscreen control panel with white background
Follow these instructions for wireless models that have a white display background: M329dw, M428dw, M428fdw, M429dw, M429fdw, M454dw, M479dw, M479fdw, M479fnw.
Figure : Touchscreen control panels with a white display background
-
From the Home screen on the printer control panel, swipe the tab at the top of the screen downward to open the Dashboard, and then touch the Setup icon
 .
.
-
Open the Network Setup menu.
-
Select Restore Network Settings.
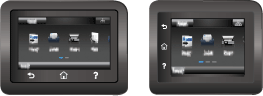
Touchscreen control panel with black background
Follow these steps for printers that have a touchscreen control panel with a black display background.
Figure : Touchscreen control panels with a black background
-
From the Home screen on the printer control panel, swipe until the Setup menu displays. Touch the Setup icon
 to open the menu.
-
Scroll to and touch the Network Setup menu.
-
Select Restore Defaults.
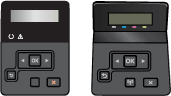
2-line LCD control panel
Follow these steps for printers that have a 2-line LCD control panel with physical buttons to press. Steps vary according to the printer model.
Figure : 2-line LCD control panels
Step two: Get the HP Smart app
-
If it is not already connected, connect the Android device to the same network in which you want to connect the printer.
-
Go to 123.hp.com.
-
Tap Get the App and then follow the prompts to install HP Smart. There might be a prompt to install the "HP Print Service Plugin" if it is not already installed. Install the HP Print Service Plugin if prompted.
Step three: Set up the printer on the wireless network
-
Open the HP Smart app, tap the check box to agree to the terms, and then tap Start. If this is the first time the app is opened, a welcome screen appears.
-
Tap Select a Printer, and then tap Continue. The app searches for and detects printers connected to the wireless network and printers that need to be set up.
-
If no printer is found or your printer is not in the list of detected printers, tap Set up a New Printer or Add Printer. Otherwise, select your printer model from the list. It will have "Setup" in the name.
-
If prompted, enter the password or passphrase for your wireless network, and then tap Continue. Wait while the app finds the printer, configures it for a wireless connection, and then connects it to the network.
-
With the connection complete, tap Continue.
note:
To print using HP Smart in Android, the HP Print Service Plugin must be installed and enabled. If the message HP Print Service Plugin is missing! appears, follow the prompts to install the plugin, and then return to HP Smart. -
With the printer setup complete, try to print from your Android device by tapping Print a Document.
note:
If you receive any prompts by the plugin or app requesting access to your device or files, always tap Allow. -
Follow the instructions, adjust any desired settings, and then tap Print. The document prints over the wireless network on your HP LaserJet Pro printer.
The printer is ready for wireless printing from your Android mobile device.
Optional: Print a network configuration page
If you want to print from additional devices, print a network configuration page from the printer control panel. The page shows the settings for the printer, including the IP address, which can be used to set up your printer on other devices.
Follow the steps for your type of control panel:
Touchscreen control panel with white background
Follow these instructions for wireless models that have a white display background: M329dw, M428dw, M428fdw, M429dw, M429fdw, M454dw, M479dw, M479fdw, M479fnw.
Figure : Touchscreen control panels with a white display background
-
From the Home screen on the printer control panel, swipe the tab at the top of the screen downward to open the Dashboard, and then touch the Setup icon.
-
Scroll to and touch Reports.
-
Scroll to and touch Network Configuration Page.
Touchscreen control panel with black background
Follow these steps for printers that have a touchscreen control panel with a black display background.
Figure : Touchscreen control panels with a black background
-
From the Home screen on the printer control panel, swipe until the Setup menu displays. Touch the Setup icon to open the menu.
-
Scroll to and touch the Reports menu.
-
Select Network Summary.
2-line LCD control panel
Follow these steps for printers that have a 2-line LCD control panel with physical buttons to press. Steps vary according to the printer model.
Figure : 2-line LCD control panels
Enter a topic to search our knowledge library
What can we help you with?

Need Help?