This document is for the following printers.
|
HP DeskJet Ink Advantage 3835 All-in-One Printer
|
HP ENVY 4520 All-in-One Printer
|
HP ENVY 5547 All-in-One Printer
|
|
HP DeskJet Ink Advantage 3836 All-in-One Printer
|
HP ENVY 4521 All-in-One Printer
|
HP ENVY 5548 All-in-One Printer
|
|
HP DeskJet Ink Advantage 3838 All-in-One Printer
|
HP ENVY 4522 All-in-One Printer
|
HP OfficeJet 3830 All-in-One Printer
|
|
HP DeskJet Ink Advantage 4535 All-in-One Printer
|
HP ENVY 4523 All-in-One Printer
|
HP OfficeJet 3831 All-in-One Printer
|
|
HP DeskJet Ink Advantage 4536 All-in-One Printer
|
HP ENVY 4524 All-in-One Printer
|
HP OfficeJet 3832 All-in-One Printer
|
|
HP DeskJet Ink Advantage 4538 All-in-One Printer
|
HP ENVY 4525 All-in-One Printer
|
HP OfficeJet 3833 All-in-One Printer
|
|
HP DeskJet Ink Advantage 4675 All-in-One Printer
|
HP ENVY 4526 All-in-One Printer
|
HP OfficeJet 3834 All-in-One Printer
|
|
HP DeskJet Ink Advantage 4676 All-in-One Printer
|
HP ENVY 4527 All-in-One Printer
|
HP OfficeJet 3835 All-in-One Printer
|
|
HP DeskJet Ink Advantage 4678 All-in-One Printer
|
HP ENVY 4528 All-in-One Printer
|
HP OfficeJet 4650 All-in-One Printer
|
|
HP DeskJet Ink Advantage 5575 All-in-One Printer
|
HP ENVY 5540 All-in-One Printer
|
HP OfficeJet 4652 All-in-One Printer
|
|
HP DeskJet Ink Advantage Ultra 5738 All-in-One Printer
|
HP ENVY 5541 All-in-One Printer
|
HP OfficeJet 4654 All-in-One Printer
|
|
HP DeskJet Ink Advantage Ultra 5739 All-in-One Printer
|
HP ENVY 5542 e-All-in-One Printer
|
HP OfficeJet 4655 All-in-One Printer
|
|
HP ENVY 4511 All-in-One Printer
|
HP ENVY 5543 All-in-One Printer
|
HP OfficeJet 4656 All-in-One Printer
|
|
HP ENVY 4512 All-in-One Printer
|
HP ENVY 5544 All-in-One Printer
|
HP OfficeJet 4657 All-in-One Printer
|
|
HP ENVY 4513 All-in-One Printer
|
HP ENVY 5545 e-All-in-One Printer
|
HP OfficeJet 4658 All-in-One Printer
|
|
HP ENVY 4516 All-in-One Printer
|
HP ENVY 5546 All-in-One Printer
|
The control panel contains buttons and icons to run the printer and a control panel display to select print options.
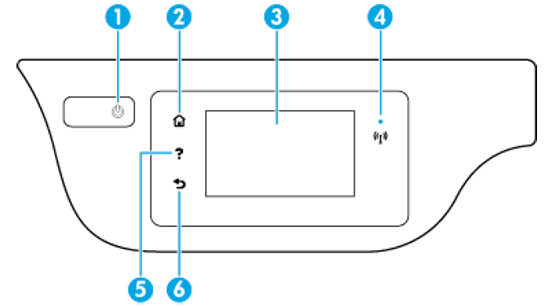
 Power button: The button turns the printer on or off.
 Home button: The button returns the control panel display to the Home screen, which is the screen that displays when you first turn on the printer. The button lights up when the feature is available.
 Wireless status light: The light indicates the status of the printer wireless connection. A solid blue light indicates that a wireless connection is established and that you can print wirelessly. If the wireless feature is turned off, the wireless light is off and the
  Help button: The button opens the Help menu for the current operation. The button lights up when the feature is available.
 Back button: The button returns to the previous screen. The button lights up when the feature is available.
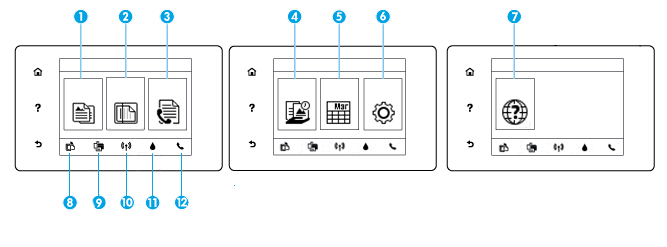
 Copy: The option opens the
 Scan: The option opens the
 Fax: The option opens a screen to send a fax or change fax settings.
 HP Printables: The option provides a quick way to access and print information from the web such as coupons, coloring pages, puzzles, and more.
 Quick Forms: The option opens the
 Setup: The option opens the
 Help: The option opens the
  HP ePrint icon: The option opens the
  Wireless Direct icon: The option opens the
  Ink icon: The option shows estimated ink levels by ink cartridge. The icon displays a warning symbol if the ink level is less than the minimum expected ink level.
 Fax status icon: The option opens status information for the Auto Answer function, fax logs, and the fax sound volume.
