solution Contentsolution Content

Paper Jam Error Message Displays on the Control Panel for HP LaserJet MFP M225dw and M226dw Printers

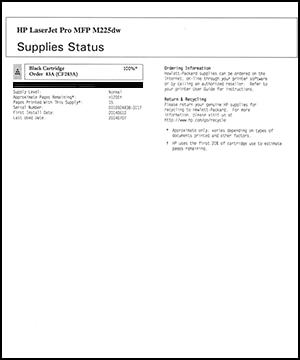
This document is for HP LaserJet MFP M225dw and M226dw printers
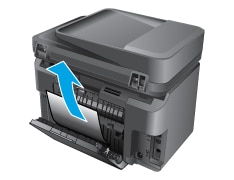
When trying to print, one of the following Paper Jam error messages displays on the printer control panel.
  • Jam in cartridge area
  • Jam in output bin
  • Jam in duplex area
  • Jam in the document feeder

Solution one: Turn the printer off and then on again

Turning the printer off and then on partially resets the printer. Follow these steps to restart the printer, and then print a test page.

Step 1: Turn the printer off and then on again

Follow these steps to turn off the printer, and then turn it on again.
  1. Press the power button to turn off the printer. If the printer does not turn off, disconnect the power cord from the printer.
  2. Unplug the power cord from the power source.
  3. Wait 60 seconds.
  4. Connect the power cord directly to a wall outlet and to the printer.
  5. Turn on the printer to complete the reset.

Step 2: Print a Supplies Status report

Print a Supplies Status report to make sure that the hardware functions correctly.
  1. Make sure that there is unused, plain white letter or A4 paper in the input tray.
  2. On the printer control panel, touch the Supplies icon ().
  3. Touch Report. A Supplies Status report prints.
    Figure : Example of a Supplies Status report
    Image: Example of a Supplies Status report

Solution two: Clear a paper jam in the automatic document feeder area (ADF)

A Jam in the document feeder message displays on the printer control panel. Follow these steps to resolve the issue.
  1. Remove any loose paper from the automatic document feeder (ADF) input tray that has not fed into the printer.
  2. Remove any jammed paper visible in the input tray area. Use both hands to slowly pull out the jammed paper to avoid tearing the paper.
    Figure : Remove the jammed paper
  3. Lift the ADF input tray.
    Figure : Lift the ADF input tray
  4. Place your thumb under the tab on the end of the jam-access cover, and then lift the jam-access cover.
    Figure : Lift the jam-access cover
  5. Gently pull out any jammed paper from the ADF. To avoid tearing any whole sheets of paper, pull the paper with both hands.
    note:
    If the paper tears while you remove it, check the rollers and wheels for any torn pieces of paper that might remain inside the ADF. Use a flashlight to thoroughly look for torn pieces of paper. If any torn pieces of paper remain inside the printer, more paper jams might occur.
    Figure : Remove the jammed paper
  6. Close the jam-access cover.
    Figure : Close the jam-access cover
  7. Close the ADF input tray.
    Figure : Close the ADF input tray
  8. If the error message still displays on the control panel, touch OK to clear it.

Solution three: Clear a paper jam in the cartridge area

A Jam in cartridge area message displays on the printer control panel, along with an animation showing the jam-clearing procedure. Follow these steps to resolve the issue.
  1. Lift the scanner assembly.
    Figure : Lift the scanner assembly
  2. With the printer turned on, disconnect the power cord from the rear of the printer, and then open the top cover.
      warning:
    To avoid risk of injuries or electric shock, you must disconnect the power cord before you reach inside the printer.
    Figure : Open the top cover
  3. Remove the toner cartridge.
    Figure : Remove the toner cartridge
  4. Remove any jammed paper from the cartridge area. Use both hands to remove jammed paper to avoid tearing the paper.
    note:
    If the paper tears while you remove it, check the rollers and wheels for any torn pieces of paper that might remain inside the ADF. Use a flashlight to thoroughly look for torn pieces of paper. If any torn pieces of paper remain inside the printer, more paper jams might occur.
    Figure : Remove the jammed paper
  5. Reinsert the toner cartridge.
    Figure : Insert the toner cartridge
  6. Close the top cover.
    Figure : Close the top cover
  7. Lower the scanner assembly.
    Figure : Lower the scanner assembly
  8. Reconnect the power cord.
  9. If the error message still displays on the control panel, touch OK to clear it.

Solution four: Clear a paper jam in the output bin area

A Jam in output bin message displays on the printer control panel, along with an animation showing the jam-clearing procedure. Follow these steps to resolve the issue.
  1. Lift the scanner assembly.
    Figure : Lift the scanner assembly
  2. With the printer turned on, disconnect the power cord from the rear of the printer, and then open the top cover.
      warning:
    To avoid risk of injuries or electric shock, you must disconnect the power cord before you reach inside the printer.
    Figure : Open the top cover
  3. Pull out the green tab to release the jam-access cover.
    Figure : Release the jam-access cover
  4. Remove any jammed paper from the cartridge area. Use both hands to remove jammed paper to avoid tearing the paper.
    note:
    If the paper tears while you remove it, check the rollers and wheels for any torn pieces of paper that might remain inside the ADF. Use a flashlight to thoroughly look for torn pieces of paper. If any torn pieces of paper remain inside the printer, more paper jams might occur.
    Figure : Remove the jammed paper
  5. Close the jam-access cover.
    Figure : Close the jam-access cover
  6. Close the top cover.
    Figure : Close the top cover
  7. Lower the scanner assembly.
    Figure : Lower the scanner assembly
  8. Reconnect the power cord.
  9. If the error message still displays on the control panel, touch OK to clear it.

Solution five: Clear a jam in the duplex area

A Jam in duplex area message displays on the printer control panel, and an animation showing the jam-clearing procedure. Follow these steps to resolve the issue.
  1. Open the rear access door.
    Figure : Open the rear access door
  2. Disconnect the power cord from the rear of the printer.
      warning:
    To avoid risk of injuries or electric shock, you must disconnect the power cord before you reach inside the printer.
  3. Use both hands to remove jammed paper to avoid tearing the paper.
    note:
    If the paper tears while you remove it, check the rollers and wheels for any torn pieces of paper that might remain inside the ADF. Use a flashlight to thoroughly look for torn pieces of paper. If any torn pieces of paper remain inside the printer, more paper jams might occur.
    Figure : Remove the jammed paper
  4. Close the rear access door.
    Figure : Close the rear access door
  5. Reconnect the power cord.
  6. If the error message still displays on the control panel, touch OK to clear it.

Solution six: Reset the printer

Sometimes a paper jam error persists even though there is no jammed paper (false paper jam). Follow these steps to reset the printer, which might clear a false paper jam error, and then print a test page.

Step 1: Reset the printer

Follow these steps to reset the printer.
  1. With the printer turned on, disconnect the power cord from the printer.
  2. Unplug the power cord from the power source.
  3. Wait 60 seconds.
  4. Reconnect the power cord to a wall outlet and to the printer.
    note:
    HP recommends plugging the printer directly into a wall outlet.

Step 2: Print a Supplies Status report

Print a Supplies Status report to make sure that the hardware functions correctly.
  1. Make sure that there is unused, plain white letter or A4 paper in the input tray.
  2. On the printer control panel, touch the Supplies icon ().
  3. Touch Report. A Supplies Status report prints.
    Figure : Example of a Supplies Status report
    Image: Example of a Supplies Status report

Solution seven: Service the printer

Service or replace your HP product if the issue persists after completing all the preceding steps.
Go to Contact HP Customer Support to schedule a product repair or replacement. If you are in Asia Pacific, you will be directed to a local service center in your area.
To confirm your warranty status, go to HP Product Warranty Check. Repair fees might apply for out-of-warranty products.