This document is for HP Officejet Pro 8500A (A910) e-All-in-One printers.
HP Officejet Pro 8500A Printers - Color or Black Ink Not Printing
The printer is working, but the printed output is missing black or color ink, or the printed page is blank or has very little ink.
note:Ink level warnings and indicators provide estimates for planning purposes only. When an indicator shows low ink levels, consider having a replacement ink cartridge available to avoid possible printing delays. You do not need to replace ink cartridges until you are prompted to.
Step 1: Use genuine HP cartridges
HP recommends that you use genuine HP ink or toner supplies. HP cannot guarantee the quality or reliability of non-HP or refilled cartridges. If you do not use genuine HP cartridges, the steps in this document might not resolve the issue. To check the authenticity of your cartridges, go to the HP anti-counterfeit webpage (in English).
Purchase replacement cartridges and other supplies from the HP Store or local retailers.
If using genuine HP ink cartridges resolved the issue, you do not need to continue troubleshooting.
Step 2: Use an automated tool to clean the printheads
Use an automated tool to clean and unclog the printheads.
caution:Never turn off the printer when ink cartridges are not installed. To avoid issues that require cleaning the printhead or that can damage the ink system, always replace ink cartridges as soon as possible, and always turn off the printer using the Power button.
-
Load plain white paper into the tray.
-
Press the Power button to turn on the printer, if it is not already on.
-
On the control panel, touch the right arrow
 to display the second navigation screen.
-
Touch Setup
 , and then touch Tools.
-
Touch Clean Printheads.The printer cleans the printheads.
-
Wait while the printer completes the printhead cleaning process, and then touch OK. You might have to clean the printheads more than once for the best print quality.
Try to print. If the issue persists, continue to the next step.
Step 3: Print a Print Quality Diagnostics Page
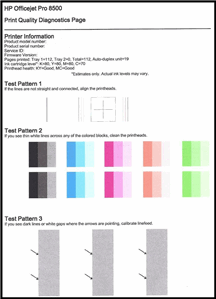
Print a Print Quality Diagnostics Page to help you identify the problem printhead.
-
Load plain white paper into the tray.
-
On the control panel, touch the right arrow
 to display the second navigation screen.
-
Touch Setup
 , touch the down arrow
  , and then touch Reports.
-
Touch Print Quality Report.The Print Quality Diagnostics Page prints.Figure : Example of a Print Quality Diagnostics Page

Continue to the next step to identify the problem printhead using the Print Quality Diagnostic Page.
Step 4: Identify the printhead to replace
If you have completed all of the troubleshooting steps and are still experiencing a problem, replace the printhead. Review the Print Quality Diagnostics Page to determine which printhead to replace.
If, after repeated printhead cleaning, the Print Quality Diagnostic page shows white lines across the color blocks in Test Pattern 2 (but no white lines in the gray blocks in Test Pattern 3), one or both of the printheads will have to be replaced. The Print Quality Diagnostic page shows which printhead should be replaced.
Look at the color blocks labeled Test Pattern 2. Some of them should show white horizontal streaks (if none of the blocks are streaked, the printheads are okay).
|
Figure : Streaked black, red, or green color blocks - replace Black/Yellow Printhead

|
|
Figure : Streaked cyan or magenta color blocks - replace Cyan/Magenta Printhead

|
Once you have identified the problem printhead, continue to the next step to replace the printhead.
Step 5: Replace the printhead
Replace the printhead identified in the previous step.
caution:Wait until you have a new printhead available before you remove the old printhead. HP recommends that you do not leave the printhead outside the printer longer than 30 minutes. This could damage both the printer and the printhead.
If you have a defective cartridge or printhead, it might be under warranty. To check the warranty on your ink or toner supplies, go to Printer and Page Yield Overview, and then review the limited warranty information for your supplies.
When you have the replacement printhead, go to replacing the printheads.
Try to print. If the issue persists, continue to the next step.
Step 6: Service the printer
If you have completed all of the previous steps and the issue persists, service the printer.
Service or replace your HP product if the issue persists after completing all the preceding steps.
Go to Contact HP Customer Support to schedule a product repair or replacement. If you are in Asia Pacific, you will be directed to a local service center in your area.
To confirm your warranty status, go to HP Product Warranty Check. Repair fees might apply for out-of-warranty products.
note:Keep a print sample that shows the problem. If the ink cartridges, printhead, or printer is replaced under warranty, the support agent will request the print sample. If the printer is returned to HP, the print sample must be returned with the printer. Place the sample in the output tray when you package your printer for shipping.
Enter a topic to search our knowledge library
What can we help you with?
Need Help?
