This document is for HP LaserJet Pro M12a, M12w, P1102, P1102s, P1102w, P1106, P1108, P1109, and P1109w printers.
HP LaserJet Pro P1102-P1109, M12 printers - Fix poor print quality
The quality of a printed document is not as expected. The procedures in this document should help with print quality problems such as smeared, fuzzy, dark, or faded print, and loose, partially missing, or scattered toner.
Step 1: Use genuine HP toner cartridges
HP recommends that you use genuine HP ink or toner supplies. HP cannot guarantee the quality or reliability of non-HP or refilled cartridges. If you do not use genuine HP cartridges, the steps in this document might not resolve the issue. To check the authenticity of your cartridges, go to the HP anti-counterfeit webpage (in English).
Purchase replacement cartridges and other supplies from the HP Store or local retailers.
Print another page. If using genuine HP toner cartridges did not resolve the issue, continue to the next step.
Step 2: Check the paper
The quality and type of paper can affect the print job. Make sure you are using an appropriate paper for your print job.
-
Use paper that is designed for use in HP LaserJet printers. Do not use paper that is designed only for InkJet printers.
-
Do not use paper that is too rough. Smoother paper might result in better print quality.
After loading the appropriate paper in the tray, try to print. If the issue persists, continue to the next step
Step 3: Check the EconoMode settings
If the entire page is too dark or too light, check the EconoMode settings. HP does not recommend the full-time use of EconoMode. If EconoMode is used full time, the toner supply might outlast the mechanical parts in the toner cartridge.
note:This feature is available with the PCL 6 print driver for Windows. If you are not using that driver, enable the feature in the HP Embedded Web Server.
-
In the program you are trying to print from, select the Print option.
-
Right-click your printer, and then depending on the software program, the button might be Properties, Options, Printer Setup, Printer, or Preferences.
-
Click the Paper/Quality tab, and then locate the Print Quality area.
-
If the entire page is too dark, use these settings:
-
Select the 600 dpi option.
-
Select the EconoMode check box to enable it.
If the entire page is too light, use these settings:-
Select the FastRes 1200 option.
-
Clear the EconoMode check box to disable it.
-
-
Click OK, and then click OK to print the job.
If changing the EonoMode settings did not resolve the issue, continue to the next step.
Step 4: Check print settings
Sometimes the print settings can affect the print quality. Check the print settings to make sure they are appropriate for your print job.
If changing the print settings did not resolve the issue, continue to the next step.
Step 5: Check the toner level
You can check the toner level by printing a Supplies Status page, or by checking the Supplies Status on the Embedded Web Server (EWS) if your model includes this feature.
Check the toner level in Windows
To check the toner level, print a Supplies Status page from Windows.
-
Load plain, white paper in the input tray.
-
Make sure the ready light is on.
-
Search Windows for devices, and click Devices and Printers in the list of results.
-
Right-click your printer, and then depending on the software program, the button might be Properties, Options, Printer Setup, Printer, or Preferences.
-
Click the Services tab.
-
Select Supplies Status Page from the Print Information Pages drop-down menu.
-
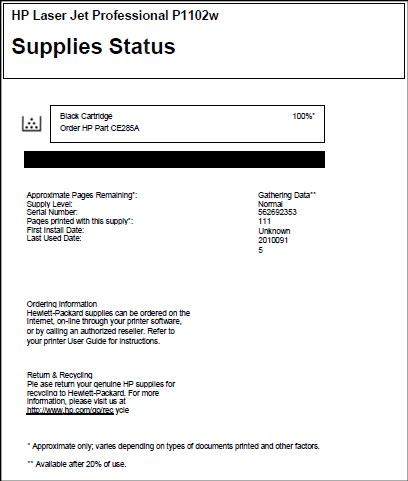
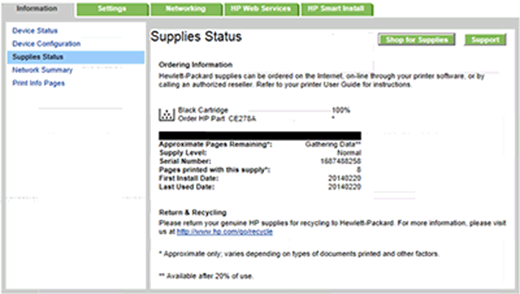
Click Print.The Supplies Status page prints.Figure : Example of the Supplies Status page
Check the toner level on a Mac
To check the toner level, print a Supplies Status page on your Mac.
-
Search the Mac for Print, and then click Print & Scan or Printers & Scanners.
-
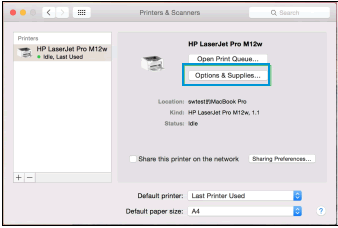
In the Printers section, click the name of your printer, and then click Options & Supplies.Figure : Selecting Options & Supplies
-
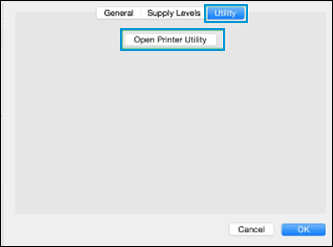
Click Utility, and then click Open Printer Utility.Figure : Clicking Open Printer Utility
-
Click OK.The Utility Window opens.
-
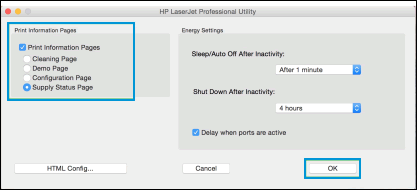
Select the check box next to Print Information Pages, then select Supply Status Page.Figure : Selecting the Supply Status Page
-
Click OK.The Supply Status Page prints.Figure : Example of the Supplies Status page
Check the toner level in the EWS (HP LaserJet Pro M12w, P1102w, P1109w printers)
Check the toner level from the Embedded Web Server (EWS). These steps work for any printer connected to a wireless network, regardless of operating system.
-
Print a Self Test/Device Configuration page to find the printer IP address to use for the EWS.
-
Press and hold the Cancel button
 until the Ready light
  blinks.
-
Release the Cancel button.
The Self Test/Device Configuration page prints.
-
Find the IP address of your printer on the Self Test/Device Configuration page.Figure : Example of the printer IP address

-
Type the IP address into the address bar of an Internet browser, and then press Enter.The EWS opens in the browser.Figure : Example of an IP address in a browser address bar

-
In the EWS, click the Information tab, and then select Supplies Status.Figure : Example of the Supplies Status page on the EWS
-
If the toner cartridge is low or empty, continue to the next step to replace the toner cartridge.
-
If the toner cartridge is not low or empty, skip to the step to clean the printer..
Step 6: Replace a low or empty toner cartridge
If the toner cartridge is low or empty, replace it.
-
Open the toner cartridge door, and then remove the old toner cartridge.Figure : Removing the toner cartridge

-
Remove the new toner cartridge from the packaging. Place the used toner cartridge in the bag and box for recycling.
caution:
To prevent damage to the toner cartridge, hold the toner cartridge at each end. Do not touch the cartridge shutter or the roller surface.Figure : Replacing the new toner cartridge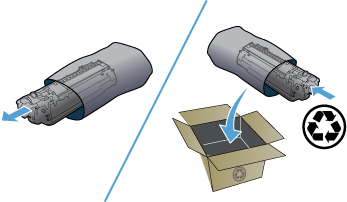
-
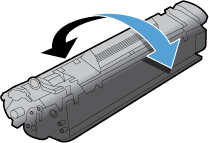
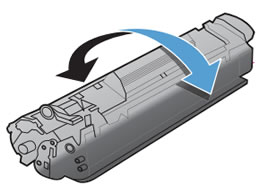
Grasp both sides of the toner cartridge and gently rock the toner cartridge to distribute the toner evenly inside the cartridge.Figure : Rocking the toner cartridge
-
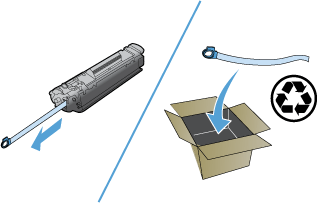
Bend the tab on the left side of the toner cartridge until the tab breaks loose, and then pull the tab until all the tape is removed from the toner cartridge. Place the tab and tape in the toner cartridge box to return for recycling.Figure : Removing the sealing tape
-
Insert the toner cartridge in the product, and then close the toner cartridge door.Figure : Inserting the toner cartridge
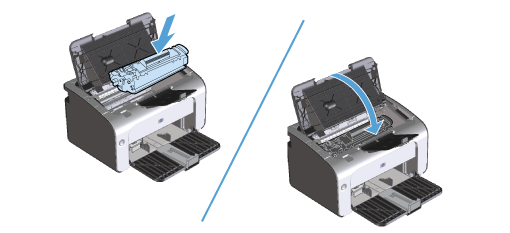
If replacing the toner cartridge did not resolve the issue, continue to the next step.
Step 7: Print a cleaning page
During the printing process, paper, toner, and dust particles can accumulate inside the printer. Over time, this buildup can cause print quality issues such as toner specks, smears, or marks. The printer has a cleaning mode that can correct and prevent print quality problems.
note:The cleaning process takes about 2 minutes. The cleaning page stops periodically during the cleaning process. Do not turn the printer off until the cleaning process has finished. You might need to repeat the cleaning process several times to thoroughly clean the printer.
If cleaning the printer did not resolve the issue, continue to the next step.
Step 8: Inspect the toner cartridge for damage
If there are issues like toner smears on the printed pages, check the toner cartridge for damage.
-
Remove the toner cartridge from the printer, and make sure the sealing tape has been removed.
-
Grasp both ends of the toner cartridge, and then gently rock the cartridge back and forth to distribute the toner.Figure : Rocking the toner cartridge
-
Check the memory chip for damage.
-
Slide back the toner cartridge cover to expose the imaging drum.
caution:
Do not touch the roller (imaging drum) on the toner cartridge. Fingerprints on the imaging drum can cause print quality problems.Figure : Sliding back the cartridge cover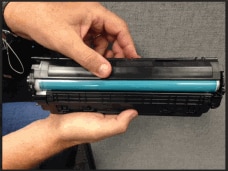
-
Examine the surface of the imaging drum on the toner cartridge.
-
If you see any scratches, fingerprints, or other damage on the imaging drum, replace the toner cartridge.
-
If the imaging drum does not appear to be damaged, close the cover, and then reinstall the toner cartridge in the printer.
-
If you were unable to find any damage to the toner cartridge, continue to the next step.
Step 9: Service the printer
If you have completed the steps above and your printer is still experiencing print quality issues, contact HP, and then service the printer.
Service or replace your HP product if the issue persists after completing all the preceding steps.
Go to Contact HP Customer Support to schedule a product repair or replacement. If you are in Asia Pacific, you will be directed to a local service center in your area.
To confirm your warranty status, go to HP Product Warranty Check. Repair fees might apply for out-of-warranty products.
Enter a topic to search our knowledge library
What can we help you with?

Need Help?