Use this information to set up and install the USB printer auto switch. Follow the steps in order.
HP USB Auto Printer Sharing Switch - Setting up the HP USB Auto Printer Sharing Switch
Introduction
Set up the HP USB Network Print Adapter
note:The printer and printer auto switch come with a total of three USB cables. To connect more than two computers to the switch, purchase additional USB cables.The maximum length of the USB cables between the HP printing product and the computer is 5 meters (15 feet). When purchasing additional USB cables, make sure that the length of the cable from the computer to the printer auto switch and the length of the cable from the printer auto switch to the product do not add up to more than 5 meters (15 feet).Figure : Maximum cable length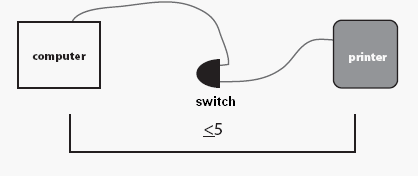
Step one: Unpack the HP USB printer auto switch
-
Remove the HP USB printer auto switch from the box.
-
Remove the packaging material, including tape, around the switch.
Step two: Check the contents of the box
The contents might vary by country/region. See the packaging for a list of items shipped in the box.
Step three: Connect the printer auto switch
caution:Do not connect the switch to the product or the computer yet. Wait until prompted to do so in the instructions.
-
Insert the product software CD into the CD-ROM drive of the computer and then follow the on-screen instructions to install the product.
-
When the installation program indicates that the product should be connected to the computer, follow these instructions and then click Next to continue with the installation:
-
Turn on the product and then use one of the USB cables that came with the printer auto switch to connect the product USB cord to the Device Port on the back of the printer auto switch.
-
Device Port

-
-
Use the second USB cable that came with the printer auto switch to connect the printer auto switch to a USB port on the computer.
-
-
Remove the HP product software from the computer CD-ROM drive and insert the printer auto switch software CD into the computer CD-ROM drive.
note:
On a computer running Mac OS X, click the HP Installer icon on the desktop to start the installer. -
Follow the on-screen instructions to install the printer auto switch software.
-
Repeat steps 1-4 on each computer that should use the printer auto switch to share the product.
Step four: Use the printer auto switch
Print to the shared product, from any computer connected to the printer auto switch, the same way you would print if the product connected directly to a computer. The printer auto switch allows print jobs from any computer to print to the product.
Enter a topic to search our knowledge library
What can we help you with?

Need Help?