This document explains how to set up the physical parts of the product. Complete these steps before you install the product software on your computer.
HP Deskjet F2200 All-in-One Printer Series - Setting up the All-in-One (Hardware)
Introduction
This document includes the following steps to set up the product:
-
Unpack the product
-
Connect the power cord and adapter
-
Turn on power
-
Load plain paper
-
Install the cartridges
-
Align the cartridges
Setting up the All-in-One
Follow these steps in order.
Step one: Unpack the product
-
Lower the paper tray.Figure : Lower the paper tray

-
Lower the cartridge door and remove all packing material.Figure : Remove the packaging material

note:USB cables are not included with new printers. To order optional accessories such as USB cables, click the 'How to Buy' link on this page to purchase the accessory. If the accessory is not available from HP, there are many resellers that carry HP-compatible accessories.
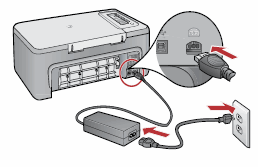
Step two: Connect the power cord and adapter
-
Connect the power adapter to the back of the product.
-
Connect the power cord to the power adapter.
note:
The power cord is either in a separate packet with the product or it inside the paper tray along with the cartridges. -
Connect the other end of the power cord to an electrical outlet.Figure : Plug in the power cord
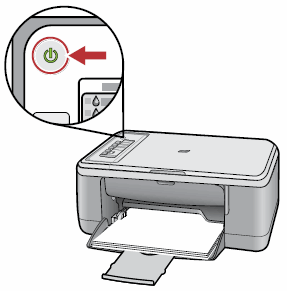
Step three: Turn on power
Press the power button ( ) to turn on the
product.
) to turn on the
product.
) to turn on the
product.
Figure : Power button on the product
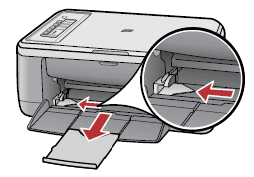
Step four: Load plain paper
-
Flip the paper tray extender.Figure : Pull out the tray extender
-
Make sure the paper-width guide is in its outermost position.
-
Insert the stack of paper into the input tray with the short-edge forward and the print-side down. Slide the stack of paper forward until it stops.Figure : Load paper
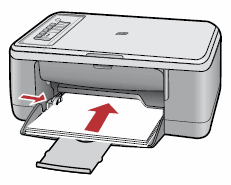
caution:
Make sure that the HP product is idle and silent when loading paper into the main input tray. If the HP product is servicing the cartridges or otherwise engaged in a task, the paper stop inside the device might not be in place. If the paper is too far forward, the HP product might eject blank pages. -
Slide the paper-width guide inward until it stops at the edge of the paper.
note:
Do not overload the input tray. Make sure the stack of paper fits within the input tray and is no higher than the top of the paper-width guide.
Step five: Install the cartridges
-
Make sure that the product is turned on.
caution:
The product must be on to release the cartridges. Trying to remove the cartridges while the product is off might damage the product. -
Open the cartridge door.Figure : Open the cartridge door
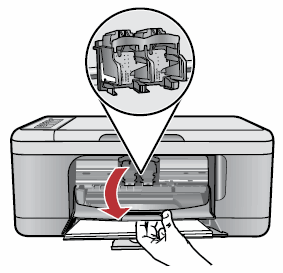
note:
Make sure that the carriage moves to the center of the product. If the carriage does not move to the center, turn the product off and then turn it back on again. -
Remove the new cartridge from its packaging, being careful to touch only the black plastic. Gently remove the plastic tape by using the pink pull tab.Figure : Remove the tape from a cartridge

caution:
Do not touch the copper-colored contacts or ink nozzles. Contact with these parts can result in clogs, ink failure, and bad electrical connections.Figure : Copper-colored contacts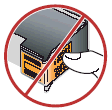
-
Hold the cartridge with the HP logo on top, and insert the new cartridge into the empty cartridge slot.
-
If installing the tri-color cartridge, slide it into the left slot.
-
If installing a black, photo, or gray photo cartridge, slide it into the right slot.
Figure : Insert the cartridges
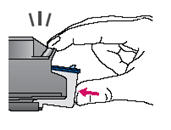
-
-
Push the cartridge in firmly until it snaps into placeFigure : Push the cartridge in firmly
-
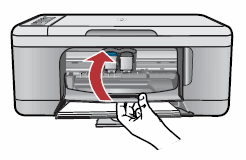
Close the cartridge door.Figure : Close the cartridge door
-
The product prints an alignment page because it recognizes that a new cartridge has been installed. Save the alignment page for the next step.
Step six: Align the cartridges
After the product prints an alignment page, follow these steps to complete the alignment process.
-
Make sure that there is letter or A4 unused plain white paper loaded in the input tray.
-
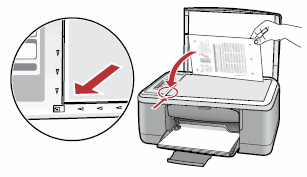
Life the product lid.
-
Place the cartridge alignment sheet print-side down on the left, front corner of the glass with the top of the page to the left.Figure : Load the alignment sheet
-
Press the Scan button (
 ).
The product aligns the cartridges. Recycle or discard the cartridge alignment sheet.
).
The product aligns the cartridges. Recycle or discard the cartridge alignment sheet.
Enter a topic to search our knowledge library
What can we help you with?

Need Help?