Printer Prints a Blank Page or Does Not Print Black or Color Ink for the HP Officejet J6400 All-in-One Printer Series
Issue
The printer is working, but the printed output is missing black or color ink, or the printed page is blank or has very little ink.
Solution one: Check estimated ink levels, and then replace any low or empty cartridges
Low ink can contribute to poor print quality. Follow these steps to check the ink levels, and then replace any low or empty cartridges.
Step one: Check estimated ink levels
note:Ink level warnings and indicators provide estimates for planning purposes only. When an indicator shows low ink levels, consider having a replacement ink cartridge available to avoid possible printing delays. You do not need to replace ink cartridges until print quality becomes unacceptable.
Check the estimated ink levels from the Home screen on the printer control panel.
-
Look at the estimated ink levels on the Home screen of the printer control panel. The control panel displays the ink levels as "bucket" icons above the ink level indicator.
-
Example of the color cartridge with low ink levels
-
Example of the black cartridge with full or nearly full ink levels
Figure : Estimated ink level indicators on the printer control panel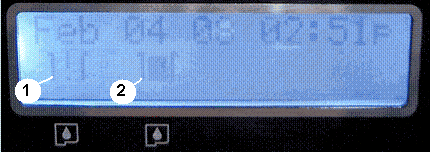
-
-
Identify any low or empty cartridges:
-
An exclamation mark (!) indicates low ink levels.
-
A question mark (?) indicates the product cannot determine the status of the cartridge. This might be because the cartridge is refilled.
-
-
If none of the cartridges are low on ink, you do not need to replace them yet. Skip to the next solution in this document.
-
If any of the cartridges are low on ink, continue to the next step to replace them.
Step two: Replace any low or empty cartridges
Follow these steps to replace any low or empty cartridges.
-
Press the Power button to turn on the printer.
note:
If the printer is off when you open the cartridge access door to access the cartridges, the printer does not release the cartridges for changing. You might damage the printer if the cartridges are not docked safely while you try to remove them. -
Open the cartridge access door.Figure : Open the cartridge access door
 The carriage moves to the far right side of the printer.
 -
Wait until the carriage is idle and silent, and then lightly press down on a print cartridge to release it.To replace the tri-color cartridge, remove the cartridge from the slot on the left.To replace the black, photo, or gray photo cartridge, remove the cartridge from the slot on the right.Figure : Remove the cartridge
-
Pull the cartridge toward you and out of its slot.
-
Remove the new cartridge from its packaging being careful to touch only the black plastic. Use the pull tab to remove the plastic tape.
-
Copper-colored contacts
-
Plastic tape with pink pull tab (must be removed before installing)
-
Ink nozzles under tape
Figure : Remove the plastic tape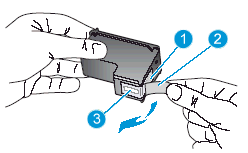
caution:
Do not tape the cartridges, or touch the copper-colored contacts or ink nozzles. Doing so can result in clogs, ink failure, and bad electrical connections.Figure : Do not touch copper-colored contacts or ink nozzles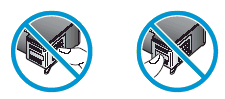
-
-
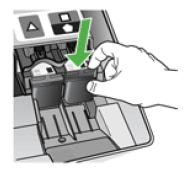
Hold the new cartridge with the HP logo on top, and then insert the new cartridge into the empty cartridge slot. Push the cartridge in firmly until it snaps into place.
-
To install the tri-color cartridge, slide it into the slot on the left.
-
To install the black, photo, or gray photo cartridge, slide it into the slot on the right.
Figure : Insert the new cartridge into the appropriate slot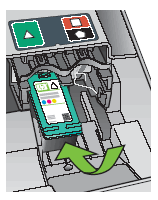
-
-
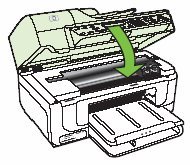
Close the cartridge access door.Figure : Close the cartridge access door
Step three: Align the new print cartridge
The HP product prompts you to align cartridges every time you install or replace a cartridge. You can also use the product control panel or the HP software to align the cartridges at any time. Aligning the cartridges is necessary to obtain the best possible print quality.
-
Load unused, plain white, U.S. letter or A4 sized paper in the input tray.
-
Press the Setup button (
 ) on the control panel.
-
Select Tools, and then select Align Print Cartridge.
-
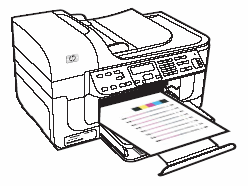
The HP product prints a self-test page and aligns the cartridges. Recycle or discard the page.Figure : Print a self-test page
-
If these steps resolved the issue, you do not need to continue troubleshooting.
-
If the issue persists, continue to the next solution.
Solution two: Clean the cartridges using an automated tool
Follow these steps to run an automated tool to clean the cartridges.
note:You might need to clean the cartridges several times for optimal print quality.
-
On the printer control panel, press Setup.
-
Press 6 to select Tools, and then press 1 to select Clean Print Cartridge. The printer cleans the cartridges and then prints a test page.
note:To avoid issues that require cleaning, always turn the printer off with the Power button.
-
If these steps resolved the issue, you do not need to continue troubleshooting.
-
If the issue persists, continue to the next solution.
Solution three: Replace the problem cartridge
Follow these steps to replace the problem cartridge if you saw defects on the test page and the preceding steps did not resolve the issue, even if the cartridge is not low on ink. The problem cartridge is the one that printed the defects on the test page.
-
Press the Power button to turn on the printer.
note:
If the printer is off when you open the cartridge access door to access the cartridges, the printer does not release the cartridges for changing. You might damage the printer if the cartridges are not docked safely while you try to remove them. -
Open the cartridge access door.Figure : Open the cartridge access door
The carriage moves to the far right side of the printer.
-
Wait until the carriage is idle and silent, and then lightly press down on a print cartridge to release it.To replace the tri-color cartridge, remove the cartridge from the slot on the left.To replace the black, photo, or gray photo cartridge, remove the cartridge from the slot on the right.Figure : Remove the cartridge
-
Pull the cartridge toward you and out of its slot.
-
Remove the new cartridge from its packaging being careful to touch only the black plastic. Use the pull tab to remove the plastic tape.
-
Copper-colored contacts
-
Plastic tape with pink pull tab (must be removed before installing)
-
Ink nozzles under tape
Figure : Remove the plastic tape
caution:
Do not tape the cartridges, or touch the copper-colored contacts or ink nozzles. Doing so can result in clogs, ink failure, and bad electrical connections.Figure : Do not touch copper-colored contacts or ink nozzles
-
-
Hold the new cartridge with the HP logo on top, and then insert the new cartridge into the empty cartridge slot. Push the cartridge in firmly until it snaps into place.
-
To install the tri-color cartridge, slide it into the slot on the left.
-
To install the black, photo, or gray photo cartridge, slide it into the slot on the right.
Figure : Insert the new cartridge into the appropriate slot
-
-
Close the cartridge access door.Figure : Close the cartridge access door
-
If these steps resolved the issue, you do not need to continue troubleshooting.
-
If the issue persists, continue to the next solution.
Solution four: Service the printer
If you have a defective cartridge or printhead, it might be under warranty. To check the warranty on your ink or toner supplies, go to Printer and Page Yield Overview, and then review the limited warranty information for your supplies.
Service or replace your HP product if the issue persists after completing all the preceding steps.
Go to Contact HP Customer Support to schedule a product repair or replacement. If you are in Asia Pacific, you will be directed to a local service center in your area.
To confirm your warranty status, go to HP Product Warranty Check. Repair fees might apply for out-of-warranty products.
Enter a topic to search our knowledge library
What can we help you with?

Need Help?