solution Contentsolution Content

HP Laser Printers - How to Print Photos (Windows)

This document is for the HP Laser 100, 150, 1000, MFP 130, and 170 printer series.
Print photographs from a Windows PC using the correct paper type and print job settings.

Step 1: Load photo paper into the main input tray

Load photo paper into the main paper tray.
note:
If your printer has a separate photo paper tray, consult your user guide on how to print from the tray.
  1. Remove any plain paper from the main paper tray.
  2. Load the short edge of the photo paper into the tray with the glossy or print side facing up. If the paper has a perforated tab, load the paper so the tab faces up or towards you to prevent printing on it.
    note:
    Do not use inkjet photo paper. It could cause damage to the machine.
  3. Adjust the paper width guides so they rest against the edges of the paper.

Step 2: Print the photo

Open the print window and document properties to set up the print job.
  1. Before printing, edit the photo to improve colors, brightness, contrast and any other appearance settings.
  2. Right-click the photo, select Open with, and then select Windows Photo Viewer or Paint.
    note:
    For Windows 10, open the photo with Paint to use these steps. Windows Photo Viewer does not come with Windows 10 and was replaced by the Photos app.
  3. Click Print, File, or the menu icon (Paint), and then click Print.
    The Print or Print Pictures window opens with general print job settings.
  4. Open the printer Document Properties window to access more print settings.
    • In the Print Pictures window in Windows Photo Viewer, click Options, and then click Printer Properties....
    • In the Print window in Paint, click Preferences.
    Properties window with settings tabs
  5. Find and use print job settings for photos in the Properties window.
    Setting
    Location
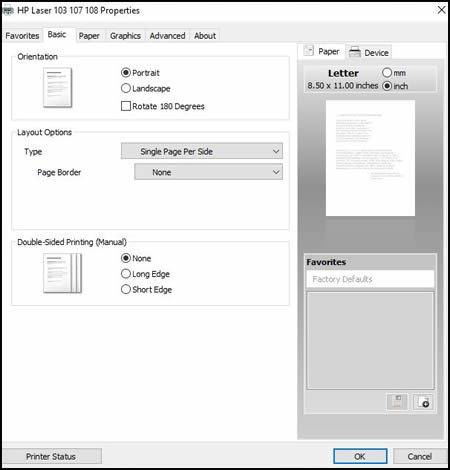
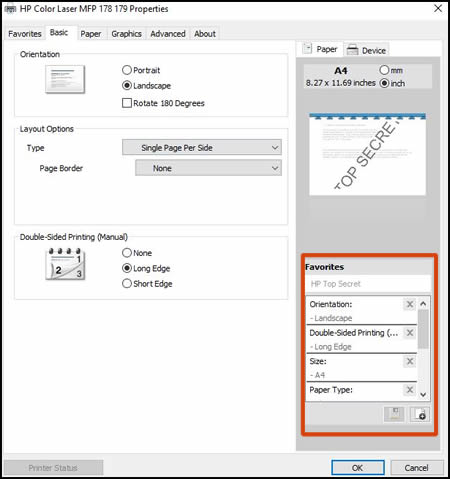
    Portrait or landscape orientation
    Select Portrait for vertical prints or Landscape for horizontal prints.
    Orientation menu on the Basic tab
    Photo paper type
    Set the paper type you are using, such as HP photo paper, glossy, or matte finish.
    Paper Options menu on the Paper tab
    Paper size
    Paper size: Select the Original Size for your print job, and then select the Output Size for the paper size you loaded in the printer, such as Letter or Legal. Check your printer specifications for supported paper sizes.
    Paper Options menu on the Paper tab
    Some newer printers support more paper options. Go to Creating Custom Paper Sizes for more information.
    Add or remove a border
    Add a white border around the photo or print to the very edge of the paper.
    Layout Options menu on the Basic tab
    The Favorites tab might include shortcuts to print with or without a border
  6. Change the following color and quality settings for best photo printing results.
    Setting
    Location
    Quality: Measured in print resolution dots per inch (DPI). Higher DPI produces clearer and more detailed prints, but slows print speed and may use more ink.
    • Normal: Default quality setting suitable for most print jobs
    • Best: Better DPI than Normal
    Advanced on the Document Type menu on the Graphics tab
    Economode: Lowest DPI typically used when ink cartridge levels are low or when high quality prints are not needed
    Economode menu on the Graphics tab
    Printing in color or grayscale: The following settings might be available, depending on the printer model:
    • Color: Uses all cartridges to print documents with color text or images
    • Grayscale: Printer uses ink from all cartridges to produce a wider range of black and grey tones; suitable for high quality black and white prints
    Select Color or Grayscale on the Graphics tab
  7. Click OK, and then click Print.
  8. After printing, remove any photo paper from the tray and store it in the package it came in or in a plastic bag. If left in the tray for an extended time, the paper might start to curl.

Tips for printing quality photos

Read these tips and recommendations for printing the best pictures with your HP printer.
  • Use HP photo paper: HP photo papers are optimized for use with inkjet printers and provide quality prints for craft projects or framing.
  • Take high resolution photos: Higher resolution photographs result in clearer, more vibrant prints.
  • Edit photos before printing: Before printing, use photo editing tools to improve colors, brightness, contrast, and any other appearance settings.
  • Check the computer display: If your computer monitor displays colors inaccurately, printed photo quality might be unsatisfactory. Try changing to the monitor's default color settings or use a calibration tool to confirm the color accuracy.
  • Use Photo or Best quality in print settings: Higher print quality settings provide best results.

Frequently asked questions

Read frequently asked questions about printing photographs.