solution Contentsolution Content

HP DeskJet 2130, 2300 Printers - Replacing Ink Cartridges

This document is for HP DeskJet 2130, 2131, 2132, 2134, 2136, 2320, DeskJet Ink Advantage 2134, 2135, 2136, 2138, 2336, 2374, 2375, and 2376 All-in-One printers.
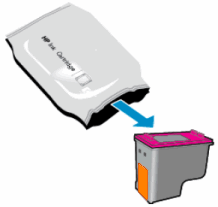
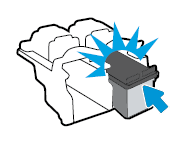
Replace cartridges that are low or out of ink with new, genuine HP cartridges.

Video overview

This video shows how to replace the ink cartridge in the HP DeskJet 2132 printer.
Replacing a Cartridge on the HP DeskJet 2132 Printer
Learn how to replace an ink cartridge on the HP DeskJet 2132 printer.

Step 1: Load paper

Before you replace the ink cartridges and begin the alignment process, load paper in the printer.
  1. Raise the input tray.
    Figure : Raise the input tray
    Image: Raise the input tray
  2. Remove any paper from the input tray that is different than the type of paper you want to load, and then slide the paper width guide as far as possible to the left.
    Figure : Slide the paper width guide to the left
    Image: Slide the paper width guide to the left
  3. Load a stack of U.S. letter, A4, or legal size paper into the input tray with the short edge forward and the printside facing closest to you. Push the stack into the tray until it stops.
    Figure : Load the paper into the input tray
    Image: Load the paper into the input tray
  4. Slide the paper width guide to the right until it rests at the edge of the paper.
    Figure : Slide the paper width guide to the right
    Image: Slide the paper width guide to the right.
  5. Lower the output tray and pull out the output tray extender.
    Figure : Lower the output tray and pull out the output tray extender
    Image: Lower the output tray and pull out the output tray extender.

Step 2: Replace the ink cartridges

Replace one or both ink cartridges indicated by the blinking Ink Alert light on the printer control panel:
    Figure : Control panel with the Ink Alert lights
    Image: Control panel with the Ink Alert lights
  1. Ink Alert light (tri-color)
  2. Ink Alert light (black)
  1. Press the Power button to turn on the printer, if it is not already on.
  2. Lower the output tray, reach inside the printer, grasp the handle, and then lower the ink cartridge access door to open it.
    The carriage moves to the center of the printer.
    Figure : Open the ink cartridge access door
    Image: Open the ink cartridge acesss door
  3. Wait until the printer is idle and silent before you continue.
  4. Lightly press down on the ink cartridge to release it, and then pull the ink cartridge out of its slot.
    Figure : Remove the ink cartridge
    Image: Remove the ink cartridge
  5. Remove one of the new ink cartridges from its package. Be careful to only touch the black plastic on the ink cartridge.
    Figure : Remove the ink cartridge from its package
    Image: Remove the ink cartridge from its package
  6. Remove the plastic tape.
      caution:
    Do not touch the copper-colored contacts or the ink nozzles.Do not replace the protective tape on the contacts. Handling these parts can result in clogs, ink failure, and bad electricalconnections.
    Figure : Remove the plastic tape
    Image: Remove the plastic tape
  7. Hold the ink cartridge by its sides with the contacts toward the printer, and then insert the ink cartridge into its proper slot.
    • Insert the black ink cartridge into the right slot.
    • Insert the tri-color ink cartridge into the left slot.
  8. Slide the new ink cartridge at a slight upward angle into the empty slot, and then gently push the ink cartridge until it snaps into place.
    Figure : Snap the ink cartridge into place
    Image: Snap the ink  cartridge into place
  9. Repeat these steps to install the other ink cartridge, if necessary.
  10. Close the ink cartridge access door.
    Figure : Close the ink cartridge access door
    Image: Close the ink cartridge access door

Step 3: Align the ink cartridges

To achieve the best print quality, it is necessary to align the ink cartridges.
  1. After loading the paper, the printer automatically prints an alignment page.
    note:
    The printer only prints an alignment page automatically when new ink cartridges are installed.
  2. Lift the scanner lid.
  3. Place the alignment page with the print side down on the scanner glass, and then position it according to the engraved guides around the glass.
    Figure : Place the alignment page on the scanner glass
    Image: Place the alignment page on the scanner glass
  4. Close the scanner lid.
  5. Press the Start Copy Black button () or the Start Copy Color button () on the control panel of the printer.
    The printer aligns the ink cartridges.

Frequently asked questions (FAQs)

Review the list of frequently asked questions about replacing the ink cartridges.