solution Contentsolution Content

HP Officejet Pro 8100 ePrinter - Setting up the Product (Hardware)

Setting up the product

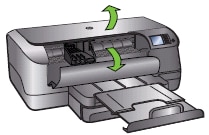
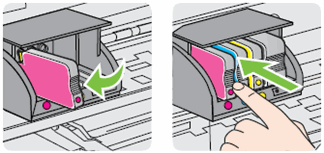
Follow these steps in the order provided to set up the printer hardware.
note:
Do not connect a USB cable now. If you plan to use a USB cable to connect the printer to the computer, you will be prompted to connect it at the correct time during the software installation.

Step one: Check the contents of the box

The contents might vary by country/region. See the packaging for a list of items shipped in the box.

Step two: Unpack the product

Remove all the tape and packing material from the product.
Figure : Remove the tape and packing material
Illustration: Remove tape and packing material

Step three: Install the two-sided printing accessory (duplexer)

note:
Do not press the buttons on either side of the duplexer when you install it. Use the buttons only to remove the duplexer from the product.
  1. Turn the product around to access the rear.
    Figure : Turn the product around
    Illustration: Turn the product around
  2. Line up the duplexer with the opening at the rear of the product.
    Figure : Line up the duplexer with the opening
    Illustration: Line up the duplexer with the opening
  3. Slide the duplexer into the product until it locks into place.
    Figure : Slide the duplexer into the product
    Illustration: Slide the duplexer into the back of the product

Step four: Install paper tray 2 (optional)

Follow these steps if you purchased the optional paper tray 2.
Place tray 2 on a sturdy, flat, level surface, and then lower the product onto the tray.
  caution:
Keep your fingers and hands clear of the bottom of the product to avoid injury.
Figure : Install paper tray 2
Illustration: Install paper tray 2

Step five: Connect the power cord and turn on the product

  1. Connect the power cord to the rear of the product, and then plug the cord into an electrical outlet.
      Figure : Connect the power cord to the product and an electrical outlet
      Illustration: Connect the power cord to the product and an electrical outlet
    1. Connect the power cord to the rear of the product.
    2. Plug the power cord into an electrical outlet.
  2. Press the Power button () to turn on the product.
    Figure : Press the Power button
    Illustration: Press the Power button
note:
Windows Vista and Windows 7 only: HP Auto Wireless Connect is offered up to 60 minutes after initial product setup. After that time, the installation defaults to the alternate USB setup method. If you want to use HP Auto Wireless Connect to set up your product wirelessly, complete the software installation immediately after you set up the hardware.

Step six: Load paper

Use the following method to load plain white paper in the paper tray(s).
note:
Tray 2 is an optional accessory.
  1. Pull out the paper tray.
    Figure : Pull out the paper tray
    Illustration: Pull out the paper tray
    note:
    To load Legal size paper, press and hold the release latch on the inside, top-left corner of the paper tray, and then gently pull the tray out to extend it.
  2. Insert plain white paper print-side down in the center of the tray. Make sure the stack of paper is no higher than the paper stack guide located on the side of the tray.
    Figure : Insert plain paper
    Illustration: Insert plain paper
  3. Press and hold the paper guide release latches on the inside left and top of the paper tray, and then slide the paper guides in until they rest against the edges of the paper.
    Figure : Adjust the paper guides
    Illustration: Adjust the paper guides
  4. Reinsert the paper tray.
    Figure : Reinsert the paper tray
    Illustration: Reinsert the paper tray
  5. Pull out the extension on the output tray.
    Figure : Pull out the extension on the output tray
    Illustration: Pull out the extension on the output tray

Step seven: Install the cartridges and wait for the cartridge alignment

  caution:
Failure to install the SETUP cartridges that came with the product causes a cartridge error.
  1. Press the Power button () to turn on the product, if it is not already on.
  2. Load plain white paper in the paper tray, if you have not already done so.
  3. Open the cartridge access door, and then lift the product lid. The carriage moves to the access area.
    note:
    Wait until the carriage stops moving before you proceed.
    Figure : Open the cartridge access door, and then lift the product lid
    Illustration: Open the cartridge access door, and then lift the product lid
  4. Remove the new cartridge from its packaging.
  5. Slide the new cartridge into its slot, and then gently push it forward until it clicks into place.
    note:
    Make sure that the colored dot on the cartridge label matches the colored dot on the slot.
    Figure : Insert the cartridge into its color-coded slot
    Illustration of inserting the cartridge into its color-coded slot
      caution:
    Do not lift the latch handle on the print carriage to install the cartridges. Doing so could cause the printhead or cartridges to be incorrectly seated, which can cause errors or print quality problems. The latch must remain down to correctly install the cartridges.
  6. Repeat these steps for each cartridge, and then close the cartridge access door and product lid. The product automatically starts the alignment process.
    When the product prints an alignment page, the hardware setup process is complete.
    note:
    If the HP product does not print the alignment page automatically, follow these steps to start the alignment process manually:
    1. Press and hold the Power button (), and then press the Resume button () three times.
    2. Release the Power button (). The alignment process starts.