The following is how to create a custom paper size, when using Mac OS X version 10.2 and an HP Designjet printer.
-
From the application, select the File menu and select Page Setup.
-
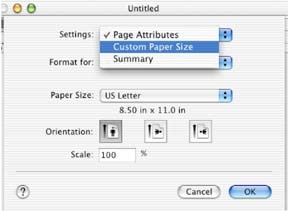
Click Page Attributes in the Settings drop down menu, select Custom Paper Size (see Figure 1 below).Figure : Custom Paper Size
-
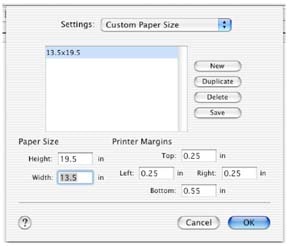
In the Custom Paper Size window, give the paper size a name by clicking New and typing in a name. Type the height and width dimensions. Always create these dimensions in a portrait orientation so the height dimension is the longer edge. Click Save, Do not click OK yet.Figure : New Paper Size Name
-
From Setting drop down menu, reselect Page Attributes (See Figure 1 above).
-
In the Page Attributes screen, select Paper Size and select the custom page size that was just created. Verify the dimensions below the Paper Size to be the same dimensions entered in Step 3. Choose the correct orientation to match the document.Figure : Page Orientation

-
Click OK when completed.
-
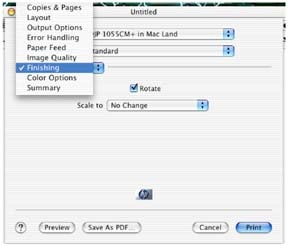
From the application, select File, and then Print. Select the settings that are normally used. To rotate the page and document so it prints long edge first as it comes out of the printer, check the Rotate check box within the Copies and Pages menu. This location may vary depending on printer model and version of OS X.2Figure : Rotate