solution Contentsolution Content

HP Color LaserJet Pro MFP M277 - Skewed Copies, Scans from ADF

This document is for HP Color LaserJet Pro MFP M277n and M277dw printers.
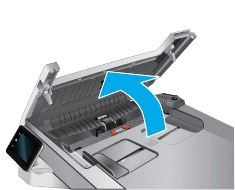
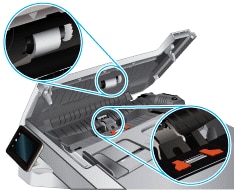
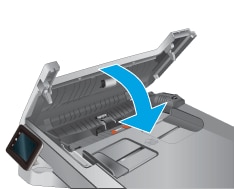
Copies or scans from the automatic document feeder (ADF) are tilted or skewed. Skewed copies or scans might occur if paper is wrinkled, torn, or not loaded correctly in the ADF, or if the ADF rollers are dirty. The results might display inconsistent print margins along the paper's edge (the output is slanted on the page or screen).

Step 1: Test the skew

If the ADF is producing skewed copies or scans, use the steps below to measure any alignment issues. A normal skew range for the demo page is less than 2.5 mm.
  1. On the Home screen of the printer control panel, swipe left, and then touch the Setup icon.
  2. Touch Reports, and then touch Demo Page.
    The Demo Page prints.
    Figure : Original demo page
    Original demo page
  3. Load the demo page in the ADF, and then print a copy.
  4. To determine the amount of skewing, examine the copy, and then use the following formula to test the skew:
    1. Measure the distance from the top left edge of the image to the vertical line (Point 1) and the bottom left edge of the vertical line (Point 2).
    2. Subtract the distance from the top left edge of the image (Point 1) from the bottom left edge of the image (Point 2).
      For example, if Point 1 is 17 mm from the edge and Point 2 is 14 mm from the edge, subtract the difference between the two measurements (17mm - 14mm = 3 mm).
      Figure : Measuring the skew
      Measuring the skew
    1. Point 1: Distance from the top left edge to the vertical line
    2. Point 2: Distance from the bottom left edge to the vertical line
    If the results show a distance less than 2.5 mm, the printer is printing within the normal skewing range. You do not need to continue troubleshooting.
    If the results show a distance greater than 2.5 mm, the skew is out of alignment. Continue to the next step.

Step 2: Check the condition of the paper

Make sure the original is free of staples and not wrinkled or torn, and always use the recommended paper type and size in each tray.
  1. Remove any foreign items from the original, such as staples or self-adhesive notes.
  2. Make sure the paper is smooth and without folds or curls.
  3. Do not print on paper that is already printed on. The dampness of the ink can cause the paper to stick together.
  4. Use only clean paper, and make sure the paper size is supported by your printer.

Step 3: Load paper into Tray 2, and then load the document into the ADF

Load clean plain paper into Tray 2, load the document or photo you want to copy into the ADF, and then try to copy or scan again.
  1. Pull out Tray 2.
    Figure : Pulling out Tray 2
    Pulling out Tray 2
  2. Slide out the paper guides as far as possible.
    Figure : Sliding the paper width guides
    Sliding the paper width guides
  3. Load paper into Tray 2.
    Make sure you are using the correct paper type. It should not be lighter than 16 lb and not be heavier than 24 lb bond.
    Figure : Loading paper into Tray 2
    Image: Loading paper into the main input tray
  4. Slide the paper guides until they touch the edge of the stack of paper. Do not push in the guides so tightly that they bind against the paper.
    Figure : Sliding the paper guides
    Sliding the paper guides
  5. Make sure the stack of paper does not exceed the paper fill guide.
  6. Insert Tray 2 into the printer
    Figure : Inserting Tray 2
    Inserting Tray 2
  7. Load the original document print side up in the ADF. Gently slide the document into the printer as far as it can go.
    note:
    Do not load more than 35 sheets of paper in the ADF. Larger stacks of paper can lead to pick problems.
    Figure : Loading originals in the ADF
    Image: Loading originals in the ADF input tray
  8. Slide the paper guides until they touch the edge of the stack of paper. Do not push in the guides so tightly that they bind against the paper.
    Figure : Sliding the paper guides
    Sliding the paper width guides
Try to copy or scan again. If the skew persists, continue to the next step.

Step 4: Inspect and clean the ADF rollers

Dust or paper residue on the paper pick rollers or separator pad inside the ADF can result in paper feed issues. Clean the paper pick rollers and separation pad to resolve any skewed or paper feed issues.
Gather the following materials:
  • A clean, lint-free cotton swab
  • Distilled or bottled water
      caution:
    Do not use tap water because it might contain contaminates that can damage the printhead.
  1. Turn off the printer, and then disconnect the power cord and any other cables.
  2. Open the ADF cover.
    Figure : Opening the ADF cover
    Opening the ADF cover
  3. Lightly dampen the cotton swab with water, and then squeeze any excess liquid from the swab.
  4. Press the swab against the rollers, and then rotate them upward with your fingers. Apply a moderate amount of pressure to remove any dust or dirt buildup.
    Figure : The paper pick roller and separator pad
    The paper pick rollers and separator pad
  5. Leave the ADF cover open and allow the rollers to dry completely (approximately 10 minutes).
  6. Close the ADF cover.
    Figure : Closing the ADF cover
    Image: Closing the ADF cover
  7. Reconnect the power cord and any other cables to the rear of the printer, and then turn on the printer.
Try to copy or scan again. If the skew persists, continue to the next step.

Step 5: Service the printer

If the steps in this document did not resolve the issue, service the printer.
Service or replace your HP product if the issue persists after completing all the preceding steps.
Go to Contact HP Customer Support to schedule a product repair or replacement. If you are in Asia Pacific, you will be directed to a local service center in your area.
To confirm your warranty status, go to HP Product Warranty Check. Repair fees might apply for out-of-warranty products.