solution Contentsolution Content

HP ENVY 5540, DeskJet 5570 Printers - Replacing the Ink Cartridges

This document is for the HP ENVY 5540, 5541, 5542, 5543, 5544, 5545, 5546, 5547, 5548 All-in-One, and DeskJet Ink Advantage 5575 printers.
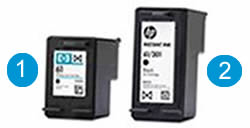
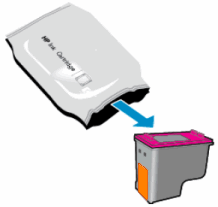
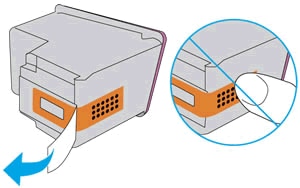
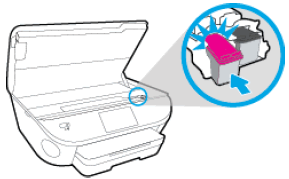
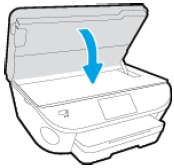
Replace ink cartridges that are low or out of ink with new, genuine HP ink cartridges.
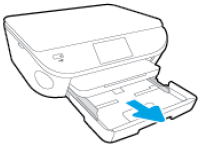
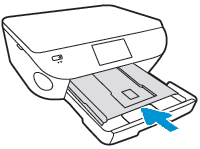
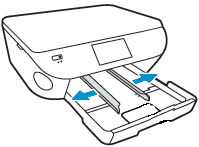
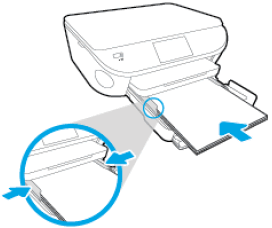
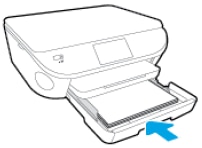
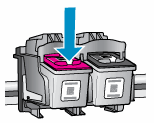
When you install a new ink cartridge, the printer completes an ink cartridge alignment. Load paper in the input tray, and then replace one or both ink cartridges as needed.

Video overview

This video shows how to replace an ink cartridge in the HP ENVY 5540 printer.
Replacing a Cartridge in the HP ENVY 5540 Printer
Learn how to replace an ink cartridge in the HP ENVY 5540 printer. Replace any ink cartridges that are low, or out of ink, with genuine HP ink cartridges or HP Instant Ink cartridges.

Step 1: Load paper into the paper tray

Before you install the ink cartridges, load the paper tray with plain white U.S. letter or A4-sized paper.
  1. Grasp the handle on the bottom of the paper tray, and then pull the tray toward you to open it.
    Figure : Opening the paper tray
    Image: Opening the paper tray
    The Close Tray screen displays on the printer control panel with the message, A paper tray is open. Make sure the paper you want to use is loaded, and then close the tray to continue.
  2. With the paper tray pulled out, push in the photo tray as far as possible.
    Figure : Pushing in the photo tray
    Image: Pushing in the photo tray
  3. Slide out the paper width guides as far as possible.
    Figure : Sliding out the paper width guides
    Image: Sliding out the paper width guides
  4. Load plain white U.S. letter or A4-sized paper into the paper tray.
  5. Push the stack of paper toward the rear of the paper tray until the paper stops.
    Figure : Sliding the paper back and the paper width guides in
    Image: Sliding the paper back and the paper width guides in
  6. Gently slide in the paper width guides until they lightly rest against the edges of the paper.
  7. Push in the paper tray until it locks into place.
    Figure : Pushing in the paper tray
    Image: Pushing in the paper tray
  8. The Have You Changed the Paper? screen displays. If, after several seconds, you do not touch an option, the message fades, and the printer uses the most recent paper settings. Adjust the paper settings as needed.
    • If you did not change the paper size or type in the main tray or the photo tray, touch OK to return to the Home screen, or wait several seconds to allow the printer to automatically return to the Home screen.
    • If you did change the paper size or type in the input tray or photo tray, adjust the paper settings:
      • If you changed the paper in the input (main) tray, touch Main Tray, touch Paper Size, and then touch your paper size. Touch Paper Type, and then touch your paper type. Touch Done, and then touch OK to return to the Home screen, or wait several seconds to allow the printer to automatically return to the Home screen.

Step 2: Replace the ink cartridges

After you have loaded the paper, replace one or both of the ink cartridges.
note:
If you are enrolled in the Instant Ink program, you receive special Instant Ink cartridges. Instant Ink cartridges are larger than standard ink cartridges, but they fit in the carriage in the same way. For more information, go to HP Instant Ink.
    Figure : Standard and Instant Ink cartridges
    Image: Instant Ink and standard ink cartridges.
  1. Standard ink cartridge
  2. Instant Ink cartridge
  1. Turn on the printer.
  2. Open the ink cartridge access door by placing two fingers under one or both of the small handles on the sides of the ink cartridge access door, and then lift up.
    Figure : Opening the ink cartridge access door
    Image: Opening the ink cartridge access door.
    'The ink cartridge access door is open. Close the door to continue.' displays on the printer control panel.
  3. Lightly press down on the low or empty ink cartridge to release it.
    Figure : Pressing down on the ink cartridge
    Image: Pressing down on the ink cartridge.
  4. Pull the ink cartridge toward you out of its slot, and then set it aside for recycling.
    note:
    Recycle any low or empty ink cartridges. The HP Inkjet Supplies Recycling Program is available in many countries/regions, and it is free of charge.
  5. Remove the new ink cartridge from its package. Be careful to touch only the black plastic on the ink cartridge.
    Figure : Removing the ink cartridge from its package
    Image: Removing the ink cartridge from its package.
  6. Remove the protective tape from the ink cartridge.
      caution:
    Do not touch the copper-colored contacts or the ink nozzles.Do not replace the protective tape on the contacts. Handling these parts can result in clogs, ink failure, and bad electricalconnections.
    Figure : Removing the tape and avoiding touching the ink cartridge contacts or ink nozzles
    Image: Removing the tape and avoid  touching the ink cartridge contacts or ink nozzles.
  7. Slide the new ink cartridge into the empty slot, and then gently push up on the ink cartridge until it snaps into place.
    Figure : Inserting the new ink cartridge
    Image: Inserting the new ink cartridge
  8. Repeat these steps to replace the other ink cartridge, if necessary.
  9. Close the ink cartridge access door.
    Figure : Closing the ink cartridge access door
    Image: Closing the ink cartridge access door
  10. Touch OK.
  11. Wait for the printer to calibrate and align the ink cartridges.
    An alignment page prints.
  12. If the alignment page does not print, print an alignment page through the printer control panel:
    1. Make sure to load the input tray with plain, white paper.
    2. On the printer control panel, swipe the display to the left, and then touch Setup.
      The Setup menu displays.
    3. Touch Tools, and then touch Align Printer.
      An alignment page prints.
  13. Place the alignment page with the print side down on the scanner glass. Position it according to the engraved guides around the glass.
    Figure : Placing the alignment page on the scanner glass
    Image: Placing the alignment page on the scanner glass.
  14. Close the scanner lid, and then touch OK.
    The printer aligns the ink cartridges.

Frequently Asked Questions (FAQs)

Review the list of frequently asked questions about replacing the ink cartridges.