This document is for the LaserJet Pro 200 Color M251nw printer.
Setting Up the Printer Hardware for HP LaserJet Pro 200 Color M251nw Printer Series
Introduction
This document explains how to set up the physical parts of the product. Complete these steps before you install the product software on your computer.
This document includes the following steps to set up the printer:
-
Check the contents of the box.
-
Remove the packaging and prepare the cartridges.
-
Load the paper.
-
Adjust the control panel display.
-
Connect the power cord and turn on the power.
-
Select the language and location.
Setting up the printer
Step one: Check the contents of the box
The contents might vary by country/region. See the packaging for a list of items shipped in the box.
Step two: Remove the packaging and prepare the cartridges
Follow these steps to prepare the cartridges.
-
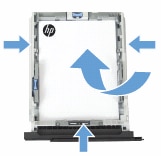
Take the HP printer out of its box, and then remove the packaging.Figure : Unpack the HP printer

-
Put the printer in a sturdy, well-ventilated, dust-free place.
-
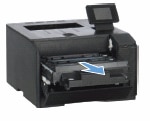
Open the print cartridge door.Figure : Open the print cartridge door

-
Pull out the print cartridge drawer.Figure : Pull out the print cartridge drawer
-
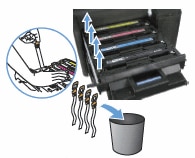
Remove the cartridge sealing tape. Locate the orange tab on the left side of the cartridge, and then pull up to remove the sealing tape.Repeat these steps for all cartridges.Figure : Remove the cartridge sealing tape, and then discard it
-
Push the print cartridge drawer into the printer.Figure : Push the print cartridge drawer into the printer

-
Close the cartridge access door, and then remove the protective film from the control panel display.
-
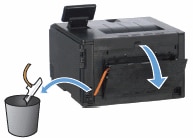
Turn the printer around so you can access the rear of the printer.
-
Open the jam access door, and then remove the orange packing strip from inside the printer.Figure : Remove and discard the orange packing strip from inside the printer
Step three: Load paper
Follow these steps to load paper in the paper input tray.
-
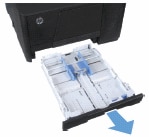
Pull out the paper input tray.Figure : Pull out the paper input tray
-
Slide the paper width and length guides to their outermost positions.Figure : Slide the paper guides outward

-
Load the paper in the input tray, print side up. Slide the paper forward until it stops.
note:
Do not overload the paper input tray. Make sure that the stack of paper fits within the tray and is no higher than the top of the guides. -
Slide the paper width and length guides inward until they stop at the edges of the paper.Figure : Load the paper and slide the paper guides inward
-
Insert the paper input tray back into the printer.Figure : Insert the paper input tray

Step four: Adjust the control panel display
Gently lift the display into the preferred position. Make sure that the display clicks into place.
Figure : Adjust the control panel display

Step five: Connect the power cord and turn on the power
-
Connect the power cord to the rear of the printer, and then plug it into the electrical outlet.Figure : Connect the power cord

-
Press the Power button (
 ) to turn on the printer. The printer initializes, and then calibrates itself. Wait until the printer is idle and silent before proceeding.
Do not connect the USB cable yet.Figure : Press the power button
) to turn on the printer. The printer initializes, and then calibrates itself. Wait until the printer is idle and silent before proceeding.
Do not connect the USB cable yet.Figure : Press the power button Figure : Do not connect the USB cable yet
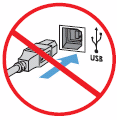
Step six: Select the language and location
Follow these steps to select the language and location.
note:After you turn on the printer, the control panel screen messages prompt you to select the language and location.
-
On the printer control panel, touch your desired language, and then touch Yes to confirm the selection.
-
When prompted, touch your desired location, and then touch Yes to confirm the selection.
Getting started with ePrint
Now you can stay connected and productive on the go with ePrint. ePrint lets you print directly to your ePrint-enabled HP printer using a smartphone, notebook, or other mobile device.
|
HP ePrint
|
|

|
For additional information related to setting up and using ePrint, click here to get started with ePrint.
|
Enter a topic to search our knowledge library
What can we help you with?

Need Help?