solution Contentsolution Content

HP Enterprise MFP, HP Managed MFP - Fluorescent Highlighter Not Visible In Copy or Scan

Issue

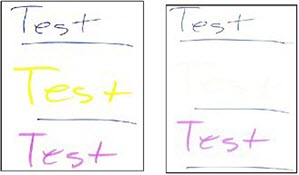
Fluorescent highlighter is not visible, or appears lighter or darker than expected, on documents that have been copied or scanned on an HP LaserJet Enterprise MFP or HP OfficeJet Enterprise MFP.
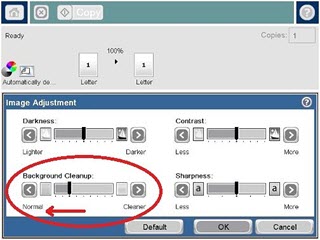
Cause

Fluorescent highlighter inks tend to reflect more light than that which is absorbed by the paper source. This reflection might cause the image to not be visible or to be interpreted by the copier/scanner as white or gray. Also, color and ink properties vary greatly depending upon the brand of highlighters used. Due to these differences, highlighted text in copied or scanned images might vary from not being visible at all to changes in color (e.g., orange highlighter could appear brown in the copy/scan).

Solution

A Firmware enhancement has been introduced for HP Enterprise printers to help improve color reproduction when scanning text documents that have been marked with fluorescent highlighters.
To affect the way that highlighted text or images are copied or scanned, use one of the options below.

Option one: Enhance highlighter in text documents using the latest firmware

To affect the way that highlighted text is copied or scanned with documents that have mostly text, update the firmware, and then select the Text option from the Optimize Text/Picture menu on the control panel when copying or scanning.
note:
If you are not able to update the firmware, or if the document has mostly graphics or photos, see Option two: Enhance highlighter in documents using the Image Adjustment settings.

Step one: Update the firmware

  1. Use the table below to find the required minimum firmware version for the printer(s).
    Applicable Enterprise Printers
    Minimum Firmware Version Required
    HP Color LaserJet Enterprise M527 MFP
    FutureSmart 3.6
    HP Color LaserJet Enterprise M577 MFP
    FutureSmart 3.6
    HP Color LaserJet Enterprise M630 MFP
    FutureSmart 3.6.1
    HP Color LaserJet Enterprise M680 MFP
    FutureSmart 3.6.1
    HP LaserJet Enterprise M725 MFP
    FutureSmart 3.6.1
    HP Color LaserJet Enterprise M775 MFP
    FutureSmart 3.6.1
    HP LaserJet Enterprise M830 MFP
    FutureSmart 3.6.1
    HP Color LaserJet Enterprise M880 MFP
    FutureSmart 3.6.1
    HP Officejet Enterprise Color MFP X585
    FutureSmart 3.6.1
  2. Update the firmware to the version required in the table above.
    note:
    For detailed instructions, go to Update Firmware Using a USB flash drive or the Embedded Web Server (EWS) (c03847902).

Step two: Select the ‘Text’ setting when copying or scanning (text documents)

note:
These settings are temporary. After you have finished the job, the printer returns to the default settings. To make this the default setting, contact the system administrator.
  1. From the Home screen on the printer control panel, select the Copy, Email, Save to Network folder, Send E-mail, or Send To… option.
  2. Select More Options, and then select Optimize Text/Picture.
  3. Select the Text option and then select OK.
    note:
    The Text mode is best suited for scanning highlighted text. Selecting this option enables the firmware enhancement.
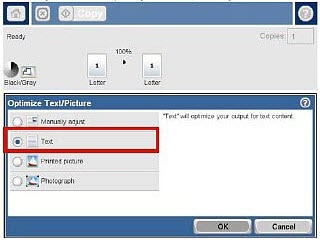
    Figure : Optimize Text/Picture settings: Selecting the ‘Text’ option
  4. Select Start.

Option two: Enhance highlighter in documents using the Image Adjustment settings

If you are not able to update the firmware, or to affect the way that highlighted text is copied or scanned with documents that have mostly graphics or photos, follow the steps below to optimize image quality when copying or scanning from the control panel. These steps provide suggested copy/scan settings for documents that have been marked with fluorescent highlighter when you want the highlight to be visible in the copy or scan. If the document has a small graphic with mostly text, see Option one: Enhance highlighter in text documents using the latest firmware.
note:
These settings are temporary. After you have finished the job, the printer returns to the default settings. To make this the default setting, contact the system administrator.
  1. From the Home screen on the printer control panel, select the Copy, Email, Save to Network folder, Send E-mail, or Send To… option.
  2. Change the Image Adjustment options to the following suggested settings:
    • Adjust Background Cleanup to the left -1.
      Figure : Image Adjustment settings: Adjusting Background Cleanup
    • Adjust Darkness to the right +2.
    • Adjust Contrast to the right +2.
    • Keep the Sharpness default setting.
For more detailed information, go to the white paper Copying or Digitally Scanning Highlighted Images (c04949243).