solution Contentsolution Content

Blinking Lights on the HP LaserJet 1018 and 1020 Printer Series

Blinking lights

The lights on the front panel of the product indicate the product status. These lights can be on, off, or flashing, depending on the product status. The following sections describe the most common combinations of flashing lights, what they mean, and how to fix the issue.
Light status legend
Light off
Light on and steady
Light blinks
Figure : All lights are off
Illustration: All lights are off
Issue
The Power and Attention lights are off.
Solution
  1. Press the Power switch on the back of the product to turn the product on.
  2. If the product does not turn on, disconnect the power cord from the back of the product, and then unplug the power cord from the electrical outlet.
  3. Reconnect the power cord to the back of the product, and then plug the power cord into the electrical outlet.
  4. Press the Power switch on the back of the product to turn the product on.
Figure : Attention light is off and Ready light is on
Illustration: The Attention light is off and the Ready light is on
Issue
The Attention light is off and the Ready light is on.
Solution
The product is ready to print. You do not need to do anything.
Figure : Ready light blinks and Attention light blinks
Illustration: The Ready light blinks and the Attention light blinks
Issue
The Ready light and the Attention light blink at the same time.
Solution
The product is initializing. You do not need to do anything.
Figure : Ready light blinks
Issue
The Ready light blinks.
Solution
The product is receiving or processing data. Wait for the print job to complete.
Figure : Lights blink in a cycle
Illustration: Lights blinking in a cycle
Issue
The front panel lights blink in sequence from top to bottom. The cycle continues in this pattern.
Solution
The product is in cleaning mode. Wait until the cleaning or self-test page prints and the product returns to the Ready state. This process might take up to two minutes.
Figure : Attention light blinks
Illustration: The Attention light blinks
Issue one
The product is out of memory.
Solution one
The document you want to print might be too complex for the product memory capacity. Follow these steps to reduce the resolution of the document:
  1. Remove the paper from the product.
  2. Windows XP: Click Start, click Printers and Faxes, double-click the icon for your product, select your print job, and then click Cancel.
    Windows Vista: On the task bar, click the Windows icon (), click Printers, double-click the icon for your product, select your print job, and then click Cancel.
  3. In the program from which you want to print, click File, and then click Print.
  4. On the Print dialog box, click Properties. The product Properties dialog box opens.
  5. Click the Paper/Quality tab.
  6. In the Print Quality drop-down menu, select a lower resolution level.
  7. Click OK to apply the settings.
  8. Try printing the document again.
Issue two
The print cartridge door is open.
Solution two
Check the print cartridge door. Open the door, and then close it. Press it down to close it all the way.
Figure : Close the print cartridge door
Illustration: Closing the print cartridge door
Issue three
The product is out of paper.
Solution three
Follow these steps to load paper in the product:
  1. Make sure that the stack of paper contains no more than 150 sheets of paper.
  2. Tap the stack of paper on a table or other flat surface to align the edges.
  3. Slide the paper into the main tray with the short edge toward the product and the print side up.
  4. Slide the paper width and paper length guides toward the stack of paper until they rest against the edges of the stack.
Issue four
The print cartridge is installed incorrectly.
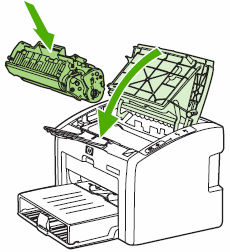
Solution four
Follow these steps to reinstall the print cartridge:
  1. Lift the print cartridge door, and then remove the print cartridge from the product.
    Figure : Remove the print cartridge
    Illustration: Lifting the print cartridge door and removing the print cartridge
  2. Replace the print cartridge in the product. Make sure that it snaps into place.
    Figure : Reinstall the print cartridge
    Illustration: Reinstalling the print cartridge and closing the print cartridge door.
  3. Close the print cartridge door.
Issue five
There is paper jammed in the product
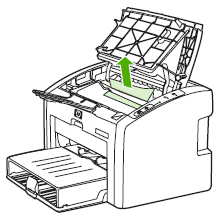
Solution five
Follow these steps to clear the paper jam:
  1. Remove all loose paper from the main tray, the priority feed slot, and the output bin.
      caution:
    Do not try to remove jammed paper at this stage.
  2. Lift the print cartridge door, and then remove the print cartridge from the product.
    Figure : Remove the print cartridge
    Illustration: Lifting the print cartridge door and removing the print cartridge
  3. With both hands, grasp the paper where it is most visible, including the middle, and then carefully pull the paper out of the product.
    Figure : Remove jammed paper
    Illustration: Remove the jammed paper
  4. Look inside the product for any torn pieces of paper or labels, and then remove them.
  5. If any jammed paper remains in the input trays or the output tray, grasp it with both hands and gently remove it.
  6. Reinsert the print cartridge, and then close the print cartridge door.
    Figure : Reinsert the print cartridge and close the print cartridge door
    Illustration: Reinstalling the print cartridge and closing the print cartridge door.
For more information and more troubleshooting steps, see the Paper Jam document (c00311028) (in English) for this product on the HP Web site.
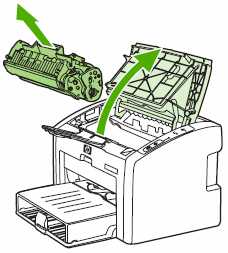
Figure : All lights are on
Illustration: All lights are on
Issue
The product experienced a fatal error.
Solution
  1. Unplug the power cable from the electrical outlet.
  2. Wait for 30 minutes, and then plug the power cable into the electrical outlet.
  3. If you have completed all the steps listed above and are still experiencing a problem, service the product.