INTRODUCTION:
This document explains the basic procedure to successfully clean the scanner and perform the Scanner Maintenance on the HP Designjet HD Scanners:
DJ 820 MFP, DJ T1100 MFP, DJ T1120 HD MFP, DJ 4500 MFP, DJ 4500 Scanner, DJ 4520 HD MFP, DJ T1200 HD MFP, and DJ HD Scanner.
Various scanning quality issues may appear if the scanner is not properly calibrated. Different Scanner System Error Codes or Messages may appear as well when scanning or running the Scanner Maintenance wizard.
All these issues can be resolved, in most of the cases, by performing a good cleaning; erasing the Parameter Blocks and run the Scanner Maintenance.
CLEANING THE SCANNER:
1. Open the scanner’s cover by holding down the two lever buttons on each side of it. Then flip the cover open.
 2.
2. Clean the white background
using a non-abrasive liquid and a lint-free cloth.
 3.
3. Clean the Glass plate
using a non-abrasive liquid and a lint-free cloth.
 NOTE:Both components (Glass Plate and White Background) are consumables (not covered under warranty) and Customer Self Replaceable (CSR) parts. If it is required, the Glass Plate can be removed and cleaned on the back (just in case it is very dirty on that side). If so, make sure not to drop anything inside the scanner. The White Background can be also removed to check that it is not bent; however, it is not necessary for cleaning purposes. Make sure not to drop, scratch or bend the already mentioned components if they are removed.
4.
NOTE:Both components (Glass Plate and White Background) are consumables (not covered under warranty) and Customer Self Replaceable (CSR) parts. If it is required, the Glass Plate can be removed and cleaned on the back (just in case it is very dirty on that side). If so, make sure not to drop anything inside the scanner. The White Background can be also removed to check that it is not bent; however, it is not necessary for cleaning purposes. Make sure not to drop, scratch or bend the already mentioned components if they are removed.
4. Check for scratches on the White Background and Glass Plate.
NOTE:Deep scratches on the Glass Plate or White Background mean replacement of the part as this will cause scanning quality issues or errors and messages (when scanning or running Scanner Maintenance).
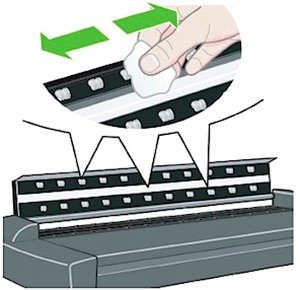
5. Clean the upper rollers (surrounding the White background) and lower rollers (surrounding the Glass Plate)
using a non-abrasive liquid and a lint-free cloth.
 6.
6. Clean the scanner’s surface
using a non-abrasive liquid and a lint-free cloth.
 7.
7. Close the scanner’s cover. The lever buttons will reengage (locking sound on every side).
RUNNING SCANNER MAINTENANCE:
1. Make sure the scanner is clean (
see previous steps).
2. Make sure the lamp is
ON.
NOTE:The lamp is a consumable (not covered under warranty) and a Customer Self Replaceable (CSR) part. It has to be On for at least 1 hour before using the scanner (scanning or running Scanner Maintenance). This is required to allow all the internal components to properly expand with the heat coming from it, otherwise, scanning quality issues, errors or messages (when scanning or running Scanner Maintenance) may appear.
3. Make sure the lamp has not been on for more than 4000 hours. Check the following path on the Panel PC:
Path: Setup/Options/System/WIDEsystem/Log/Lamp Light on.
 NOTE:4000 hours is the maximum of hours supported by HP. After this, scanning quality issues, errors or messages (when scanning or running Scanner Maintenance) may appear. Normally after 4000 hours or if there is not enough light coming from the lamp, scanners will ask for the MAINTENANCE KIT #1. This kit simply refers to the LAMP. Users only need to order the LAMP (it comes with the AIR FILTERS). Part number is subject to change. If the lamp is not replaced when the scanner asks for the Maintenance Kit then there is a good chance that scanning quality issues, errors or messages (when scanning or running Scanner Maintenance) may appear.
4.
NOTE:4000 hours is the maximum of hours supported by HP. After this, scanning quality issues, errors or messages (when scanning or running Scanner Maintenance) may appear. Normally after 4000 hours or if there is not enough light coming from the lamp, scanners will ask for the MAINTENANCE KIT #1. This kit simply refers to the LAMP. Users only need to order the LAMP (it comes with the AIR FILTERS). Part number is subject to change. If the lamp is not replaced when the scanner asks for the Maintenance Kit then there is a good chance that scanning quality issues, errors or messages (when scanning or running Scanner Maintenance) may appear.
4. Make sure the lamp has been on for at least one hour.
5. Make sure the Calibration sheet is in good conditions (clean and without any scratchers).
 NOTE:Even if there are some scratches on the Glass Plate, White Background or Calibration Sheet or if there is not enough light, the scanner may still be able to scan or calibrate (Scanner Maintenance). However, if there are issues (errors or messages) then the corresponding component needs to be replaced.
6.
NOTE:Even if there are some scratches on the Glass Plate, White Background or Calibration Sheet or if there is not enough light, the scanner may still be able to scan or calibrate (Scanner Maintenance). However, if there are issues (errors or messages) then the corresponding component needs to be replaced.
6. Make sure the scanner’s cover is in the lowest position.
Press ATAC key on the scanner.

After that, press and hold the down key to decrease the height of the cover (insertion slot) until it gets to the lowest position.
7. On the Panel PC select “
Setup”.
8. Select “
Options”.
 9.
9. Select “
Scanning”.
 10.
10. Select “
Scanner Maintenance”.
 NOTE:Another way to access the Scanner Maintenance button is by selecting the Scanner Message Area.

A direct Scanner Maintenance button will appear:
 11.
11. Select “
Erase Parameter Blocks”. Confirmation message will appear (select “
Next”).
 NOTE:Erasing the Parameter Blocks is exceptionally important before continuing with the next steps. Unavailability to run the Scanner Maintenance due to messages or error codes is in most cases solved by cleaning and erasing these blocks. Some old versions of the software may not show the “Erase Parameter Blocks” button, however, the option can be found by clicking on the icon on the left top corner of the screen. A dropdown menu will appear:
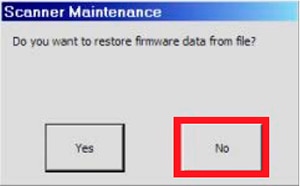
 12.
12. Select “
No” if a message about restoring firmware data from file appears:
 13.
13. Select “
Next” once the Parameter Blocks have been erased.
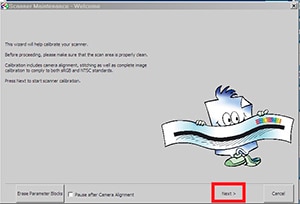
 14.
14. Select “Next” to run the Scanner Maintenance by following the Wizard (follow the onscreen steps).
 IMPORTANT:If you have questions or doubts, or if more assistance is needed, please contact your HP Representative or call HP Technical Support.
