This document explains how to set up the physical parts of the product. Complete these steps before you install the product software on your computer.
HP ENVY 120 e-All-in-One Printer Series - Setting up the All-in-One (Hardware)
Introduction
Setting up the All-in-One
Follow these steps in order.
Step one: Check the contents of the box
The contents might vary by country/region. See the packaging for a list of items shipped in the box.
Step two: Unpack the All-in-One
-
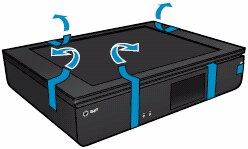
Remove all the packing tape from the front, sides, and back of the printer.Figure : Remove the packing tape
-
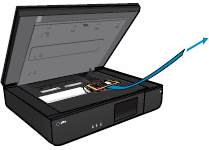
Open the scanner lid, open the cartridge access door, and then remove all the packing material from inside the printer.Figure : Remove the packing material from inside the printer

-
Close the cartridge access door.Figure : Close the cartridge access door

-
Close the scanner lid.
-
Remove the clear protective plastic from the top and front of the printer.Important: Your printer might have a protective plastic sticker that looks like an active printer control panel. Remove the sticker from the control panel before you continue to the next step.
Step three: Turn on the power
-
Connect the power cord to the back of the printer, and then connect the other end of the cord to the electrical outlet.Figure : Connect the power cord

-
Press the Power button (
 ) to turn on the printer.
Figure : Press the Power button
) to turn on the printer.
Figure : Press the Power button
-
Wait until the printer is idle and silent before you continue to the next step.
Step four: Select the language and country/region
-
On the printer control panel, touch the desired language, and then touch Yes to confirm your choice. If you do not see the desired language, use your finger to scroll down the menu.
-
Touch the desired country/region, and then touch Yes to confirm your choice.
-
Touch OK, touch Setup, and then continue to the next step.
Step five: Insert the cartridges
-
Press the Power button () to turn on the printer, if it is not already turned on.
-
Open the scanner lid.
-
Open the cartridge access door. The carriage moves into the access area. Wait until the carriage is idle and silent before proceeding.Figure : Open the cartridge access door

-
Lift the cartridge latch.Figure : Lift the cartridge latch

-
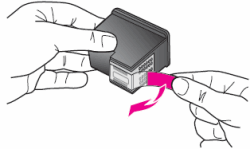
Remove the new cartridge from its packaging, and then pull the pull-tab straight back to remove the plastic tape.Figure : Remove the plastic tape
-
Hold the cartridge at a slight upward angle with the cartridge contacts facing the rear of the printer, and then slide the cartridge into the empty slot.Make sure that the color of the cartridge matches the color on the cartridge latch.
-
The tri-color cartridge goes in the slot on the left.
-
The black cartridge goes in the slot on the right.
Figure : Insert the cartridge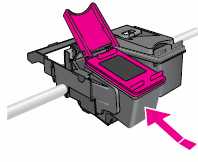
-
-
Close the cartridge latch to secure the cartridge.Figure : Close the cartridge latch

-
Repeat these steps to insert the other cartridge.
-
Close the cartridge access door. The carriage returns to the right side of the printer.Figure : Close the cartridge access door
-
Close the scanner lid.
-
Touch Done, and then touch OK.
Step six: Load plain paper
Follow these steps to load plain white paper in the printer.
note:Plain white paper is needed for cartridge alignment after you insert the new cartridges.
-
On the printer control panel, touch the Paper icon (
 ). The paper tray slides part way out of the printer.
-
Gently pull the paper tray out of the printer.
-
Slide out the paper guides.
-
Load a stack of A4 or letter size paper into the paper tray with the short edge forward.
-
Push the stack forward until it stops at the end of the tray.Figure : Push the stack of paper forward in the paper tray

-
Slide in the paper guides against the edges of the paper.
-
If the control panel is idle, touch it to wake it up.
-
Gently slide the paper tray into the printer until the printer pulls in the tray automatically.
-
Touch Done. The printer aligns the cartridges and prints an alignment page.Figure : Example of an alignment page
-
Alignment page did not print?If the printer did not print an alignment page, follow these steps:On the printer control panel, touch the Settings icon (
 ), touch Tools, and then touch Align Printer.
-
Step seven: Connect the printer
On the printer control panel, select the connection option that you want to use, and then follow the on-screen instructions to connect the printer. The following list might help you decide which option to select:
-
Setup Wireless via Software (recommended): Select this option to connect the printer to your wireless network using the software CD that shipped with your printer. With this option you can go online to check for the latest software and to register an HP ePrint service account (Internet connection required). If you do not want to go online, you can use the basic CD installation to install and connect the printer.
-
Setup Wireless via Printer: Select this option to connect the printer using the Wireless Setup Wizard on the printer control panel. With this option you manually connect the printer to your network. Once connected, insert the software CD to install the software.
-
Connect Later: Select this option if you do not want to connect the printer now, or if you want to connect the printer via USB. Insert the software CD into your computer. Do not connect the USB cable to the computer until prompted to do so during the software installation.
Enter a topic to search our knowledge library
What can we help you with?

Need Help?