solution Contentsolution Content

Replacing the Imaging Drum for HP LaserJet Pro CP1025 and CP1025nw Color Printers

Introduction

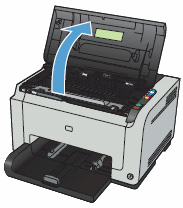
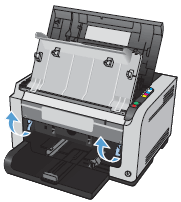
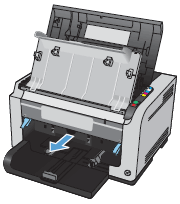
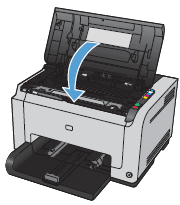
This document contains steps to replace the imaging drum.
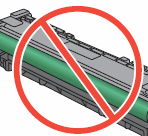
note:
The imaging drum installed in the product is covered by the product warranty. Replacement imaging drums have a one-year limited warranty from the date of installation. The imaging drum installation date displays on both the Configuration page and on the Supplies Status page when the imaging drum reaches approximately 30% of its estimated remaining life. HP's Premium Protection Warranty applies only to the print cartridges for the product.

Replacing the imaging drum

Follow these steps to replace the imaging drum.
  1. Open the print cartridge door.
    Figure : Open the print cartridge door
    Image: Open the print cartridge door.
  2. Open the front cover.
    Figure : Open the front cover
    Image: Open the front cover.
  3. Lift the two levers that hold the imaging drum.
    Figure : Lift the imaging drum levers
    Image: Lift the imaging drum levers.
  4. Remove the old imaging drum.
    Figure : Remove the imaging drum
    Image: Remove the imaging drum.
  5. Remove the new imaging drum from the packaging. Place the used imaging drum in the bag and box for recycling.
    Figure : Unpack the new imaging drum and recycle the old imaging drum
    Image: Unpack the new imaging drum and recycle the old imaging drum.
  6. Remove the protective shield from the new imaging drum.
      caution:
    To prevent damage to the imaging drum, do not expose it to light. If you need to keep the imaging drum outside the product for a short period, cover it with paper.
    Do not touch the green roller on the imaging drum. Fingerprints on the imaging drum can cause print quality issues.
    Figure : Do not touch the imaging drum roller
    Image: Do not touch the imaging drum roller.
    Figure : Remove the protective shield from the imaging drum
    Image: Remove the protective shield from the imaging drum.
  7. Insert the new imaging drum into the product.
    Figure : Insert the imaging drum
    Image: Insert the imaging drum.
  8. Lower the imaging drum levers.
    Figure : Lower the imaging drum levers
    Image: Lower the imaging drum levers.
  9. Close the front cover.
    Figure : Close the front cover
    Image: Close the front cover.
  10. Close the print cartridge door.
    When you close the print cartridge door, the Print Cartridge, Ready, and Attention lights flash. Allow up to three minutes for the product to calibrate.
    Figure : Close the print cartridge door
    Image: Close the print cartridge door.