Scanning from the HP LaserJet all-in-one control panel is possible only after the option has been configured in the HP LaserJet Scan software.
HP LaserJet 3050/3052/3055/3390/3392 All-in-One Printers - Configure "Scan To" on Windows 7 32-bit Operating Systems (Only)
Information
Details
Perform the following to enable Scan To functionality.
-
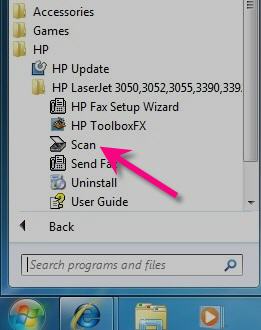
Select Scan.exe from Start, HP, HP LaserJet 3050/3052/3055/3390/3392, Scan.
-
On HP LaserJet Scan screen, select Setup.

-
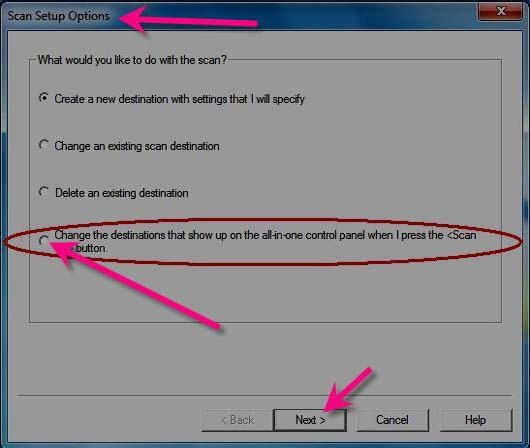
Select 4th option (Change the destination that show up on the all-in-one control panel, when I press the <Scan To> button) on Scan Setup Options and select Next.
-
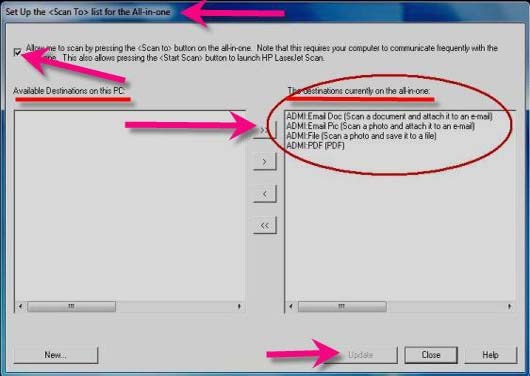
Put tick mark for Allow me to scan be pressing the <Scan To> option on Set UP the <Scan To> list for the All-in-one.This will provide all default destinations under Available Destinations on this PC.
-
Use >> to move all default destination to The destination currently on the all-in-one.
-
Select Update option to get these destination on device.
To scan from HP LaserJet all-in-one by using HP LaserJet all-in-one product control panel perform the following:
On the HP LaserJet all-in-one control panel, press the Scan To button. Use the < or > buttons to make a selection from the destination listed, and then press the Enter button.
note:See Windows Help for instructions on how to run an application in “Compatibility Mode”.The Hewlett Packard LaserJet 3050/3052/3055/3390/3392 product CD for Windows Vista 32 bit (and the Vista 32 bit Full Solution Software bundle on hp.com) can be run in “Compatibility Mode” in Windows 7 for product software functionality.
This Vista 32 bit Full Solution Software bundle for The LaserJet 3050/3052/3055/3390/3392 is supported in Windows 7 32 bit Operating Systems only. it is not supported with Windows 7 64 bit.
Enter a topic to search our knowledge library
What can we help you with?

Need Help?