This document explains how to set up the physical parts of the product. Complete these steps before you install the product software on your computer.
HP Deskjet F2400 All-in-One Printer Series - Setting up the All-in-One Parts (Hardware)
Introduction
This document includes the following steps to set up the product:
-
Unpack the All-in-One
-
Check the contents of the box
-
Connect the power cord and adapter
-
Turn on power
-
Load plain paper
-
Install the cartridges
-
Align the cartridges
Setting up the All-in-One
Follow these steps in order.
Step one: Unpack the All-in-One
-
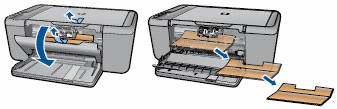
Remove the tape from the outside of the product, and then open it. Be sure to remove and discard the orange shipping lock.
-
Lower the paper tray.
-
Open the front access door, and then remove the packing material from the inside of the product, including the packing material inside the door.Figura : Unpack the All-in-One
-
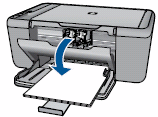
Close the front access door.Figura : Close the front access door

Step two: Check the contents of the box
The contents might vary by country/region. See the packaging for a list of items shipped in the box.
Step three: Connect the power cord and adapter
-
Plug one end of the power cord into the back of the product.
-
Plug the other end into a grounded wall outlet.
Figura : Connect power cord and adapter

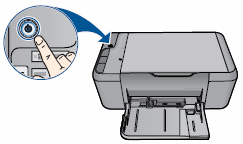
Step four: Turn on power
Press the Power button to turn the product on.
Figura : Turn on the product
Step five: Load plain paper
-
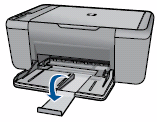
Lower the paper tray.
-
Lift out the paper tray extension.Figura : Lift out the paper tray extension
-
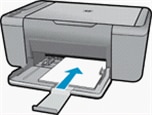
Slide the paper width guide all the way to the left.
-
Load a stack of 216 x 279 mm (8.5 x 11 inch) plain paper into the paper tray, print-side down. Slide the stack of paper forward until it stops.Figura : Load paper
-
Slide the paper width guide snugly against the paper.
Step six: Install the cartridges
-
Press the Power button (
 ) to turn on the product, if it is not already turned on. Wait until the product is idle and silent before continuing.
-
Open the front access door.The carriage moves to the center of the product. Wait until the carriage is idle and silent before continuing.Figura : Open the front access door
-
Remove the new cartridge from its packaging, and then carefully remove the plastic tape using the pink pull tab.
atención:
Do not touch the copper-colored contacts or ink nozzles. Also, do not re-tape the cartridges. Doing so can result in clogs, ink failure, and bad electrical connections.-
Copper-colored contacts
-
Plastic tape with pink pull tab (must be removed before installing)
-
Ink nozzles under tape
Figura : Remove the plastic tape
-
-
Hold the cartridge by its sides with the nozzles toward the product, and then insert the cartridge into its color-coded slot until it snaps into place. Make sure that the icon on the cartridge matches the icon on the slot.Figura : Example of inserting the tri-color cartridge

-
Insert the tri-color cartridge in the slot on the left.
-
Insert the black cartridge in the slot on the right.
Figura : Color-coded cartridge slots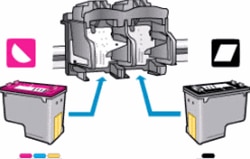
-
-
Repeat these steps for the other cartridge.
-
Close the front access door. An alignment page prints automatically. Wait until the page prints before continuing.Figura : Close the front access door
Step seven: Align the cartridges
-
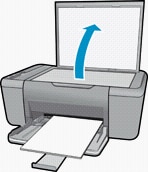
Lift the product lid.Figura : Lift the product lid
-
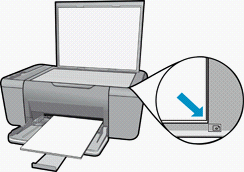
Place the alignment page with the printed-side down on the right-front corner of the scanner glass. See the engraved guide next to the scanner glass for help loading the alignment page.Figura : Place the alignment page on the scanner glass
-
Lower the product lid.Figura : Lower the lid

-
Press Start Copy Color to start the alignment.
-
When the cartridge alignment is complete, recycle or discard the alignment page.
Ingrese un tema para buscar en nuestra biblioteca de conocimientos
¿Con qué podemos ayudarle?

¿Necesita ayuda?