solution Contentsolution Content

HP Printers - Replacing the Internal Power Module for HP OfficeJet 4600, Deskjet 3500, and Photosmart 5500, 6500 Printers

This document provides instructions for replacing the internal power module for the following HP printers:
HP DeskJet printers
HP DeskJet 3520 e-All-in-One Printer
HP DeskJet 3521 e-All-in-One Printer
HP DeskJet 3522 e-All-in-One Printer
HP DeskJet 3524 e-All-in-One Printer
HP DeskJet 3526 e-All-in-One Printer
HP OfficeJet printers
HP OfficeJet 4610 All-in-One Printer
HP OfficeJet 4620 e-All-in-One Printer
HP OfficeJet 4622 e-All-in-One Printer
HP Photosmart printers
HP Photosmart 5510 e-All-in-One Printer - B111a
HP Photosmart 5510 e-All-in-One Printer - B111b
HP Photosmart 5510 e-All-in-One Printer - B111g
HP Photosmart 5511 e-All-in-One Printer - B111j
HP Photosmart 5512 e-All-in-One Printer - B111a
HP Photosmart 5512 e-All-in-One Printer - B111e
HP Photosmart 5512 e-All-in-One Printer - B111f
HP Photosmart 5514 e-All-in-One Printer - B111c
HP Photosmart 5514 e-All-in-One Printer - B111d
HP Photosmart 5514 e-All-in-One Printer - B111h
HP Photosmart 5515 e-All-in-One Printer - B111a
HP Photosmart 5515 e-All-in-One Printer - B111h
HP Photosmart 5515 e-All-in-One Printer - B111j
HP Photosmart 5520 e-All-in-One Printer
HP Photosmart 5522 e-All-in-One Printer
HP Photosmart 5524 e-All-in-One Printer
HP Photosmart 5525 e-All-in-One Printer
HP Photosmart 6510 e-All-in-One Printer - B211a
HP Photosmart 6510 e-All-in-One Printer - B211b
HP Photosmart 6510 e-All-in-One Printer - B211e
HP Photosmart 6512 e-All-in-One Printer - B211a
HP Photosmart 6515 e-All-in-One Printer - B211a
Replace the internal power module when the printer does not respond after various attempts of troubleshooting.
  1. Obtain a medium-sized flathead screwdriver.
  2. Press the Power button to turn off the printer.
  3. Disconnect the power cord from the rear of the printer.
  4. Disconnect the USB cable and network cable from the rear of the printer, if they are connected.
  5. Rotate the printer so that the rear of the printer is facing you.
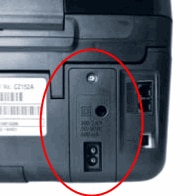
  6. Locate the internal power module on the right-hand side of the rear of the printer.
    Figure : Location of the internal power module
    Image: Location of the internal power module
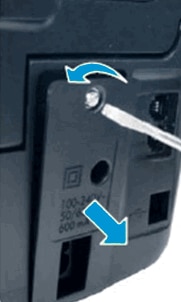
  7. Turn the medium-sized flathead screwdriver in a counter-clockwise direction to remove the screw securing the cover of the power module. Do not lose the screw.
    Figure : Remove the screw
    Image: Remove the screw
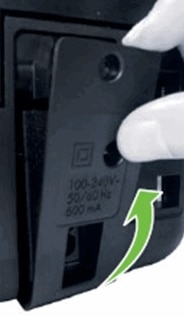
  8. Remove the power module cover, then set it aside.
  9. Slide the power module out of the printer just enough to access the wire connector on top of the power module.
    Figure : Slide out the power module
    Image: Slide out the power module
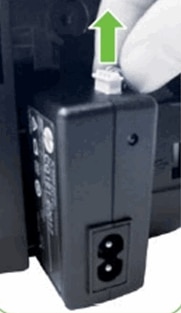
  10. Disconnect the wire connector on top of the power module by gently lifting the connector upwards.
      caution:
    Do not pull on the wire.
    Figure : Disconnect the wire connector
    Image: Disconnect the wire connector
  11. Remove the power module completely from the printer.
    Figure : Remove the power module
    Image: Remove the power module
  12. Remove the new power module from its package.
  13. With the power cord socket facing out, slide the new power module into the printer just enough to plug in the wire connector on top.
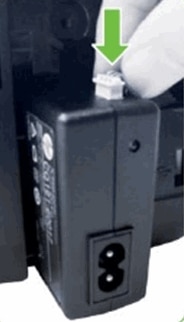
  14. Plug the wire connector into the top of the new power module by gently pushing it downwards.
    Figure : Plug in the wire connector
    Image: Plug in the wire connector
  15. Push the power module into the printer until it stops.
  16. Place the power module cover over the power module. The socket for the power cord should be visible.
    Figure : Reinstall the power module cover
    Image: Reinstall the power module cover
  17. Insert the screw into the cover, then turn the flathead screwdriver in a clockwise direction to secure the cover.
  18. Reconnect the power cord to the rear of the printer.
  19. Press the Power button to turn on the printer.
  20. If necessary, reconnect the USB cable and network cable to the rear of the printer.