This document explains how to set up the physical parts of the product. Complete these steps before you install the product software on your computer.
HP LaserJet Pro M1536dnf, M1537dnf, M1538dnf, and M1539dnf Multi-Function Printers - Setting Up the LaserJet (Hardware)
Introduction
This document includes the following steps to set up the product:
-
Unpack the product
-
Check the contents of the box
-
Remove packing tape and attach trays
-
Insert the cartridge
-
Connect the power cord
-
Turn on the power
-
Select the language
-
Load plain paper
Setting up the product
note:Do not connect a USB cable now. If you plan to use a USB cable to connect the printer to the computer, you will be prompted to connect it at the correct time during the software installation.
Step one: Unpack the product
Remove the product and other items from the box.
Figure : Unpack the product

Step two: Check the contents of the box
The contents might vary by country/region. See the packaging for a list of items shipped in the box.
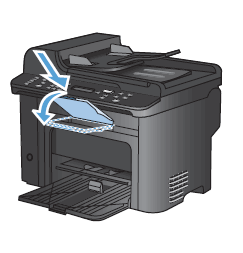
Step three: Remove the tape and packing material from the product
-
Position the product on a sturdy surface in a well-ventilated, dust-free area that is away from direct sunlight.
-
Remove all pieces of blue tape from the product.Figure : Remove tape from the product

-
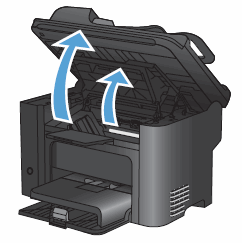
Open the cartridge door.
-
Lift up the paper packing material, but do not remove it.Figure : Lift up the paper packing material

-
Remove the cartridge packing material.Figure : Remove the cartridge packing material

-
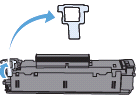
Remove the cartridge from the product.Figure : Remove the cartridge

caution:
Hold the cartridge at each end to prevent damage to the cartridge. -
Remove the paper packing material from inside the product.Figure : Remove the paper packing material

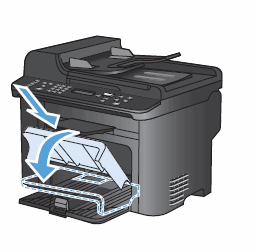
Step four: Attach the trays
-
Attach the output tray by snapping it into place.Figure : Attach the output tray
-
Attach the priority input tray.Figure : Attach the priority input tray
Step five: Prepare and insert the cartridge
-
Open the print cartridge door.Figure : Open the print cartridge door
-
Remove the orange clip from the end of the cartridge.Figure : Remove the orange clip
-
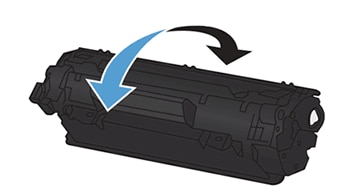
Gently rock the cartridge from front to back to distribute the toner.Figure : Rock the cartridge
-
Remove the sealing tape from the cartridge.
-
Bend the tab on the left side of the cartridge until the tab breaks loose.
-
Pull the tab to remove the sealing tape from the cartridge.
-
Put the tab in the cartridge box to return for recycling.
Figure : Remove the sealing tape
caution:
If toner gets on your clothing, wipe it off with a dry cloth and wash the clothing in cold water. Hot water sets toner into the fabric. -
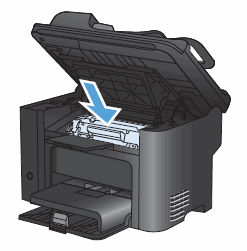
-
Insert the cartridge into the product, and then close the cartridge door.Figure : Insert the cartridge and then close the door
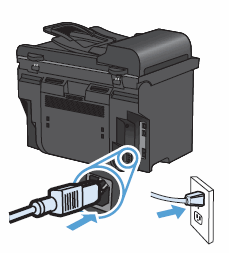
Step six: Connect the power cord
Connect the power cord to the rear of the product, and then plug it into a wall outlet.
Figure : Connect the power cord
Step seven: Turn on the power
Press the Power button ( ) to turn on the product.
) to turn on the product.
Figure : Turn on the product

note:After you turn on the product, an 'Install black cartridge' message might display on the product control panel. If you receive this message, follow these steps to resolve the issue.
Issue: The Attention light blinks and an 'Install black cartridge' message displays on the control panel
During product setup, the Attention light ( ) blinks, and an 'Install black cartridge' message displays on the control panel.
) blinks, and an 'Install black cartridge' message displays on the control panel.
Solution one: Remove any packing material from the product and the cartridge
Follow these steps to make sure that all packing material has been removed from the product and the cartridge.
-
Open the cartridge door.
-
Lift up the paper packing material, but do not remove it.Figure : Lift up the paper packing material
-
Remove the cartridge packing material.Figure : Remove the cartridge packing material
-
Remove the cartridge from the product.Figure : Remove the cartridge
caution:
Hold the cartridge at each end to prevent damage to the cartridge. -
Remove the paper packing material from inside the product.Figure : Remove the paper packing material
-
Remove the orange clip from the end of the cartridge.Figure : Remove the orange clip
-
Gently rock the cartridge from front to back to distribute the toner.
-
Remove the sealing tape from the cartridge.
-
Bend the tab on the left side of the cartridge until the tab breaks loose.
-
Pull the tab to remove the sealing tape from the cartridge.
-
Put the tab in the cartridge box to return for recycling.
Figure : Remove the sealing tape
caution:
If toner gets on your clothing, wipe it off with a dry cloth and wash the clothing in cold water. Hot water sets toner into the fabric. -
-
Insert the cartridge into the product, and then close the cartridge door.
-
If these steps resolved the issue, you do not need to continue troubleshooting.
-
If the issue persists, continue to the next solution.
Solution two: Service the All-in-One
Service or replace your HP product if the issue persists after completing all the preceding steps.
Go to Contact HP Customer Support to schedule a product repair or replacement. If you are in Asia Pacific, you will be directed to a local service center in your area.
To confirm your warranty status, go to HP Product Warranty Check. Repair fees might apply for out-of-warranty products.
Step eight: Select the language
-
On the control panel, press the Setup button (
 ).
).
-
Press the Right Arrow (
 ) to select System Setup, and the press OK.
-
Press OK to select Language.
-
Press the Right Arrow () to select your language, and then press OK.
-
Press OK to confirm the selection.
Step nine: Load plain paper
-
Slide the paper width and length guides to their outermost positions.
-
Place a stack of paper in the tray, and then make sure that it is flat at all four corners.Figure : Load plain paper into Tray 1

-
Slide the paper guides in so that they rest against the stack of paper.Figure : Slide the paper guides in

Enter a topic to search our knowledge library
What can we help you with?

Need Help?