The power-on password prevents anyone from starting the computer until they enter the proper password. With the power-on password enabled, the screen remains black, and you are prompted to enter a password as soon as you turn on the computer. The power-on password is set (enabled or disabled) in the System BIOS option window. By default, the power-on password is turned off.
HP EliteBook Notebook PCs - How to Set Power-On Password for the Notebook
Information
Details
To set the power-on password, do the following steps:
1. Press F10 to go to BIOS setup.
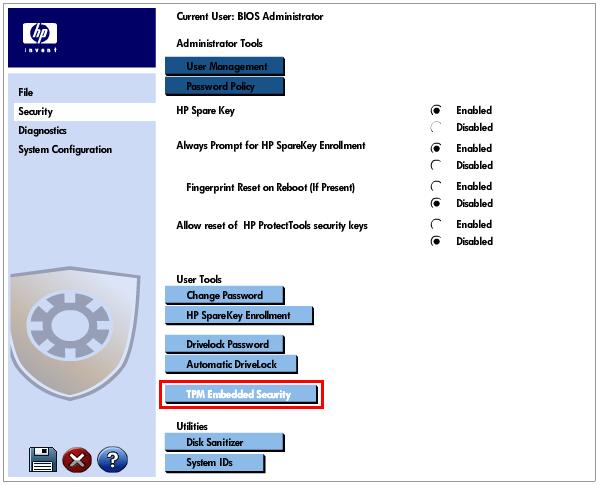
2. Select Security.
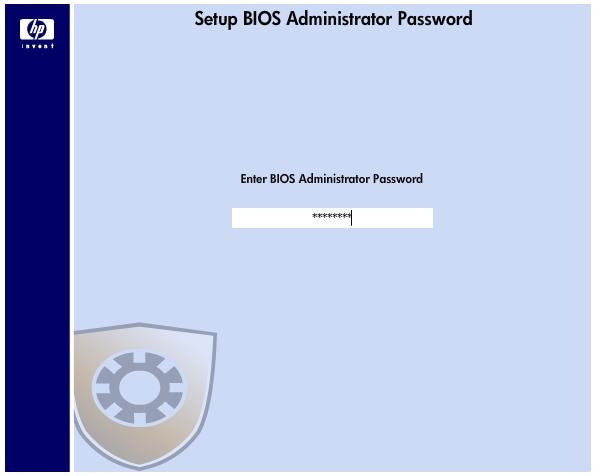
3. Select Setup BIOS Administrator Password.

4. Set the password of minimum eight characters long.
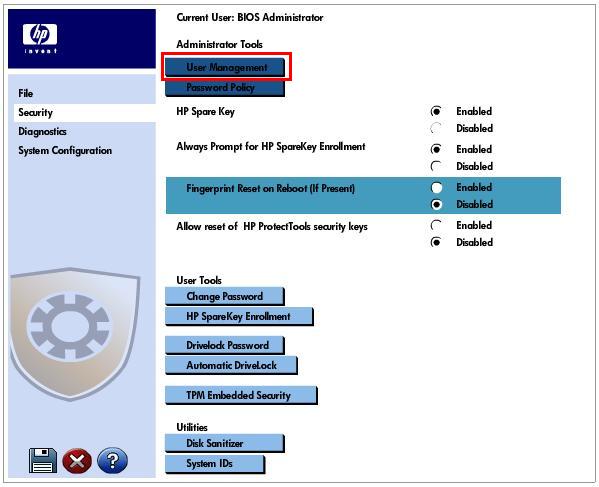
5. Select User Management.
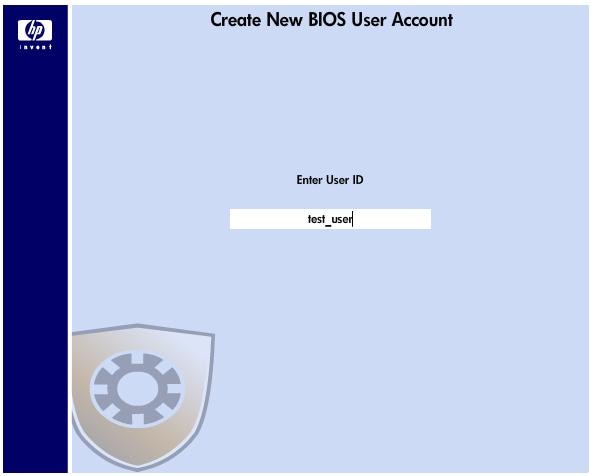
6. Select Create New BIOS User account.

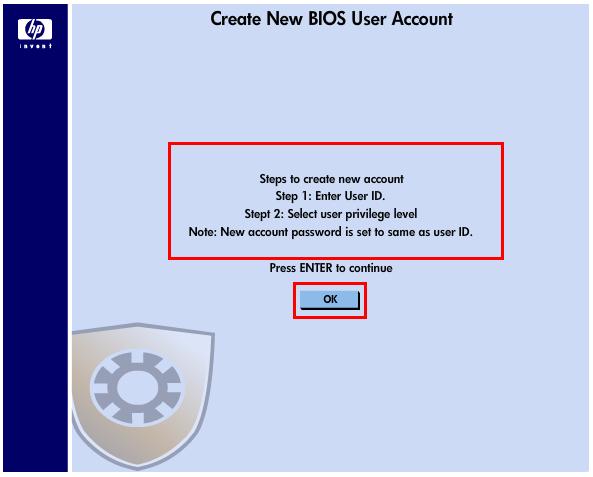
7. Press OK, enter the User ID, and set user privilege level. The default password should be the same as user ID.

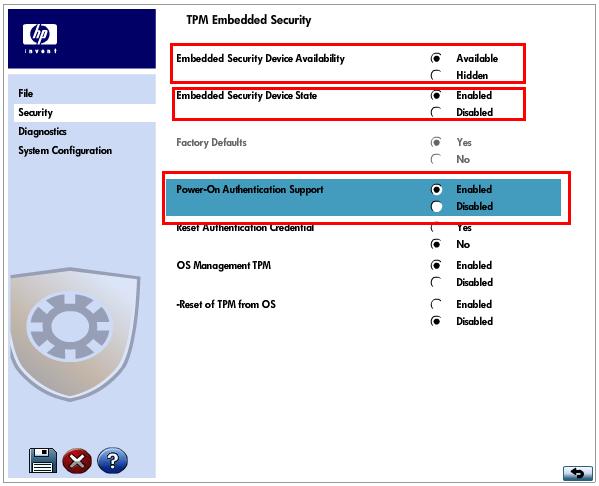
8. Select TPM Embedded Security.
9. Enable Power-On Authentication Support.
10. Enable Embedded Security Device State.
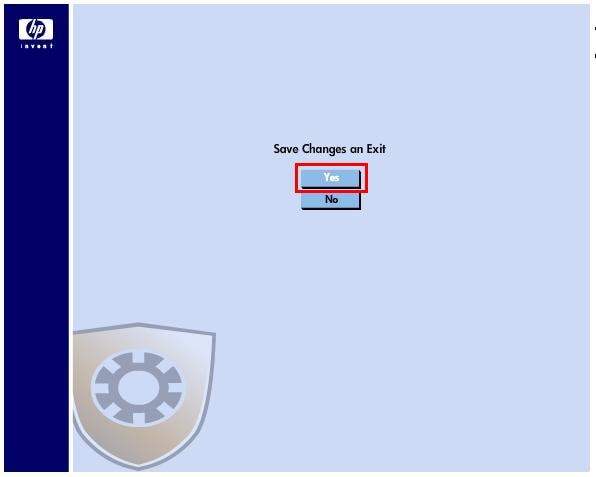
11. Press F10 and Yes to save the change and exit.
12. Install the HP ProtectTools Security Manager Suite from the HP website.
13. Install the Embedded Security for HP Protect Tools from the HP website.
Installation of HP ProtectTools Security Manager and Embedded Security
To install HP ProtectTools Security Manager, Embedded Security, and Infineon Driver, follow these steps:
1. Download the appropriate latest SoftPaqs to a directory on your hard drive.
2. Execute the Security Manager Softpaq and follow the on-screen instructions.
3. Execute the Embedded Security and Infineon Driver Softpaq and follow the on- screen instructions.
After both components are installed, launch Security Manager by clicking Start > Programs > HP ProtectTools Security Manager, or by selecting Control Panel, switching to Classic View, and double-clicking ProtectTools Security Manager.
Select Embedded Security in the left navigation pane to launch the wizard that will guide you through the Embedded Security initialization process.
note:In most cases, the IT System Administrator initializes Embedded Security. When you initialize Embedded Security, you are taking ownership of the TPM. There is just one TPM owner, although there can be many TPM users.
Perform these steps to initialize Embedded Security:
1. Right-click the HP ProtectTools icon in the system tray, then click Embedded Security Initialization. This menu item exists only when Embedded Security has not yet been set up. The HP ProtectTools Embedded Security Initialization Wizard appears.
2. Click Next.
3. Type and confirm a Take Ownership password, then click Next.
note:Type carefully. For security reasons, the characters typed do not appear on the screen. If you forget this password, you will not be able to manage or access the TPM.
4. Click Next to accept the default Recovery archive location.
5. Type and confirm an Emergency Recovery Token password, then click Next.
6. Click Browse, and select the appropriate destination.
caution:The Emergency Recovery Token Key is used to recover encrypted data in the event of a computer or TPM failure. The data cannot be recovered without the key. (The data still cannot be accessed without the Basic User password.) Store this key in a safe place.
7. Click Save to accept the location and the default file name, then click Next.
8. Click Next to confirm settings before the Security Platform is initialized.
note:A message may be displayed to say that the Embedded Security features are not initialized. Do not click in the message; this is addressed later in the procedure, and the message will close after a few seconds.
9. If you are also setting up a user account, ensure that the Start Embedded Security User Initialization Wizard checkbox is selected.
10. Click Finish.
11. Now each time it boots, it will prompt for the password.
note:The power-on password is a feature provided on HP notebooks, and the customer has to use it on their own risk. The customer has to store the password in a safe place and if lost, HP cannot help to retain the same.
Enter a topic to search our knowledge library
What can we help you with?

Need Help?