solution Contentsolution Content

HP LaserJet, HP Managed - Stack quality issue and severe curls on printed pages

Overview

Learn how to resolve issues when the output pages are curled or when experiencing stack quality issue on an HP Stapler/Stacker (Finisher or output unit). The procedures in this document will help to resolve the issue.
In some environments, customers observe severe levels of curl or excessive curl on the output pages when using an HP LaserJet Enterprise printer or an HP Managed printer causing the following issues on an HP Stapler/Stacker:
  • Output pages in the stack of pages are out of alignment,
  • Incorrect page order in the output stack of pages, or
  • Occurrence of jams when printing.
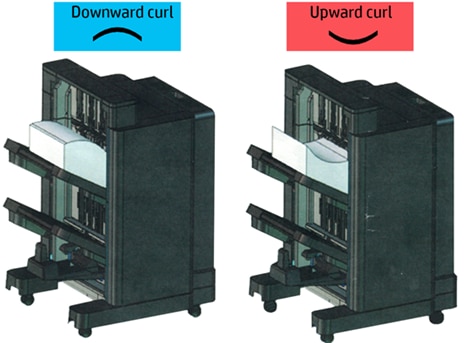
This issue occurs when printing in hot and humid environments with lightweight paper, recycled paper, or a combination of lightweight and recycled paper.
Figure : Curled pages in the output bin
Curled  pages in the output bin

Resolve poor stack quality or curling issues

Follow the steps in the order presented to resolve the issue.

Step one: Determine the direction of the curl in the output pages

Depending on the simplex, or duplex, or simplex and duplex print jobs, determine if the type of curl in the output pages is a "downward curl" or "upward curl".
  • Simplex printing (single-sided) refers to printing on one side of a paper.
  • Duplex printing (two-sided) refers to printing on both sides of a paper.
Figure : HP Stapler/Stacker: Downward and upward curl on the output pages
HP Stapler/Stacker: Downward and upward curl on the output pages.

Step two: Check for paper jams in the trays or in any printer access doors

  1. Open the tray and remove any loose sheets of paper in the tray.
  2. Open the printer access doors and remove any sheets of paper inside the printer.
  3. If any jammed paper is visible, grasp the jammed paper with both hands and gently pull it straight out to remove it out of from the printer.
  4. Make sure that no torn remnants of paper remain inside the printer.
      warning:
    Do not tear the paper when removing any paper jams as it becomes more difficult to identify paper remnants inside the printer.

Step three: Check the paper type

  1. Use paper that meets HP specifications for the printer.
  2. Flex the paper stack to separate pages stuck to each other.
    1. Use both hands to hold the ends of the paper stack, and then bring each end up to form a slight "U" shape.
    2. Rotate the ends down to reverse the U shape.
      Figure : Flex the stack of paper
    3. Hold the ends of the paper stack and flatten it to separate the pages.
    4. Tap the edges of the paper stack on a table to make sure that the edges are even.
  3. Make sure to use a new ream of paper to obtain the best stack quality.
    note:
    Most reams of paper are sold in moisture-proof wrapping to keep the paper dry.
  4. Make sure that the paper has not previously been printed or copied.
    note:
    Recycled or light types of paper exposed to hot and humid conditions usually curl during the printing process.
    Light paper is less than 20 lbs/75 grams.
  5. Keep paper that is not in use inside a large re-sealable bag to reduce paper curl and to prevent the paper absorbing moisture or from being exposed to high-humidity environments.

Step four: Check the environment

  1. Verify that the humidity in the room is within the specifications for the printer.
  2. If the sheets of paper stick together, remove the paper from the tray, and then flex the paper stack. See Step three for instructions.
    note:
    Due to excess static electricity, sheets of paper in the tray might stick together.

Step five: Update the printer firmware

note:
A firmware update requires a network connection or USB flash drive, and internet access. It might take 10 to 30 minutes to update the firmware.
  1. Print a Configuration Page from the printer control panel to determine the current firmware version installed on the printer.
    To determine the firmware installed on the printer in the Configuration Page, view the Device Information section for the Firmware Revision and Firmware Datecode.
  2. Go to HP Support.
  3. Type your printer name in the Enter your serial number or product name text box, and then click the Submit button.
  4. On the left pane, select the Software, Drivers and Firmware option.
  5. Click the plus sign next to the Firmware section to view the firmware version.
  6. Check if the Firmware version listed in the Configuration Page is the same as that in the Firmware section.
    note:
    HP Enterprise and HP Managed printers have FutureSmart 3 and FutureSmart 4 revisions of firmware available.
    To identify which revision of firmware the printer is running, view the home screen of the control panel.
    HP FutureSmart 3 control panel
    HP FutureSmart 4 control panel
    Control panel for printers running FutureSmart 3 firmware
    Control panel for printers running FutureSmart 4 firmware
  7. If the latest firmware is not installed on the printer, click Download, and then select Save.
    note:
    Make sure that any solution installed is compatible with the latest firmware version. HP recommends updating the solution prior to updating the firmware.
  8. Browse to the location of the saved file, right-click the .zip file, and then extract all files.
    The firmware file has a.bdl extension. Use either a USB flash drive or the HP Embedded Web Server to install the .bdl file (firmware file).
    For instructions to update the firmware, go to the following support document HP Enterprise - Update the firmware.

Step six: Load paper in the tray and adjust the paper guides

  1. Open a new ream of paper and load the paper in the tray.
    note:
    Make sure to flex the stack of paper in both directions.
  2. Adjust the paper guides to the appropriate indentation or markings in the tray.
    note:
    Do not adjust the paper guides tightly against the paper stack.
  3. Make sure that the paper guides in the tray are adjusted correctly for the size of paper being loaded into the tray. The arrow on the tray guide should line up exactly with the marking on the tray.
    note:
    Check the stack-height markings inside the tray to make sure that the tray is not overfilled.

Step seven: Configure the printer settings using the control panel

note:
  • For a 2-line LCD control panel: Use the arrow buttons and the OK button to scroll and open a menu.
  • For a Touchscreen control panel: Touch to select and open a menu.
  1. Depending on your firmware version, select the paper type option.
    FutureSmart 3:
    1. From the Home screen on the printer control panel, scroll to select the Administration menu, and then select the General Settings menu.
    2. Select the Adjust Paper Types menu, and then select the Plain paper type.
      To save an option, touch or select the Save button.
    FutureSmart 4:
    1. From the Home screen on the printer control panel, select the Settings menu, and then select the Copy/Print or Print menu.
    2. Select the Adjust Paper Types menu, and then select the Light 60-74 paper type.
      To save an option, touch or select the Done button.
  2. Depending on the type of curl, and the print job experienced when printing, select the recommended settings on the control panel.

Applicable printers

This issue applies to the following printer series:
  • HP LaserJet
  • HP LaserJet Managed