This document is for the HP Photosmart 6510 e-All-in-One Printer Series.
Replacing Cartridges for HP Photosmart 6510 e-All-in-One Printer Series
This document contains steps for replacing the cartridges.
Cartridges types
Consult the following table to identify the correct cartridges for your area.
|
Americas and Asia Pacific (excluding China, India, and Japan)
|
Western Europe
|
Africa, CIS, Japan, and Middle East
|
China and India
|
|
|
Ink cartridge
|
HP 564
|
HP 364
|
HP 178
|
HP 862
|
Purchase replacement cartridges and other supplies from the HP Store or local retailers.
Replace the cartridges
Follow these steps to replace and align the cartridges.
Video of replacing the cartridges
The following video demonstrates how to replace a cartridge.
note:This video shows an HP Photosmart 5510 (B111a) printer, but the steps are the same for your printer.

If you have trouble viewing the video or to view the video in a different size, click here to play the video on YouTube.
-
Press the Power button to turn on the printer, if it is not already turned on. Wait until the printer is idle and silent before you continue.
-
Open the ink cartridge access door. The carriage moves to the access area.Figure : Open the ink cartridge access door

-
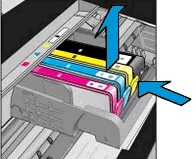
Press the tab on the front of the ink cartridge inward to release it, and then pull up on the ink cartridge to remove it from the slot.Figure : Remove the ink cartridge from the slot
-
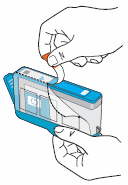
Pull the orange tab to remove the new ink cartridge from the plastic wrap.Figure : Remove the new ink cartridge from the plastic wrap
-
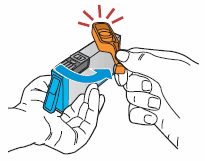
Twist the orange cap counter clockwise until it snaps off the new ink cartridge.Figure : Remove the orange cap from the new ink cartridge
-
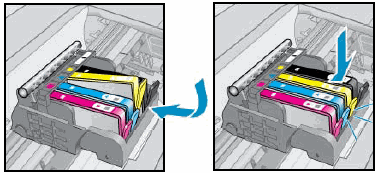
With the nozzle and contacts facing down, slide the ink cartridge into its slot. Press down on the ink cartridge until it is firmly seated.Figure : Insert the ink cartridge
-
Make sure each cartridge is firmly installed in its slot. Run your finger along the top of the cartridges to feel for any that are protruding, and if any are, press down firmly until each cartridge snaps into place.
-
Close the ink cartridge access door.Figure : Close the ink cartridge access door

-
When you insert a new ink cartridge, the printer automatically prompts you to align the ink cartridges. Touch OK on the control panel to complete the alignment.
-
If the printer control panel states that the alignment has failed, repeat the steps to Clean the Cartridge contacts.
Enter a topic to search our knowledge library
What can we help you with?

Need Help?