solution Contentsolution Content

HP Printers and Scanners - Scan documents using the HP JetAdvantage Capture app from an Android, iOS, and Windows 10 operating systems

HP JetAdvantage Capture is a free mobile app that allows you to scan or capture documents or photos using an Android phone, iPhone, or Windows 10 Universal Windows Platform (UWP), and then sends the scan job to a compatible HP printer or scanner that is connected to the same network as your mobile device, or scan files directly to cloud destinations.
This app provides the following features:
  • acquire scanned files and images from HP Multifunction Printers, HP ScanJet Scanners, and mobile or handheld integrated cameras.
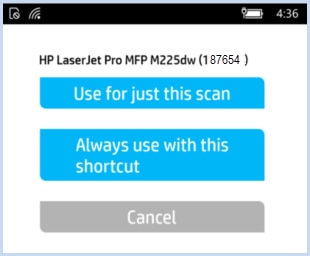
  • create shortcuts for frequently used capture settings, email or cloud destinations.
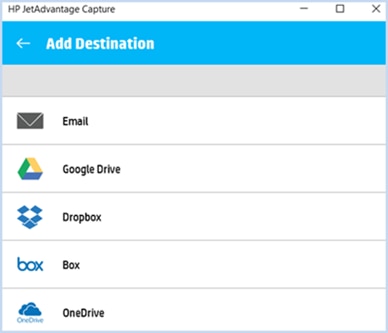
  • digitize common scan or camera image workflows, such as Scan to Email or Scan to Cloud Destinations.
    Scan to cloud destinations include iCloud, Dropbox, and Google Drive.
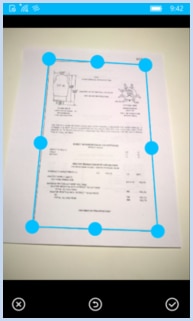
  • modify scanned images with automatic document processing features such as autocorrection, image quality, orientation, and page borders to give precise images with clear and readable text.
note:
Some of the options and images in this document will vary depending on the operating system.
Figure : HP JetAdvantage Capture icon (iOS /Windows 10/ Android)
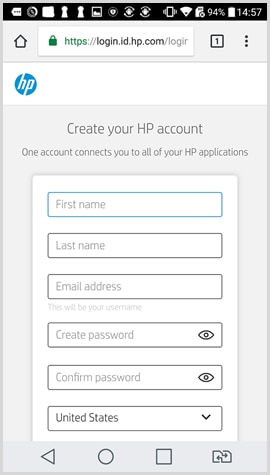
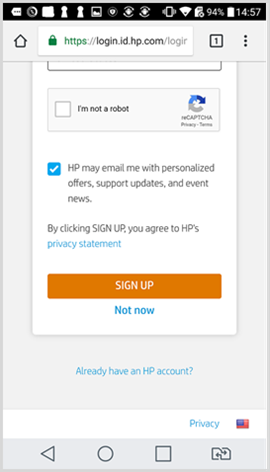
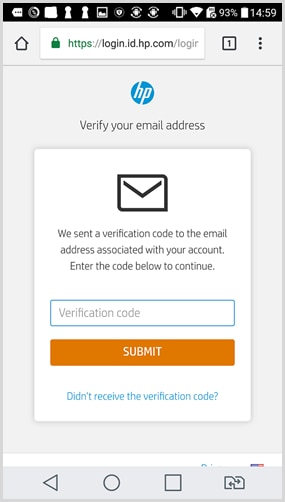
HP JetAdvantage Capture icon for iOS, Windows, and Android
note:
For existing HP JetAdvantage Capture users, the automatic upgrade to the new app version (v2.2+) on your device will require creating a new Capture Account that uses the new HPID platform for Scan to Cloud destinations.
To verify if you have already set up an HPID account, go to https://myaccount.id.hp.com/uaa, and then enter your email address and password to confirm if you have an account.
For instructions to create a new HP Capture account, see Step two: Set up the app on your device.
Follow the instructions in the below steps to set up and use the HP JetAdvantage Capture app:

Step one: Review the requirements

Before installing the HP JetAdvantage Capture app, preview the following requirements:
  • Supported operating systems (OS) for mobile devices:
    • An Android smartphone with Android OS 5.0 or newer version.
    • An iPhone with iOS 8 or a newer version.
    • A computer, laptop, or tablet with a UWP or running a Windows 10 operating system.
  • Supported HP Printers and HP Scanners for scanning:
    note:
    Make sure that the printer or scanner is connected using Wi-Fi Direct or connected to the same network as your mobile device.
    • HP All-in-One (AiO) Printer
    • HP Multifunction Printer (MFP)
    • HP ScanJet Scanner
  • A Google account to download the app from the Google Play Store.
    OR
    An Apple account to download the app from the Apple store.
  • Enable the following network settings and protocols in the HP Embedded Web server (HP EWS), if applicable, and then make sure to save these settings:
    note:
    Setting options in the HP EWS will vary depending on the HP product model.
    • eSCL, SOAP, REST, and Secure WebScan.
    • Scan from a computer or mobile device.
    • Enable Remote User Auto Capture.

Step two: Set up the app on your device

Make sure to review the requirements, and then follow these steps to set up the app on your device:
  1. Depending on your operating system, download and install the HP JetAdvantage Capture app.
    note:
    You might require to sign in using your Google or Apple account.
  2. Create an HP JetAdvantage Capture account to save scanned files to a cloud destination.
    1. On the Home screen of the HP JetAdvantage Capture app, select the menu icon.
    2. Select Account from the menu list.
    3. Select Create an Account.
    4. Type the required information in the text boxes and make sure to complete the account creation.
      Figure : Information required to create an account
      Information required to create an account
    5. Click SIGN UP to generate a verification email.
      Figure : SIGN UP button to create an account
      SIGN UP button to create an account
    6. Type your verification code and click Submit.
      An account will be created to use for Scan to Cloud destinations and to log into the HP JetAdvantage Capture app.
      Figure : Submit the verification code to create an account
      Submit the verification code to create an account

Step three: Scan documents or capture images

After installing the HP JetAdvantage Capture app, use one of the following options:
  • Option one: Scan documents from an HP Multifunction Printer (MFP) or HP ScanJet Scanner
  • Option two: Capture images from a mobile device

Option one: Scan documents from an HP MFP or HP scanner

note:
Make sure that your HP printer or scanner (HP product) is turned on and is connected to the same wireless network as the mobile device or Windows 10.
  1. Depending on the printer or scanner, load pages in the automatic document feeder (ADF), or place a page or photo in the scanner glass according to the guides of the HP model for scanning.
  2. On the Home screen of the app, tap or select Simple Scan.
  3. Tap or select the HP product for scanning.
  4. Select one of the following printer options for scanning:
    • Use for just this scan: To use the selected printer or scanner for the current scan job.
    • Always use with this shortcut: To always use the selected printer or scanner for the Simple Scan shortcut.
    • Cancel: To cancel the current scan job.
Figure : Options for scanning
Options for scanning
A dialog box displays Scanning page (number of pages) on the device, and then the scanned document displays as a thumbnail page.
Figure : Scanning page
Scanning page

Option two: Use Simple Capture images from a mobile device

note:
Simple Capture will only display if a camera is available on your mobile device or computer/laptop/tablet.
  1. On the Home screen of the app, tap or select Simple Capture.
  2. Capture an image using the camera on a mobile device or connected to a computer/laptop/tablet.
    A few messages will display when acquiring the image.
    Figure : Messages displayed when capturing an image
  3. Adjust the corners of the image captured, and then tap or click the checkmark icon.
    A message "Enhancing document quality" displays on the image captured.
    Figure : Adjusting document corners
    Adjusting document corners

Step four: Modify an image file

  1. Tap or select one of the following icons located on the bottom of the device screen to edit or save a thumbnail image:
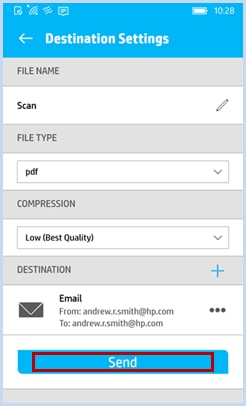
    • To change the settings on the Job settings screen.
      Tap or select the Destination section, and then modify any of the following options:
      • File Name: Click the file name to change the default name.
      • File Type: Select a file type from the drop-down list.
      • Compression: Select a compression type from the drop-down list.
      • Destination: Click the plus icon to select another cloud destination to save your file.
    • To rotate or delete a selected image.
    • To share a scan with other apps (Mail, for example) installed on a mobile or Windows 10 device.
    • To add another image.
    • To save an image on a Windows device.
  2. If desired, to deskew an image, tap or select the image file, tap or select the Deskew icon, use the slider to adjust the image, and then tap or click the checkmark icon
    Figure : Deskew feature
  3. Tap or click the back arrow , and when the dialog box displays "Are you finished with these images?", tap or select either the "Yes" or "No" option.

Step five: Save your files to a cloud destination

note:
To access a cloud destination, make sure to set up an HP JetAdvantage Capture account.
  1. After modifying an image file, tap or click the Send icon.
  2. On the Add Destinations screen, select Email or OneDrive or any cloud destination (iCloud or Google Drive or Dropbox, for example).
    Figure : Add Destination
    Add Destination
  3. Use your HP JetAdvantage Capture account to sign-in to a cloud destination.
  4. Tap or click Send to send the file to the selected destination.
    If desired, modify the file settings.
    Figure : Destination Settings
    Destination Settings
  5. To save a new file to the latest saved settings and destination, tap or click Replay Simple Scan for scanned files or Replay Simple Capture for capturing image files.

Step six: Check the delivery status of a task

  1. On the Home screen, tap or select the menu icon.
  2. Select Delivery Status from the menu list.
  3. On the Job List section, select a job.
    The Job Details screen displays information of the completed scan and destination.
    Figure : Job Details
  4. To clear a job on the Delivery Status screen, tap or click Clear Completed Jobs.

Step seven: Log out of the HP Capture account

  1. On the Home screen, tap or select the menu icon.
  2. Select Account from the menu list.
  3. Select the Log Out of My Account option.