Follow the instructions below to replace the cartridges.
HP Deskjet F4100 All-in-One Series Printers - Replacing the Cartridges
Introduction
Replacing the cartridges
Watch the video or use the following steps to learn how to replace the print cartridges.
Video of replacing a print cartridge
The following video demonstrates steps for replacing a cartridge.
note:This video shows the HP Deskjet F4180 printer. The outside of the printer might not look the same as your printer, but the steps are the same.
Replacing a Cartridge - HP Deskjet F4180 All-in-One Printer
Learn how to replace a cartridge in the HP Deskjet F4135, F4140, F4172, F4180, F4185, or F4190 All-in-One printer. The model shown is the HP Deskjet F4180 All-in-One printer.
If you have trouble viewing the video or to the view the video in a different size, click here to play the video on YouTube.
Step one: Remove the cartridges
-
Make sure that the product is turned on. Press the On button to turn it on. The On button is lit when the productis on.
caution:
If the product is off when the cartridgedoor is opened to access the cartridges, the product does notrelease the cartridges for changing. The productmight be damaged if the cartridges are not docked safely in the center when they are removed. -
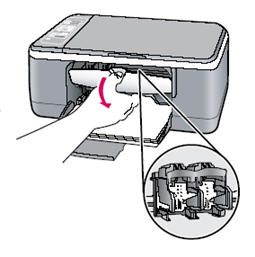
Open the cartridge door.The carriage moves to the center of the product.Figure : Open the cartridge door
-
Wait until the carriage is idle and silent, and then lightly press down on acartridge to release it.
-
Remove the cartridge from theslot on the left to replace the tri-color cartridge.
-
Remove the cartridgefrom the slot on the right to replace the black cartridge.
-
Tri-color cartridge
-
Black cartridge
Figure : Cartridge locations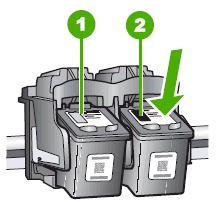
-
-
Pull the cartridge towards you out of its slot.
-
If the black cartridge is being removed in order to install the photo cartridge, store the black cartridge in the cartridge protector or anairtight plastic container.
-
If the cartridge is being removed because it is low or out of ink, recycle thecartridge. The HP Inkjet Supplies Recycling Program is available in manycountries/regions and allows you to recycle the used cartridges, free of charge.
-
Step two: Install the new cartridge
-
Remove the new cartridge from its packaging and, being careful to touchonly the black plastic, gently remove the plastic tape by using the pink pull tab.
-
Copper-colored contacts
-
Plastic tape with pink pull tab (must be removed before installing)
-
Ink nozzles under tape
Figure : Remove the tape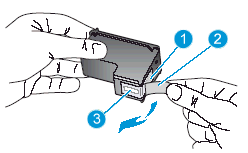
caution:
Do not touch the copper-colored contacts or the ink nozzles.Touching these parts can result in clogs, ink failure, and bad electricalconnections. Do not remove the copper strips. They are required electrical contacts.Figure : Do not touch the copper-colored contacts or the ink nozzles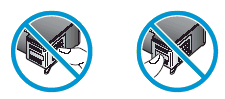
-
-
Insert the new cartridge forward into the empty slot.
-
To install a tri-color cartridge, insert it into the left slot.
-
To install a black cartridge, insert it into the right slot.
Figure : Insert the black cartridge
-
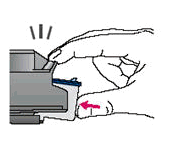
-
Press the cartridge firmly into its slot until it clicks.Figure : Press the cartridge firmly into its slot
caution:
When installing the cartridge, do not rest your hand on top of the product for leverage. This might cause the carriage to lift out of position.Figure : Do not grasp the top of the product for leverage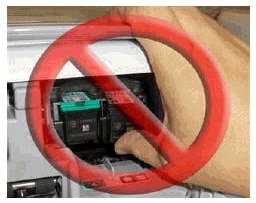
-
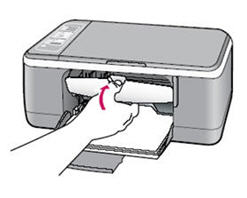
Close the cartridge access door.Figure : Close the cartridge access door
-
If a new cartridge has been installed, the cartridge alignment process starts.
-
Make sure that there is plain, unused, white, U.S. letter or A4 size paper loaded in the input tray, and then press OK.
-
The product aligns the cartridges. Recycle or discard the cartridge alignment sheet.
-
Press OK.
Enter a topic to search our knowledge library
What can we help you with?

Need Help?