This document is for HP Officejet Pro 8610, 8615, 8616, 8620, 8625, 8630, 8640, 8660 e-All-in-One printers.
HP Officejet Pro Printers - Control Panel Description
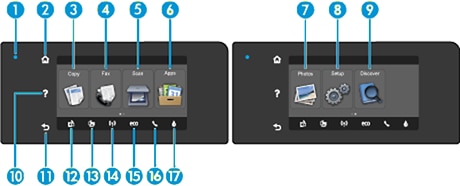
Control panel features
Swipe left or right to navigate the Home screen.
Figure : Control panel features
|
Feature
|
Description
|
|
1
|
Wireless status light: Solid blue light indicates the printer is connected to a wireless network.
|
|
2
|
Home: Returns to the Home screen from any other screen.
|
|
3
|
Copy: Opens a screen where you can select a copy type or change the copy settings.
|
|
4
|
Fax: Opens a screen where you can send a fax, or choose fax settings.
|
|
5
|
Scan: Opens the a screen where you can make a scan, or change scan settings.
|
|
6
|
Apps: Opens a screen where you can use print apps.
|
|
7
|
Photo: When a USB flash drive with photos is inserted into the USB port, it opens a screen where you can view and print photos, or reprint a printed photo.
|
|
8
|
Setup icon: Opens the Setup screen where you can setup or change primary printer settings, generate reports, change fax and other maintenance settings, and access printer tools.
|
|
9
|
Discover: Provides more information about the printer features.
|
|
10
|
Help: On the Home screen, shows all Help topics. On another screen, shows information or animation to assist in the current operation.
|
|
11
|
Back: Returns to the previous screen.
|
|
12
|
ePrint icon: Displays the Web Services Settings menu where you can check ePrint status details, change ePrint settings, or print Info Page.
|
|
13
|
Wireless Direct icon: Opens HP Wireless Direct Settings where you can turn wireless direct on (with or without security), turn wireless direct off, and display the wireless direct name and password (if turned on with security).
|
|
14
|
Wireless icon: Opens the Wireless Summary menu, where you can connect your printer to a wireless network using the Wireless Setup Wizard, check wireless status, and change wireless settings. You can also print a wireless test report, helping diagnose network connection issues.
note: |
|
15
|
eco icon: Opens the eco Settings menu where you can configure the product power saving settings features.
|
|
16
|
Fax Status icon: Opens the Fax Status menu where you can turn Auto Answer on or off, view Fax log, and change the volume of the fax sound.
|
|
17
|
Ink icon: Shows estimated ink levels by cartridge. Displays a warning or error symbol depending on the state of the cartridges.
|
 (Ethernet) and
  (Wireless) do not display at the same time. Showing the Ethernet icon or the wireless icon depends on the way your printer is connected to network. If the network connection of the printer has not been set up, by default, the printer control panel display shows
 Wireless status light
Figure : Wireless status light

|
Light status
|
Description
|
|
Off
|
|
|
Slow blinking
|
Wireless is connecting or is on but not connected to a network. If the connection cannot be established, make sure the printer is within the range of wireless signal. Use the Wireless Setup Wizard from the printer control panel display to set up wireless communication.
|
|
Fast blinking
|
A wireless error has occurred. Refer to the messages on the printer display.
|
|
On solid blue
|
Wireless connection has been established and you can print.
|
Enter a topic to search our knowledge library
What can we help you with?

Need Help?