solution Contentsolution Content

HP Officejet Pro 251dw, 276dw Printers - Wireless Printer Setup (Windows)

This document is for HP Officejet Pro 251dw and 276dw printers and Windows computers.
To set up an HP printer on a wireless (Wi-Fi) network, connect the printer to the network, then install the printer driver and software from the HP website. When prompted during the installation, select Wireless as the connection type.

Step 1: Gather the required network setup items

You must have the following items before you install the printer on the wireless network:
  1. Gather the following items:
    • Network name: The network name is the SSID (Service Set Identifier).
    • Network password: The password might also be called the WEP key or WPA security passphrase.
    • A computer connected to your wireless network
    • Internet access: HP recommends broadband Internet access such as cable or DSL for software downloads, using Web Services, and getting printer updates.
  2. Make sure the router and computer are turned on, and that the computer is connected to the same wireless network to which you want to connect the printer. Turn on the printer and place it close to the computer and within range of the router during the setup procedure.
  3. Disconnect any USB or Ethernet cables from the printer.

Step 2: Connect to the wireless network

The Wireless Setup Wizard provides an easy way to set up and manage the wireless connection toyour printer.
  1. On the printer control panel, touch the Right Arrow 
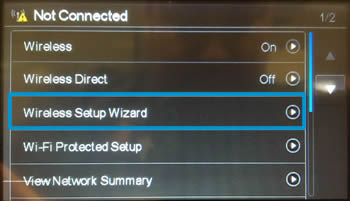
to display the second navigation screen.
  2. Touch the Setup icon .
  3. Touch Network, touch Wireless Setup Wizard, then touch Continue.
    Image: Touch Wireless Setup Wizard
  4. Touch the name of your network in the list of available networks, then touch OK.
    Image: Network names
  5. If the list does not contain your network name, touch Enter New Network Name, then follow the on-screen instructions to enter your network name.
  6. If prompted, type the WEP or WPA key (network password).
    note:
    If a connection error message displays, make sure you typed the uppercase (capital) and lowercase (small) letters for the network name and password exactly. Follow the prompts to type the information again.

Step 3: Install the driver

Complete the wireless network connection setup through the HP software installation.
note:
As an alternative method to downloading the software, you can use the installation CD.
  1. Turn on the printer.
  2. Disconnect the USB cable from the printer, if necessary. The software installation prompts you to connect the cable if needed.
  3. If a Let's identify your product to get started page displays, click Printer, type your printer model number, and then click Submit.
  4. If you need to change the operating system, click Change, select your version, and then click Change.
  5. Under the Driver heading, click Download for the full software package, or click Basic Drivers for other driver options.

Frequently asked questions

Review these frequently asked questions on setting up the wireless network connection.