When you try to print, scan, fax, or copy, more than one page at a time feeds through the printer.
HP Officejet Pro 8600 e-All-in-One Printers (N911) - More Than One Page at a Time Feeds through the Printer
Issue
If your issue is limited to the automatic document feeder (ADF), see the solution to clean the ADF first.
Video of fixing paper feed issues
The following video demonstrates what to do if the printer does not pick up or feed paper.

If you have trouble viewing the video or to view the video in a different size, click here to play the video on YouTube.
Solution one: Check the condition of the paper, and then reload it
Paper feed issues might result from dusty, torn, wrinkled, wet, or folded paper in the tray. The quality of the paper can also make a difference. Use only good quality paper that meets the printer specifications. Follow these steps to check the condition of the paper.
Check the condition of the paper - U.S. Letter or A4
Follow these steps to check the condition of the paper.
Step one: Check the condition of the paper
Follow these steps to check the condition of the paper.
-
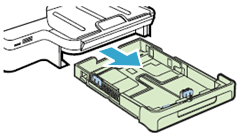
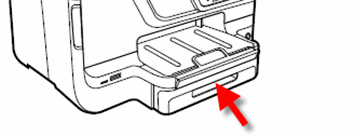
Grasp the handle on the front of the input tray, and then pull the tray towards you to open it.Figure : Pulling out the input tray
-
Remove the stack of paper from the tray.
-
Inspect the paper tray and remove any obstructions such as torn paper, foam packaging materials, or tape packaging materials. Use a flashlight to view the mechanism inside the tray to make sure that nothing blocks the paper from engaging with the rollers. Even small pieces of paper can cause paper feed issues. If you find obstructions in the paper path, skip to the section on cleaning the rollers.
-
Examine the condition of the paper, and then replace any ripped, dusty, curled, wrinkled, or bent paper.
-
Make sure that all the paper in the stack is the same size and type. Never load mixed types of paper in the tray. The printer can only process one type of paper at a time.
-
Tap the stack of paper on a flat surface to align the edges.
-
Make sure that the stack of paper contains no fewer than 10 sheets and no more than 25 sheets of paper.
note:
You need to use 10 to 25 sheets of paper only for purposes of these troubleshooting steps. When the issue is resolved, you can resume loading paper according to the paper tray capacity specifications for your printer. -
Slide the input tray back into the printer to close it.
-
If your printer includes Tray 2 as an optional accessory, repeat these steps for Tray 2.Figure : Tray 2
Step two: Reload the paper
Choose from the following options to reload paper into the printer paper trays.
Option one: Reload paper into Tray 1
-
Grasp the handle on the front of the input tray, and then pull the tray toward you to open it.Figure : Pulling out the input tray
-
Slide the paper width guides out as far as possible.
-
Remove all paper from the paper tray.
-
Hold a stack of unused, U.S. Letter or A4 plain white paper, and then tap the bottom edge on a flat surface so that the stack is even on all sides.
-
With the input tray removed from the printer, insert the stack of unused paper (with the print-side down) in the center of the tray.
note:
Only load plain, unused paper. Do not mix different types of paper in the input tray. Do not use paper with paper clips or staples attached. Do not use paper that is bent, torn, dusty, damp, wrinkled, curled, or paper that does not lie flat. -
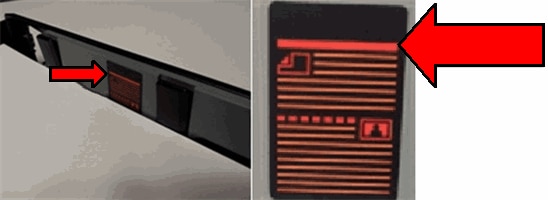
Make sure that the paper height does not go above the solid red lines on the sides of the tray.Figure : Paper fill guide
-
Adjust the paper width guides so that they rest against the edges of the paper.
-
Paper width guide
-
Paper fill guide
-
Paper length guide
Figure : Input tray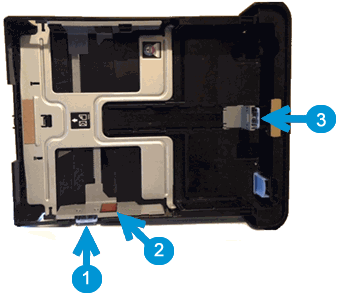
-
-
If the input tray is extended to allow for longer paper, set the paper length guide so that it secures the paper toward the end of the tray and can touch the pick roller.
-
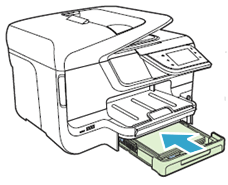
Carefully reinsert the tray into the printer, and then push the tray forward to close it.
-
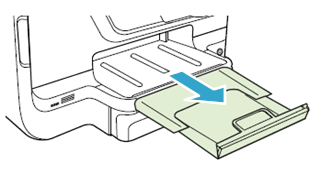
Pull out the tray extender on the output tray.Figure : Pulling out the tray extender on the output tray
Option two: Reload paper into Tray 2
note:If your printer does not include Tray 2 as an optional accessory, skip this step.
-
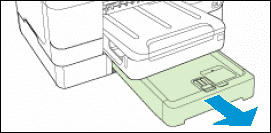
Grasp the underside of the tray, and then pull out the tray from the bottom of the printer.Figure : Pulling out Tray 2
-
Slide the paper width guides out as far as possible.
-
Remove all paper from the paper tray.
-
Hold a stack of unused, U.S. Letter or A4 plain white paper, and then tap the bottom edge on a flat surface so that the stack is even on all sides.
-
With the input tray removed from the printer, insert the stack of unused paper (with the print-side down) in the center of the tray.
note:
Tray 2 supports only U.S. Letter or A4 plain white paper. Do not use paper with paper clips or staples attached. Do not use paper that is bent, torn, dusty, damp, wrinkled, curled, or paper that does not lie flat. -
Make sure that the paper height does not go above the solid red lines on the sides of the tray.Figure : Paper fill guide
-
Adjust the paper width guides so that they rest against the edges of the paper.
-
Paper width guide
-
Paper fill guide
-
Paper length guide
Figure : Input tray
-
-
Carefully reinsert the tray into the printer, and then push the tray forward to close it.
-
Pull out the tray extender on the output tray.Figure : Pulling out the paper tray extender
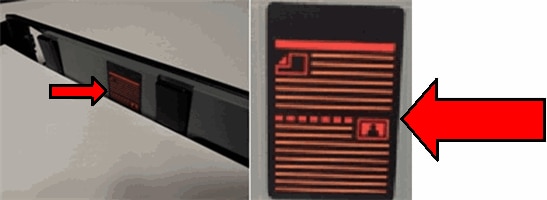
Step three: Print a Printer Status Report
Print a test page to make sure that the printer hardware functions properly.
-
Load U.S. Letter or A4 size, unused, plain white paper into the input tray.
-
On the control panel, touch the Right Arrow (
 ).
).
-
Touch Setup (
 ).
).
-
Touch the Down Arrow (
 ) to scroll to Reports.
-
Touch Reports, and then touch Printer Status Report. The Printer Status Report prints.
If your printer includes Tray 2 as an optional accessory, repeat these steps for Tray 2.
-
If these steps resolved the issue, you do not need to continue troubleshooting.
-
If the issue persists, continue to the next solution.
Check the condition of the paper - Specialty paper
Follow these steps if you are trying to print on specialty paper such as card stock, envelopes, photo paper, or labels.
Step one: Check the condition of the specialty paper
Follow these steps to check the condition of the specialty paper.
note:You can print specialty paper only from Tray 1. If your printer has the optional accessory Tray 2, specialty media cannot be printed from it.
-
Grasp the handle on the front of the input tray, and then pull the tray towards you to open it.Figure : Pulling out the input tray
-
Remove the stack of paper from the tray.
-
Inspect the paper tray and remove any obstructions such as torn paper, foam packaging materials, or tape packaging materials. Use a flashlight to view the mechanism inside the tray to make sure that nothing blocks the paper from engaging with the rollers. Even small pieces of paper can cause paper feed issues. If you find obstructions in the paper path, skip to the section on cleaning the rollers.
-
Examine the condition of the paper, and then replace any ripped, dusty, curled, wrinkled, or bent paper.
-
Make sure that all the paper in the stack is the same size and type. Never load mixed types of paper in the tray. The printer can only process one type of paper at a time.
-
Tap the stack of paper on a flat surface to align the edges.
Step two: Reload the specialty paper into Tray 1
-
Slide the paper width guides out as far as possible.
-
Load the stack of paper in the center of the tray, with the print side down and the short edge forward.
-
If you are loading photo paper, load the paper print side down and the short edge forward.
-
If you are loading envelopes, load the envelope flap side up, with the flap pointing to the right.Figure : How to load envelopes

-
-
Make sure that the paper height does not go above the dotted red lines on the sides of the tray.Figure : Paper fill guide
-
Adjust the paper width guides so that they rest against the edges of the paper.
-
Paper width guide
-
Paper fill guide
-
Paper length guide
Figure : Input tray
-
-
Carefully reinsert the tray into the printer, and then push the tray forward to close it.
-
Pull out the tray extender on the output tray.Figure : Pulling out the tray extender on the output tray
Step three: Print a test page
Try printing on the specialty paper again to make sure that the printer hardware functions properly.
-
If these steps resolved the issue, you do not need to continue troubleshooting.
-
If the issue persists, continue to the next solution.
Solution two: Clean the paper rollers
Dust, paper fiber, and other debris might accumulate on the paper feed rollers and cause paper feed issues. Follow these steps to clean the rollers inside the printer and in the duplexer.
Step one: Clean the pick roller
-
Gather the following cleaning materials:
-
A clean, lint-free cloth, or any cloth that will not come apart or leave fibers
-
Distilled, filtered, or bottled water (tap water might damage the printer)
-
-
Press the Power button to turn off the printer.
-
Disconnect the power cord from the rear of the printer.
-
Unplug the power cord from the electrical outlet.
-
Disconnect any other cables attached to the printer.
-
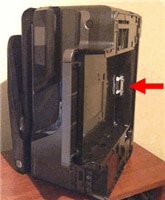
Place your fingers in the slot on the front of Tray 1.Figure : Slot on the front of Tray 1
-
Remove the tray from the printer by pulling it toward you.
-
Check for and remove any foreign objects that might have become lodged in the paper path, including any jammed or torn paper.
-
Lift the printer from the right side, and then place the printer on its left side.
-
Turn the printer so you see its underside, and then locate the pick roller.Figure : Locate the pick roller
-
Roll the pick roller to the right so that the rubber part faces you. This might require some force.
note:
The pick roller should rotate only to the right.Figure : The pick roller in its normal position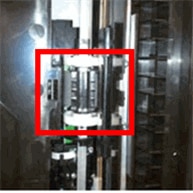 Figure : The rubber part of the pick roller
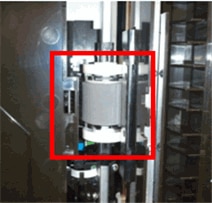
-
Lightly dampen a clean, lint-free cloth with bottled or distilled water, and then squeeze any excess liquid from the cloth.
-
Press the cloth against the rubber part of the roller, and then rotate the roller to the right with your fingers. Apply a moderate amount of pressure to remove any dust or dirt buildup.
-
Rotate the roller back to its original position.Figure : The pick roller in its original position
-
Use a flashlight to thoroughly check for torn pieces of paper or debris that might remain inside the printer. If any torn pieces of paper or debris remain inside the printer, more paper feed problems are likely to occur.
-
Turn the printer back around so that the control panel faces you.
-
Place the printer its normal position.
-
Reinstall Tray 1.Figure : Reinstalling Tray 1
-
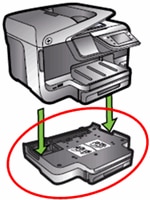
If you use Tray 2, lift the printer, and then place it on Tray 2.Figure : Placing the printer on Tray 2

Step two: Check the rollers in the duplexer
-
Push in the buttons on both sides of the duplexer, and then pull out to remove the duplexer.
note:
Your printer might look slightly different than the one pictured, but the steps are the same.-
Press the buttons on the sides of the duplexer
-
Pull the duplexer out of the printer
Figure : Removing the duplexer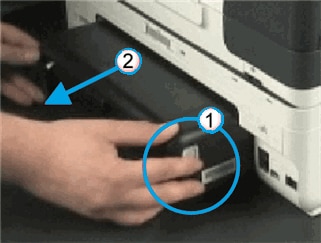
-
-
Use a flashlight to thoroughly check for jammed or torn pieces of paper that might remain inside the printer. If any jammed or torn pieces of paper remain inside the printer, more paper feed problems are likely to occur.
-
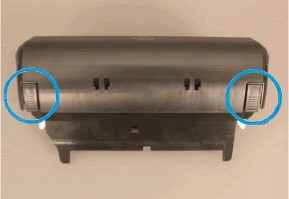
If you do not see jammed paper in the rear access area, press the tabs at the ends of the duplexer, and then lower the cover.Figure : Tabs at ends of duplexer
-
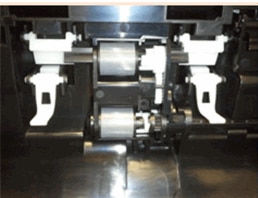
Check the rollers in the duplexer to make sure that they are clean, free of paper bits, and rotate freely.Figure : The rollers in the duplexer

-
Lightly dampen a clean, lint-free cloth with bottled or distilled water, and then squeeze any excess liquid from the cloth.
-
Press the cloth against the roller, and then rotate the roller with your fingers. Apply a moderate amount of pressure to remove any dust or dirt buildup. Repeat this step for each roller.
-
Allow the rollers in the duplexer to dry for 10 or 15 minutes.
-
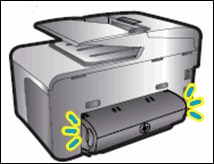
Close the duplexer cover, and then reinsert the duplexer into the rear access area of the printer.Figure : Inserting the duplexer

-
Push the duplexer in until it clicks into place.Figure : The duplexer snapping into place
-
Reconnect the power cord to the rear of the printer.
-
Press the Power button to turn on the printer.
Step three: Print a Printer Status Report
Print a test page to make sure that the printer hardware functions properly.
How do I print a test page?
-
Load U.S. Letter or A4 size, unused, plain white paper into the input tray.
-
On the control panel, touch the Right Arrow ().
-
Touch Setup ().
-
Touch the Down Arrow () to scroll to Reports.
-
Touch Reports, and then touch Printer Status Report. The Printer Status Report prints.
-
If these steps resolved the issue, you do not need to continue troubleshooting.
-
If the issue persists, continue to the next solution.
Solution three: Clean the automatic document feeder (ADF)
If the printer picks up more than one sheet of paper from the ADF, clean the rollers and the separator pad in the ADF.
Step one: Clean the separator pad and rollers
-
Gather the following materials:
-
A clean, lint-free cloth, or any cloth that will not come apart or leave fibers
-
Distilled, filtered, or bottled water (tap water might damage the printer)
-
-
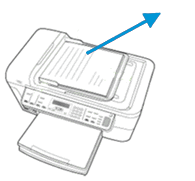
Remove any documents from the document feeder tray.Figure : Remove any documents from the ADF
-
Press the Power button to turn off the printer.
-
Disconnect the power cord from the rear of the printer.
-
Lift the cover of the ADF until it stops.
-
The ADF cover
-
The ADF rollers
-
The ADF separator pad
Figure : Lift the ADF cover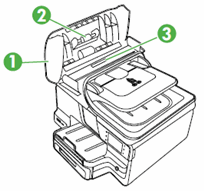
-
-
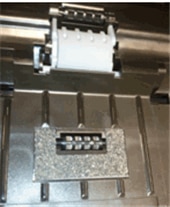
Find the separator pad.Figure : The ADF separator pad
-
Lightly dampen a clean lint-free cloth with distilled or bottled water, and then squeeze any excess liquid from the cloth.
-
Use the damp cloth to wipe any residue off the separator pad.
-
Find the ADF rollers.Figure : The ADF rollers
-
Use the damp cloth to wipe any residue off the rollers.
-
Dry the rollers and separator pad with a clean, dry, lint-free cloth.
-
Allow the rollers on the ADF to dry for 10 or 15 minutes.
-
Close the ADF cover.
-
Reconnect the power cord to the rear of the printer.
-
Press the Power button to turn on the printer.
Step two: Make a copy using the ADF
-
Load several sheets of the original document print-side up in the ADF.
-
On the printer control panel, touch Copy (
 ).
).
-
Touch Start Black to pull the pages through the ADF.
-
If these steps resolved the issue, you do not need to continue troubleshooting.
-
If the issue persists, continue to the next solution.
Solution four: Service the printer
Service or replace your HP product if the issue persists after completing all the preceding steps.
Go to Contact HP Customer Support to schedule a product repair or replacement. If you are in Asia Pacific, you will be directed to a local service center in your area.
To confirm your warranty status, go to HP Product Warranty Check. Repair fees might apply for out-of-warranty products.
Enter a topic to search our knowledge library
What can we help you with?

Need Help?