This document is for the HP Officejet Pro 8500 All-in-One printers (A909).
Fixing Print Quality Problems for the HP Officejet Pro 8500 All-in-One Printer Series (A909)
The quality of a printed document or photo is not as expected. The procedures in this document should help with streaked or faded printouts, color or black ink not printing, documents with blurred or fuzzy text, ink streaks or smears, and other print quality problems.
Solution one: Use genuine HP cartridges
HP recommends that you use genuine HP ink or toner supplies. HP cannot guarantee the quality or reliability of non-HP or refilled cartridges. If you do not use genuine HP cartridges, the steps in this document might not resolve the issue. To check the authenticity of your cartridges, go to the HP anti-counterfeit webpage (in English).
Purchase replacement cartridges and other supplies from the HP Store or local retailers.
Solution two: Check the paper
note:To purchase paper in the United States and Canada, go to the HP Store.
Use the following guidelines to make sure that the paper you are using is appropriate for the print job. If it is not, reload the product with an appropriate paper type.
-
HP papers, inks, and printers are designed to work together. Many non-HP media could be incompatible with HP inks and printing systems.
-
Use the correct paper type for your project:
-
For everyday text documents, plain paper with ColorLok technology works well.
-
For documents with dense printing, such as high contrast graphics or photographs, use HP Advanced Photo Paper for the best results.
-
-
Load the paper print side down in the input tray. Many papers have printing and nonprinting sides.
-
Do not use wrinkled or curled paper. Load only clean, wrinkle-free paper into the product.
-
Store photo paper in its original packaging inside a resealable plastic bag. Store the paper on a flat surface in a cool, dry place. Load photo paper only when you are ready to print, and then put the unused paper back in the packaging.
-
Try using a different paper. Paper that does not accept ink well is also prone to print defects. HP designs ink and paper to work together.
-
Some media may not absorb ink as well as others. If your prints smear easily, make sure you are using a recommended paper.
Figure : Plain paper with ColorLok technology is recommended for text printing

|
Figure : Horizontal streaks in printout
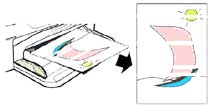
Continue with the following troubleshooting steps if your printout contains horizontal streaks, or other print-quality issues besides vertical streaks.
|
Figure : Vertical streaks in printout
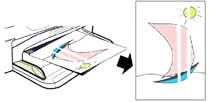
Do not replace cartridges or printheads for vertical streaks in a printout. Instead, check the paper as described earlier in this document, or search for a document that covers this issue. Vertical streaks in copies can often be fixed by cleaning the scanner glass.
|
Solution three: Check the print settings
Check the print settings to make sure that they are appropriate for your print job.
Windows
This video shows how to check the print settings on the HP Officejet Pro 8500A printer

Replacing a Cartridge - HP Photosmart 5520 e-All-in-One Printer
Learn how to replace a cartridge in the HP Photosmart 5520 e-All-in-One Printer.
Follow these steps to check the print settings for your print job.
-
In the software program you are trying to print from, click File and then click Print.The Print dialog box opens.
-
Select your product, and then click Properties.The printer Properties dialog box opens.
-
Click the Printing shortcuts tab.
-
Under Printing shortcuts, click the type of job you are trying to print.
-
Review the following options, and then make any necessary changes.
-
Paper size: Make sure that the selected option matches your paper size.
-
Paper type: If one of the options matches your paper type exactly, select that option.
-
Print quality: If you are not satisfied with your printed page quality, or want more densely printed prints, increase the print quality. To print more quickly, or for lighter prints, decrease the print quality.
-
-
Click the Features tab.
-
Check the Print in Grayscale setting
-
If you are trying to print in color, select Color Options, and then make sure that Print in Grayscale is not selected.
-
If you are printing a black and white image, select Print in Grayscale to fix streaking in black areas.
-
-
Click OK, and then click OK again to start the print job.
Solution four: Print and evaluate a Print Quality Diagnostics Page
The Print Quality Diagnostics Page can help determine if the printer needs to be aligned or if the printheads need to be cleaned or if the linefeed needs to be calibrated.
Step one: Print the Print Quality Diagnostics Page
Use the following steps to print a quality diagnostics page using the printer control panel.
-
Load plain white paper into the input tray.
-
Press the Setup button.
-
Select Print Report.
-
Select Print Quality Page.
-
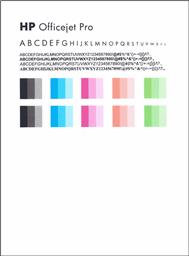
Press OK.Figure : Print Quality Diagnostics Page

If the patterns on the test page are streaked or are missing some portions, follow these steps to check the ink supply tubing:
-
Open the product lid. The carriage moves to the left side of the product.If the carriage does not move to the left side, press and hold the OK button until the carriage moves. Wait until the carriage is idle and silent.
-
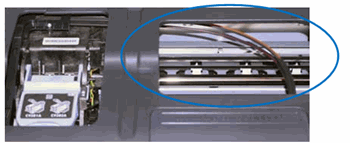
Look in the center of the product for the four ink tubes that connect to the printhead, and then examine the ink tubes. The ink tubes should be bundled neatly, and they should not appear kinked or bent.Figure : Ink tubes, correctly bundled and not kinked
-
If the ink tubes are bundled correctly and are not kinked, continue to the next step.
-
If the ink tubes are bundled incorrectly but do not appear to be kinked, service the product. You do not need to replace the printheads.
note:
Incorrect bundling of the ink tubes does not directly cause print quality problems, but it is an issue that must be corrected. When the product has been serviced, continue troubleshooting with the next step in this document. -
If the ink tubes are bundled incorrectly and are kinked, skip to the solution to service the printer. When the product has been serviced, replace the printhead associated with the kinked tubes:
-
If the black or yellow tube is kinked, replace the black and yellow printhead.
-
If the magenta or cyan tube is kinked, replace the magenta and cyan printhead.
-
Step two: Examine Test Pattern 1
Evaluate Test Pattern 1 to make sure that the lines are straight and connected.
Figure : Test Pattern 1

-
If the lines in Test Pattern 1 are straight and connected, skip to the step to examine Test Pattern 2.
-
If the lines in Test Pattern 1 are not straight and connected, continue with the steps to align the printhead.
Step three: Use an automated tool to align the printhead
Follow these steps to align the printhead.
-
Load plain white paper into the input tray.
-
Press the Setup button.
-
Select Tools.
-
Select Align Printer.
-
Press OK. Press OK again when the alignment is done to continue.
- If the lines in the Test Pattern 1 are straight and connected, there is no need to continue.
-
If the lines in Test Pattern 1 are not straight and connected, skip to the solution to service the printer.
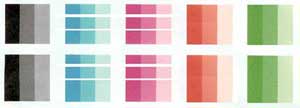
Step four: Examine Test Pattern 2
Examine the color blocks in Test Pattern 2 on the Print Quality Diagnostics Page.
Figure : White lines in Test Pattern 2
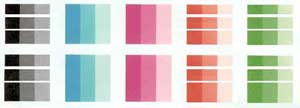
-
If there are white lines through ALL the color blocks and white lines through the gray blocks in Test Pattern 3, do not clean the printheads. Instead, skip to the step to examine Test Pattern 3.
-
If any of the color blocks in Test Pattern 2 show white lines or are faded or missing completely, continue with the steps to clean the printhead.
Step five: Use an automated tool to clean the printhead
Follow these steps to clean the printhead.
-
Load plain white paper into the input tray.
-
Press the Setup button.
-
Select Tools.
-
Select Clean Printhead.
-
Wait while the printer cleans the printhead.
-
A test page prints after the printhead is cleaned.Figure : Clean the printhead test page
-
If there are no defects on the page, then you do not need to continue.
-
If there are defects on the page, repeat the clean printhead steps.
-
If there are still defects on the page after the printhead has been cleaned a third time, skip to the solution to replace one or both printheads.
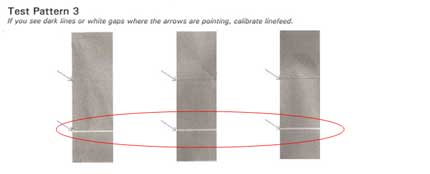
Step six: Examine Test Pattern 3
Examine the gray columns in Test Pattern 3.
Figure : Dark lines or white gaps in Test Pattern 3
-
If the grey blocks in Test Pattern 3 do not display dark lines or white gaps where the arrows are pointing, skip to the next solution to check the image.
-
If the grey blocks in Test Pattern 3 display dark lines or white gaps where the arrows are pointing, follow the steps to calibrate the linefeed.
Step seven: Use an automated tool to calibrate the linefeed
Follow these steps to calibrate the linefeed.
-
Load plain white paper into the input tray.
-
Press the Setup button.
-
Select Tools.
-
Select Calibrate Linefeed.
-
Press OK.
-
Print another Print Quality Diagnostic Page to see if the issue is resolved.
-
If there are no defects on the page, then you do not need to continue.
-
If there are dark lines or white gaps in Test Pattern 3, skip to the solution to service the printer.
Solution five: Check the image
If you see no defects on the print quality diagnostic report, the print mechanism and ink supplies are working correctly. There is no reason to clean, align or calibrate, or to replace printheads or ink cartridges. Instead, try these solutions:
-
Recheck the first steps in this document. Many non-HP media could be incompatible with HP inks and printing systems. HP cannot guarantee the quality of non-HP inks.
-
Make sure that the image you are printing has sufficient resolution. Images that have been enlarged too much might appear fuzzy or blurry.
-
If the problem is confined to a band near the edge of a printout, use the software you installed with the product, or another software program to rotate the image 180°. The problem might not appear on the other end of the printout.
|
Windows only: If you are experiencing garbled, jumbled or illogical text, incomplete printouts, or missing text or graphics, go to Continuous Pages of Strange or Garbled Characters Print in Windows (c01954177).
|
Solution six: Replace one or both printheads
If you have completed all of the troubleshooting steps and are still experiencing a problem, replace the printhead.
caution:Wait until you have a new printhead assembly available before you remove the cartridges. HP recommends that you do not leave the cartridges outside the printer longer than 30 minutes. This could damage both the printer and the cartridges.
Step one: Identify the printhead to replace
If you have a defective cartridge or printhead, it might be under warranty. To check the warranty on your ink or toner supplies, go to Printer and Page Yield Overview, and then review the limited warranty information for your supplies.
If, after repeated printhead cleaning, the Print Quality Diagnostic page shows white lines across the color blocks in Test Pattern 2 (but no white lines in the gray blocks in Test Pattern 3), one or both of the printheads will have to be replaced. The Print Quality Diagnostic page shows which printhead should be replaced.
Look at the color blocks labeled Test Pattern 2. Some of them should show white horizontal streaks (if none of the blocks are streaked, the printheads are okay).
|
Figure : Streaked black, red, or green color blocks - replace Black/Yellow Printhead
|
|
Figure : Streaked cyan or magenta color blocks - replace Cyan/Magenta Printhead
|
Step two: Replace the printhead
When you have the replacement printhead, go to How to Replace Printheads.
Solution seven: Service the printer
Service or replace your HP product if the issue persists after completing all the preceding steps.
Go to Contact HP Customer Support to schedule a product repair or replacement. If you are in Asia Pacific, you will be directed to a local service center in your area.
To confirm your warranty status, go to HP Product Warranty Check. Repair fees might apply for out-of-warranty products.
note:Keep a print sample that shows the problem. If the ink cartridges, printhead, or printer is replaced under warranty, the support agent will request the print sample. If the printer is returned to HP, the print sample must be returned with the printer. Place the sample in the output tray when you package your printer for shipping.
Enter a topic to search our knowledge library
What can we help you with?

Need Help?