This document explains how to set up the physical parts of the product. Complete these steps before you install the product software on your computer.
Setting Up the Printer Hardware for HP Officejet J4500, J4600, J4524, and J4624 All-in-One Printer Series
Introduction
This document includes the following steps to set up the printer:
-
Unpack the printer
-
Check the contents of the box
-
Connect the power cord and adapter
-
Turn the printer on
-
Select the language/region
-
Set the date and time
-
Load plain white paper
-
Install the cartridges
-
Align the cartridges
Setting up the printer
Follow these steps in order.
note:The HP Officejet J4680 and J4680c models have wireless connection capability and do not require a USB cable if you are using a wireless network.
Step one: Unpack the printer
-
Remove the tape and cardboard packaging from inside and around the printer.
-
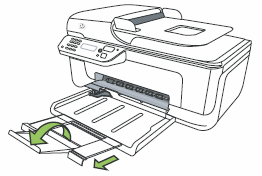
Attach the paper tray by inserting the pegs into the correct slots on the front of the printer.Figure : Attach the paper tray
-
Pull out and unfold the tray extender.Figure : Pull out the tray extender
Step two: Check the contents of the box
The contents might vary by country/region. See the packaging for a list of items shipped in the box.
note:The USB cable must be purchased separately. HP recommends using a USB 2.0 high-speed compliant cable that is 3 meters (10 feet) or less in length.
Step three: Connect the power cord and adapter
-
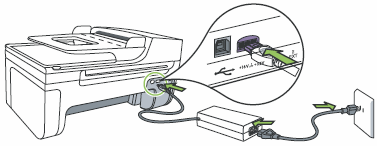
Connect the power cord to the rear of the printer.
-
Connect the power cord to the power supply.
-
Connect the power cord to the electrical outlet.Figure : Connect the power cord and adapter
Step four: Turn the printer on
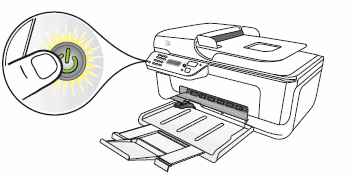
Press the Power button to turn the printer on.
Figure : Press the Power button
Step five: Select the language/region
After turning the printer on, the printer might prompt you to set the language and country/region.
If the default language and country/region settings are satisfactory, you can skip this step.
If you want to change the defaults, follow these steps.
-
Press the Left (
 ) or Right (
 ) Arrow button to select the correct language, and then press OK.
-
Use the numeric keypad to enter the two-digit code for the language, and then press 1 to confirm the selection.
-
Press the Left () or Right () Arrow button to select the correct country/region, and then press OK.
-
Use the numeric keypad to enter the two-digit code for the country/region, and then press 1 to confirm the selection.
Step six: Set the date and time
-
On the printer control panel, press Setup (
 ).
).
-
Press the Left () or Right () Arrow button to select Basic Setting, and then press OK.
-
Press the Left () or Right () Arrow button to select Date and Time, and then press OK.
-
After Enter date appears on the control panel display, use the keypad on the control panel to type the date in the correct two-digit format, MM-DD-YY (01-01-10). After entering the date, press OK.
-
After Enter time appears on the control panel display, use the keypad on the control panel to type the time in the correct two-digit format, HH:MM (10:15), and then press the Right () Arrow button to switch between AM and PM. After entering the time, press OK.
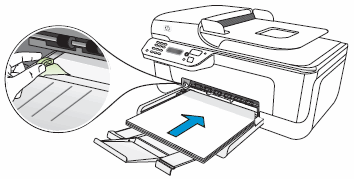
Step seven: Load plain paper
Follow these steps to load plain paper into the printer.
note:Load plain, white paper. Special media or colored paper will cause the cartridge alignment step to fail.
-
Slide the paper-width guide to its outermost position.
-
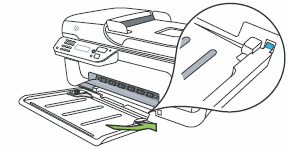
Insert the stack of paper print-side down along the right side of the paper tray.Make sure that the stack of paper aligns with the right and back edges of the tray, and fits below the line marking in the tray.Figure : Load plain paper
-
Slide the paper-width guide inward until it stops at the edge of the stack of paper.
Step eight: Install the cartridges
-
Remove the new cartridges from their packaging. Be careful to touch only the black plastic.
-
Gently remove the plastic tape by pulling the pink pull tab.
-
Copper-colored contacts
-
Plastic tape with pink pull tab (must be removed before installing)
-
Ink nozzles under tape
Figure : Remove the tape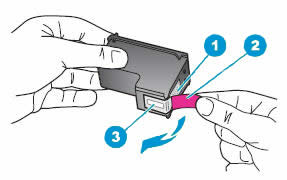
caution:
Do not touch the copper-colored contacts or the ink nozzles. Touching these parts can result in clogs, ink failure, and bad electrical connections.Figure : Do not touch the copper contacts or ink nozzles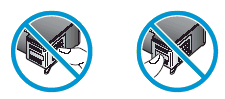
-
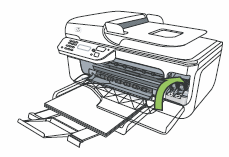
-
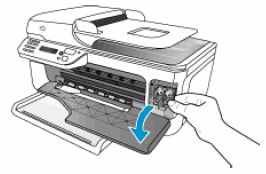
Open the front access door. The carriage moves to the far right side of the printer.Figure : Open the front access door
-
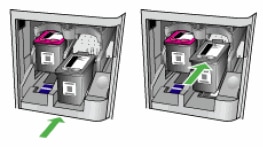
Hold the new cartridge so the HP logo is facing up, slide it at a slight upward angle into the empty slot, and push it until it snaps into place.
-
To install a tri-color cartridge, insert it into the left slot.
-
To install a black cartridge, insert it into the right slot.Figure : Insert the cartridges
-
-
Close the front access door.Figure : Close the front access door
Step nine: Align the cartridges
Follow these steps to align the cartridges by printing an alignment page for your printer.
Video of how to align the cartridges
The following video demonstrates how to print an alignment page.
note:This video shows the HP Officejet J4580 All-in-One printer. The outside of the printer might not look the same as your printer, but the steps are the same.

If you have trouble viewing the video or to view the video in a different size, click here to play the video on YouTube.
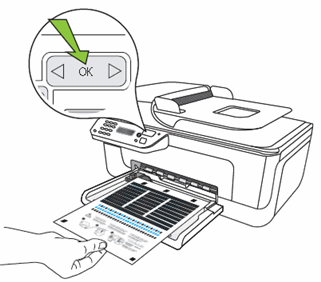
-
Make sure you have loaded plain, white paper in the main tray.
-
Press OK to print the alignment page.Figure : Print the alignment page
-
Load the alignment page print-side down on the scanner glass.Figure : Load the alignment page
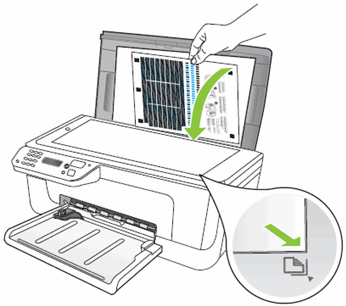
-
Close the scanner lid.
-
Press OK to scan the alignment page and complete the cartridge alignment.
-
Discard or recycle the alignment page.
Enter a topic to search our knowledge library
What can we help you with?

Need Help?