solution Contentsolution Content

HP Printers - Paper Jam Error

This document is for HP printers.
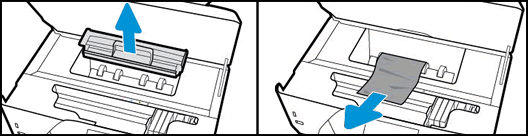
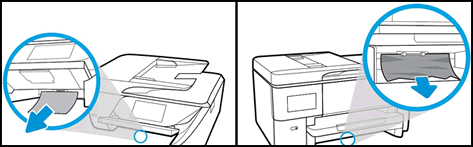
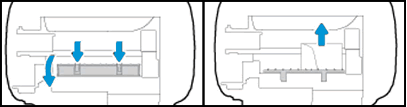
The printer stops feeding pages, and a Paper Jam, Jam in Fuser, or similar error displays.
note:
This document contains basic steps that work with a wide variety of printers. The images shown might not match your HP printer. For help with your specific printer, go to HP Customer Support and search for your HP printer name and paper jam.

Step 1: Clear a jam from the outside of the printer

Clear a paper jam from an external input tray, output tray, or automatic document feeder (ADF).
  1. Remove jammed paper from the following areas.
    • Input and output paper trays
      Look inside areas where the paper enters and exits the printer, and then remove any jammed paper.
      Example of clearing a jam from the paper trays
    • ADF
      Open the ADF cover, and then remove any jammed paper.
      Example of clearing a jam from the ADF
  2. Try to print. If the issue persists, continue to the next step.

Step 2: Clear a jam from the inside of the printer

Paper jams can occur inside the printer. Use a flashlight to check each area for torn paper or other debris.
  1. Turn off the printer.
  2. Disconnect the power cord and any other cable.
      warning:
    You must disconnect the power cord before reaching inside the printer to avoid risk of injuries or electric shock.
  3. Remove jammed paper from the following areas.
    • Ink or toner cartridge access area
      Open the access door, move the carriage if necessary, and then remove any jammed paper. On some Laserjet printers, you might need to remove the toner cartridge and/or imaging drum to access the paper jam.
      Examples of clearing a jam in the ink cartridge access area
    • Under the paper path cover
      If your printer has a paper path cover behind the carriage, remove the cover, and then remove any jammed paper.
      Example of removing the paper path cover and clearing a jam
    • Input tray
      Pull out the input tray, and then remove any jammed paper.
      Example of removing a jam from the input tray area
    • Bottom cleanout door
      If your printer has a bottom cleanout door, carefully lift the printer and look under it, and then remove any jammed paper from the bottom cleanout.
      Example of clearing jam from the bottom cleanout door
    • Rear access door
      Remove the paper path cover if necessary.
      Example of removing the paper path cover and clearing a rear door jam
  4. Replace any parts that were removed, and close any open doors.
  5. Reconnect the power cord, and other cables that were disconnected.
  6. Turn on the printer.
If the paper jam error persists, go to HP Customer Support and search for your HP printer name and paper jam for more detailed information.