solution Contentsolution Content

HP OfficeJet 6900 Printers - A 'Carriage Jam' Error Displays

This document is for HP OfficeJet 6950, 6951, 6954, 6956, 6958, 6962, OfficeJet Pro 6960, 6968, 6970, 6974, 6975, and 6978 All-in-One printers.
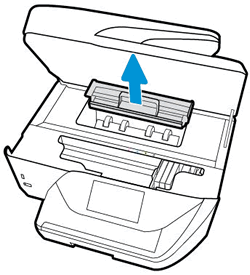
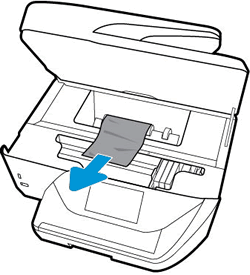
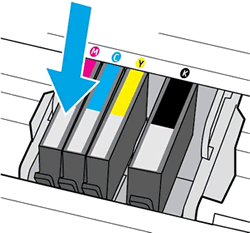
The carriage, which holds the ink cartridges, stalls in the printer and a Carriage Jam message displays on the printer control panel. A paper jam might have occurred previously.

Step 1: Clear any jammed paper

Paper jams can occur in multiple areas of the printer. If you cannot find the paper jam in one area, continue to the next area until the jam is located.

Step 2: Make sure the carriage can move freely

Make sure the carriage moves freely across the width of the printer.
  1. Turn on the printer, if it is not already on.
  2. Open the cartridge access door.
    Opening the ink cartridge access door
  3. Wait until the carriage is idle and silent before you continue.
  4. With the printer turned on, disconnect the power cord from the rear of the printer.
  5. Unplug the power cord from the power source or electrical outlet.
      warning:
    You must unplug the power cord to move the carriage by hand and reset the paper feed mechanism without the risk of electrical shock.
  6. Use a flashlight to check for any paper or objects that might be restricting the carriage, and then remove any paper or objects that you find.
      caution:
    If the paper tears when you remove it from the rollers, check the rollers and wheels for torn pieces of paper that might remain inside the printer. If pieces of paper remain in the printer, more paper jams can occur.
    Checking the rollers and wheels for pieces of paper
  7. Reach inside the printer through the ink cartridge access door, and then manually move the carriage.
    • If the carriage is stuck on the right side of the printer, move the carriage to the left side of the printer.
    • If the carriage is stuck on the left side of the printer, move the carriage to the right side of the printer.
    • If the carriage is stuck in the middle of the printer, move the carriage to the right side of the printer.
  8. Remove any loose paper or obstructions found.
  9. Make sure the carriage can move freely across the width of the printer. Firmly push the carriage to the left side of the printer, and then push it to the right side.
  10. Close the ink cartridge access door.
  11. Reconnect the power cord and any other cables to the rear of the printer, and then turn on the printer.
Try to print. If the error persists, continue to the next step.

Step 3: Make sure the ink cartridges are inserted correctly

Improper installation of the ink cartridges might cause the printer to indicate a carriage jam error.
  1. Turn on the printer.
  2. With the scanner lid closed, slip your fingers into the slot on the left side of the printer, and then lift to open the ink cartridge access door.
    Opening the cartridge access door
  3. Wait until the carriage is idle and silent before you proceed.
  4. Run your finger along the top of the ink cartridges to check for any unseated ink cartridges in the carriage. Press down on any ink cartridge that is higher than the others to firmly snap the ink cartridge into its slot.
    Pressing down on the cartridge to reinsert it
  5. If the ink cartridge does not snap into place, remove the ink cartridge from the carriage.
  6. Gently bend the tab away from the ink cartridge.
      caution:
    Be careful not to bend the tab out more than 1.27 cm (0.5 in). Moving the tab too far might damage the ink cartridge or cause the tab to break off.
      Bending the tab away from the ink cartridge
    1. Bend the tab away from the cartridge
    2. Do not bend the tab more than 1.27 cm (0.5 in)
  7. Reinsert the ink cartridge into the carriage until it snaps into place, and then close the ink cartridge access door.
Try to print. If the error persists, continue to the next step.

Step 4: Plug the printer directly into a wall outlet

Plug the printer directly into a wall outlet to make sure the power source is functioning correctly.
  1. Disconnect the power cord from the rear of the printer.
  2. Unplug the power cord from any power strips or surge suppressors.
  3. Plug the power cord directly into an electrical outlet.
  4. Reconnect the power cord to the rear of the printer.
  5. Turn on the printer.
Try to print. If the error persists, continue to the next step.

Step 5: Reset the printer

Resetting the printer can clear carriage jam errors.
  1. With the printer turned on, disconnect the power cord from the printer.
  2. Unplug the power cord from the power source.
  3. Wait 60 seconds.
  4. Reconnect the power cord to a wall outlet and to the printer.
    note:
    HP recommends plugging the printer directly into a wall outlet.
Try to print. If the error persists, continue to the next step.

Step 6: Service the printer

Service or replace your HP product if the issue persists after completing all the preceding steps.
Go to Contact HP Customer Support to schedule a product repair or replacement. If you are in Asia Pacific, you will be directed to a local service center in your area.
To confirm your warranty status, go to HP Product Warranty Check. Repair fees might apply for out-of-warranty products.