To prevent print quality issues, replace the cartridges when they are low or out of ink.
Replacing Cartridges for HP Deskjet F4200 All-in-One Series Printers
Introduction
Video of replacing cartridges
View the video or choose one of the following topics to learn how to replace a cartridge.
The following video demonstrates how to replace a cartridge.
note:This video shows the HP Deskjet F4200 printer. The outside of the printer might not look the same as your printer, but the steps are the same.

Replacing a Cartridge - HP Deskjet F4200 All-in-One Printer
Learn how to replace a cartridge in the HP Deskjet F4210, F4213, F4235, F4240, F4272, F4275, F4280, F4283, or F4288 All-in-One printer. The model shown is the HP Deskjet F4280 All-in-One printer.
If you have trouble viewing the video or to view the video in a different size, click here to play the video on YouTube.
Replacing cartridges
Use the following steps to replace the cartridges.
Step one: Prepare the cartridge
Use the following steps to prepare the cartridge for use in the product.
-
Remove the new cartridge from its packaging. Be careful to touch only the black plastic.
-
Gently remove the plastic tape by pulling the pink pull tab.
-
Copper-colored contacts
-
Plastic tape with pink pull tab (must be removed before installing)
-
Ink nozzles under tape
Figure : Remove the tape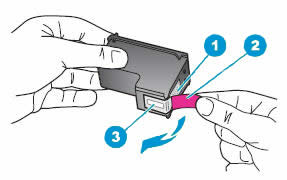
note:
Do not touch the copper-colored contacts or the ink nozzles.Touching these parts can result in clogs, ink failure, and bad electricalconnections.Figure : Do not touch the contacts or ink nozzles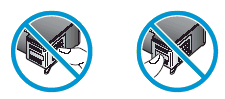
-
Step two: Replace the old cartridge
Use the following steps to replace the old cartridge. Make sure that paper is loaded correctly in the product before beginning the procedure.
-
Press the power button (
 ) to turn on the product.
caution:
If the product is off when the cartridgedoor is opened, the product will notrelease the cartridges. -
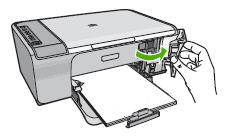
Open the cartridge door.The carriage moves to the far right side of the product. If the carriage does not move to the right side, turn the product off, and then turn it on again.Figure : Open the cartridge door
-
Wait until the carriage is idle and silent, and then lightly press down on an cartridge to release it.
-
Remove the cartridge from theslot on the left to replace the tri-color cartridge.
-
Remove the cartridgefrom the slot on the right to replace the black cartridge.
-
-
Pull the cartridge toward you out of its slot.
note:
If the cartridge is being removed because it is low or out of ink, recycle it. The HP Inkjet Supplies Recycling Program is available in manyregions and is free of charge. -
Slide the new cartridge at a slight upward angle into the empty slot.
-
To install a tri-color cartridge, insert it into the left slot.
-
To install a black cartridge, insert it into the right slot.
Figure : Insert the tri-color cartridge
-
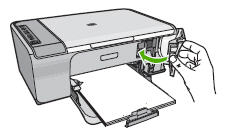
-
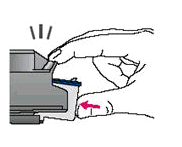
Press the cartridge firmly into the slot until it clicks into place.Figure : Press the cartridge in firmly
caution:
When installing the cartridge and pressing it into the slot, do not rest your hand on top of the product for leverage. This might cause the carriage to lift out of position.Figure : Do not grasp the top of the product for leverage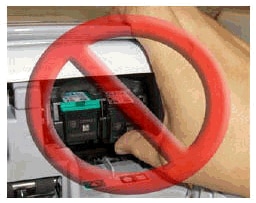
-
Close the cartridge door.Figure : Close the cartridge door
Step three: Align the new cartridge
The product prints a cartridge alignment sheet when new cartridges are installed.
If the product did not automatically print a cartridge alignment sheet, use the first two steps in the following procedure to print one from HP Solution Center. Then complete the remaining steps using that alignment sheet to align the cartridges.
If the alignment sheet printed automatically, skip steps 1 and 2 of the following procedure, and continue with step 3.
-
Open HP Solution Center using one of the following methods.
-
Windows XP: On the Windows task bar, click Start, click All Programs, point to HP, and then click HP Solution Center.
-
Windows Vista: On the Windows task bar, click the Windows icon (
 ), click All Programs, point to HP, and then click HP Solution Center.
-
-
In HP Solution Center, click Settings, and then click Printer Toolbox. The printer Toolbox opens.
-
Click the Device Services tab, and then click Align the Print Cartridges. The product prints a cartridge alignment sheet.
caution:
Printing alignment sheets shortens the life of cartridges. Print them only when necessary. -
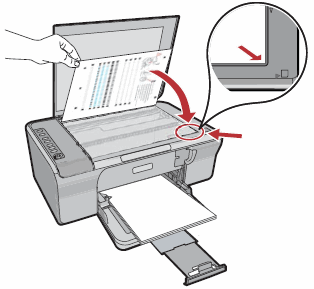
Lift the product lid.
-
Place the alignment sheet on the glass so the top of the sheet is on the right side with the text facing down. Make sure that the sheet is aligned with the right-front corner of the glass.Figure : Place the alignment sheet on the glass
-
Lower the product lid.
-
Press the Scan button (
 ) on the product control panel. The product aligns the cartridges.
-
Scan button
Figure : Press the Scan button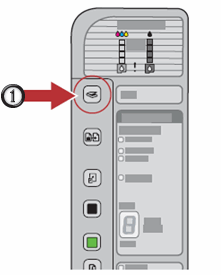
-
-
Recycle or otherwise discard the alignment sheet.
Enter a topic to search our knowledge library
What can we help you with?

Need Help?