solution Contentsolution Content

HP Deskjet 2540 and 2545 Printers - Wireless Printer Setup (Windows)

This document is for HP Deskjet 2540, Deskjet Ink Advantage 2545, 2546, and 2548 printers and Windows computers.
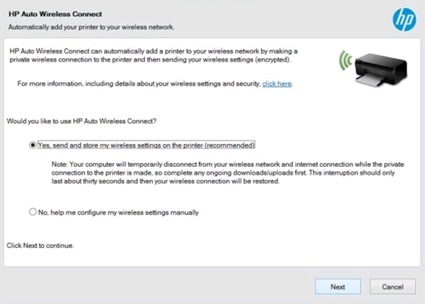
Set up your HP printer on a wireless (Wi-Fi) network. These steps apply to first time connections, new router or ISP setup, or to restore a lost connection.

Step 1: Prepare for installation

Check the requirements, turn on the computer and the router, and set up the printer.
  1. To use your printer on a wireless network, you need the following items:
    • A computer connected to your wireless network
    • Internet access: HP recommends broadband Internet access for software downloads, using Web Services, and getting printer updates.
  2. Make sure the router and computer are turned on.
  3. Make sure the computer is connected to the same wireless network that the printer is connected to.
  4. Set up the printer, load paper into the input tray, and install the toner cartridges. For more information about setting up the printer, go to First Time Printer Setup.
  5. Turn on the printer and place it within range of the router during the setup procedure.

Step 2: Start the software installation

On your computer, start the HP full feature print driver and software installation.
  1. Go to 123.hp.com/DJ2540 and click Download. The installation process begins automatically after the software downloads.
  2. During the installation, a connect window opens. STOP at the Connect window! Do not click Continue at this point.
    Example of the Connect screen. Do not click Continue at this point

Step 3: Restore default wireless settings on the printer

Reset the wireless settings to make sure the connection completes successfully.
  1. Make sure the printer is on.
  2. If the wireless light is blinking, skip to the next step to continue installing the software.
  3. Press and hold the Power button .
  4. While holding down the power button, press the Start Copy Black button two times, and then press the Cancel button three times.
  5. Release the power button. The wireless light next to the wireless button blinks. Repeat these steps if the wireless light does not blink.
  6. Continue to the next step to install the software. You have approximately 20 minutes to complete the software setup using the HP auto wireless connect feature.

Step 4: Continue the software installation

Install the software to finish setting up your HP printer and connect it to your wireless network.
  1. On the HP installation Connect window, click Continue.
  2. Follow the on-screen instructions until a Connection Options screen opens.
  3. On the Connection Options screen, select Wireless - make a wireless connection to the printer, then click Next.
    Example of the Wireless - make a wireless connection to the printer
  4. One of the following screens display with the best method to complete the wireless setup.
    • HP Auto Wireless Connect
      Click Yes, then click Next.
      Example of the HP Auto Wireless Connect screen
    • Wireless Setup Using a USB Connection
      Connect a USB cable from your computer to the printer and click Next. A prompt displays to disconnect the USB cable after the setup completes.
    If the installer does not find your printer, go to Printer Not Found During Network Driver Setup (Windows) for detailed troubleshooting steps.
  5. Continue following the on-screen instructions.

Frequently asked questions (FAQs)

Review these frequently asked questions on setting up the wireless network connection.