This document explains the purpose of monitor drivers, how to get them, and how to use them.
HP and Compaq Monitors - Updating a Monitor Driver
Find and install monitor drivers for Windows
Monitors that are Plug and Play compatible usually do not need a separate monitor driver for normal viewing because the Plug and Play process provides the display modes that the monitor and graphic adapter can produce. However, if a monitor driver is available, installing it can provide a wider range of display resolutions. If Windows allows only two resolutions (such as 640 x 480 and 800 x 600), or if the monitor's native display resolution is unavailable with Plug and Play, try to find and install a monitor driver. Updating the graphics adapter driver is equally important in the video system and should also be considered.
note:If the monitor has special features, such as a webcam or Auto Pivot, you might need extra software in addition to a monitor driver. For example, HP My Display, HP Display Assistant, or PivotPro software is necessary for Auto Pivot monitors. Install this software from the installation CD that came with the monitor or download the software from your HP monitor's support site.
Use the following steps to add or update the monitor driver files for Windows:
-
Use an installation disc:
-
If your HP or Compaq monitor came with an installation disc, insert the disc and follow the on-screen instructions. You are done.
-
If you do not have an installation disc, continue to the next step.
-
-
Check HP Customer Care to see if a driver is available for your HP or Compaq monitor:
-
Go to the Get software and drivers - Select your operating system page.
note:
If the main Get software and drivers page opens, type the exact model name of your HP or Compaq monitor in the field provided, and click Next. -
Click the name of the operating system on the computer.If the operating system is not listed, a driver is not available. Skip to Step 3.
-
Look through the list of available software updates and do one of the following:
-
If a monitor driver is available from the list, download and install the driver. You are done.
-
If a monitor driver is not available, download and install HP My Display or HP Display Assistant. You are done.
-
If a driver, HP My Display software, or HP Display Assistant software is not available, continue to the next step.
-
-
-
Open Device Manager:
-
In Windows 7 and Vista, click Start
 , type Device Manager in the search box, and select Device Manager from the menu.
If prompted with a User Account Control message, click Continue.
, type Device Manager in the search box, and select Device Manager from the menu.
If prompted with a User Account Control message, click Continue. -
In Windows XP, click Start, right-click My Computer, click Properties, click the Hardware tab, and then click Device Manager.
-
-
Click the plus sign (+) next to Monitors, and then double-click the name for the monitor (Generic PnP Monitor or similar).Figure : Generic PnP Monitor listing in Device Manager

-
Click the Driver tab, and then click the Update Driver button.
-
Select Search automatically for updated driver software to have Windows search the computer and the Internet for the latest driver software,orIf you have a driver disc, select Browse my computer for driver software.
note:
If you are using a non-HP monitor and it came with software, install the driver that came with your monitor.A window with a Browse button opens.-
Click Let me pick from a list of device drivers on my computer.An Install From Disk window opens.
-
Insert the disc into the removable media drive.
-
Type the drive letter in the Copy manufacturer's files from field.
-
Click the Browse button.
-
In the Local File window, double-click the folder name that contains the monitor driver.
-
Click the Open button.
-
-
Click Next, and then click Finish to change the driver.The monitor driver is installed.
Using HP monitors on a Mac
HP monitors are not supported in a Mac environment. However, newer Macs use graphics with VESA modes and can display to most HP LCD monitors.To do this, connect the monitor to the Mac while the Mac is off, and then turn on the MAC. The monitor should operate at 60Hz.The INF and software for the HP monitor are for Microsoft Windows and cannot be run in a standard MAC OS environment.
Download and install monitor definitions for older CRT monitors in Windows 95, 98, Me, and XP
Use the following steps to download and install monitor files that were originally produced for CRT monitors designed to work with Windows 95 and 98:
-
To download the software, click the following link: HP Monitorh.exe download.The file download window displays.Figure : File Download window

-
Click Run.The Security Warning window displays.Figure : Security Warning window

-
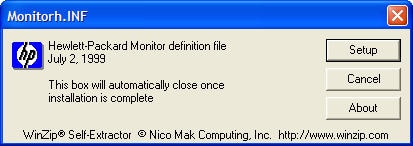
Click Run.The monitor INF file window displays.Figure : Monitor INF file window
-
Click Setup.
-
Click OK.The window automatically closes when the installation is complete. Use the next section "Manually selecting a monitor driver in Windows 98, Me, and X," to complete monitor setup.
Manually selecting an older CRT monitor in Windows 98, Me, and XP
Complete the following steps to add an older HP monitor to Windows 98, Me or XP:
-
Open Device Manager:
-
In Windows XP, Right-click the My Computer icon from the Start menu in Windows XP.In Windows 98 and Me, right-click the My Computer icon on the desktop,
-
Select Properties from the menu.
-
In Windows XP, click the Hardware tab. Then click the Device Manager button.In Windows 98 and Me, click the Device Manager tab.
-
-
Click the plus (+) sign next to Monitors.
-
Right-click the monitor listed under Monitors and click Properties. If more than one monitor is listed, delete them all, one at a time, and restart the computer. Repeat Step 1 through 3, opening Device Manager each time.
-
Click the Driver tab, and then click Update Driver.
-
Select Install from a list or specific location or Specify the location of the driver. Click Next.
-
Select Don't search... or ... or Display a list, and then click Next
-
Select your monitor name in the selection window.
-
Click Next, and then click Finish.If your monitor name does not display in the list, continue to the next step.
-
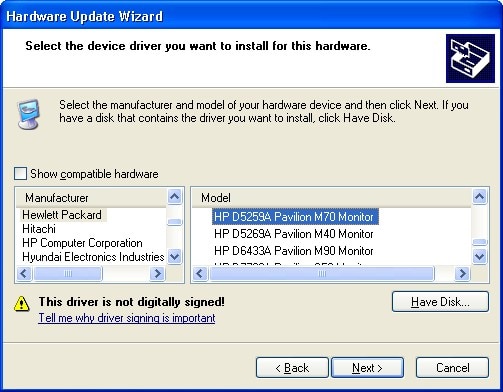
In Windows XP, remove the check from Show compatible hardware.In Windows 98 and Me, select Show all hardware.
-
Click Hewlett-Packard from the list of manufacturers. Then click your monitor name in the model list. Click Next.Figure : Hardware Update Wizard
-
Click Finish after Windows installs the necessary files.
Enter a topic to search our knowledge library
What can we help you with?

Need Help?