solution Contentsolution Content

HP OfficeJet 86xx Printers - Paper Jam Error

This document is for HP OfficeJet 8600 Series Printer, OfficeJet Pro 8610, 8615, 8616, 8620, 8625, 8630, 8640, and 8660 e-All-in-One printers.
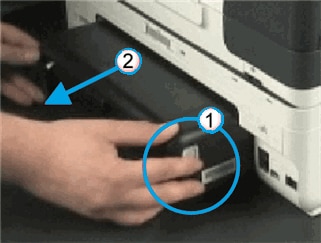
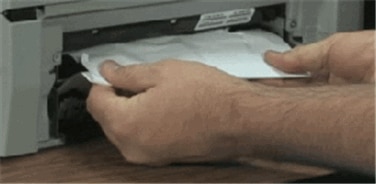
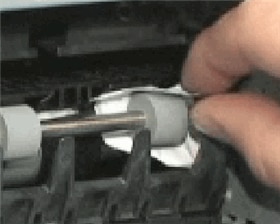
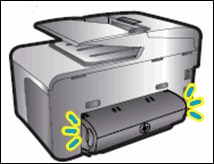
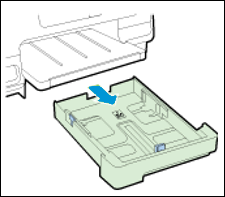
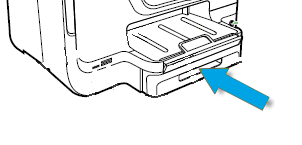
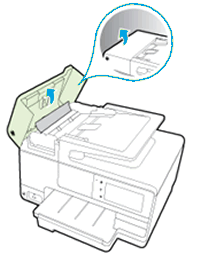
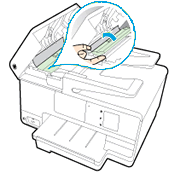
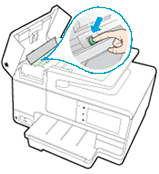
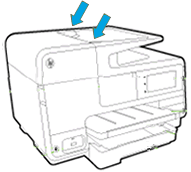
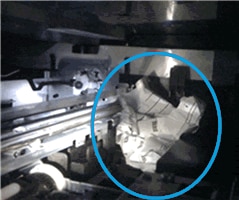
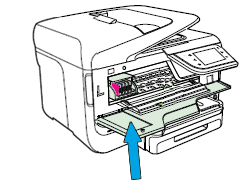
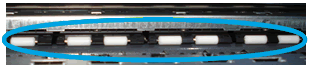
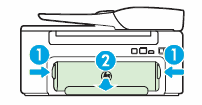
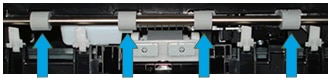
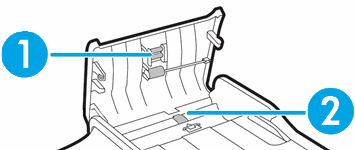
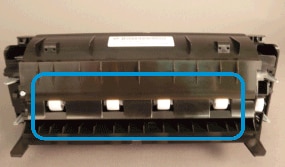
During a print job, the printer stops feeding pages, and a Paper Jam has occurred. Clear the jam, and then press OK error message displays on the printer control panel. This indicates that paper might be jammed inside the printer.
note:
Paper jams can be real or false. The printer might report a paper jam even when there is no jammed paper. The following steps apply to both real and false paper jams.

Step 1: Turn the printer off, and then on again

Turning the printer off and then on resets the carriage.
  1. Press the power button to turn off the printer. If the printer does not turn off, disconnect the power cord from the printer.
  2. Unplug the power cord from the power source.
  3. Wait 60 seconds.
  4. Connect the power cord directly to a wall outlet and to the printer.
  5. Turn on the printer to complete the reset.
Try to print. If the error persists, continue to the next step.

Step 2: Look for jammed paper

Paper jams can occur in multiple areas of the printer. If you cannot find the paper jam in one area, continue to the next area until you locate the jam.
  caution:
Trying to clear a paper jam from the front of the printer can damage the print mechanism. Gain access to and clear paper jams through the rear of the printer whenever possible.
If you have checked and removed any jammed paper from each printer area and the error persists, continue to the next step.

Step 2: Make sure the carriage can move freely

Make sure the carriage moves freely across the width of the printer.
  1. Turn on the printer.
  2. With the printer turned on, disconnect the power cord from the rear of the printer, and then unplug the power cord from the power source or electrical outlet.
      warning:
    To avoid the risk of electrical shock, you must unplug the power cord before moving the carriage by hand and resetting the paper feed mechanism.
  3. Disconnect the USB or Ethernet cable from the rear of the printer, if you have a cable connection to the printer.
  4. Place your fingers into the slot on the left side of the printer, and then pull to open the cartridge access door.
      Image: Open the cartridge access door
    1. Slot on the side of the printer
  5. Wait until the carriage is idle and silent before you continue.
  6. Use a flashlight to check for torn pieces of paper that might remain inside the printer. If any torn pieces of paper remain inside the printer, more jams might occur.
    Image: Paper jammed in carriage path
  7. Gently pull out any jammed or torn paper from inside the printer.
  8. Reach into the ink cartridge access area, and then manually move the carriage.
    • If the carriage is stuck on the right side of the printer, move the carriage to the left side of the printer.
    • If the carriage is stuck on the left side of the printer, move the carriage to the right side of the printer.
    • If the carriage is stuck in the middle of the printer, move the carriage to the right side of the printer.
  9. Remove any loose or torn pieces of paper.
  10. Make sure the carriage can move freely across the width of the printer by gently pushing the carriage to the left, and then to the right.
  11. Close the ink cartridge access door.
    Image: Close the cartridge access door
  12. Reconnect the power cord to the rear of the printer, and then turn on the printer.
  13. Reconnect the USB or Ethernet cable.
Try to print. If the error persists, continue to the next step.

Step 3: Clean the paper feed rollers

Dust, paper fiber, and other debris might accumulate on the paper feed rollers and cause paper jams and paper feed issues. Clean the rollers inside the printer, and then try to print again.

Step 4: Reset the printer

Sometimes a paper jam error persists even though there is no jammed paper (false paper jam). Reset the printer, which might clear a false paper jam error, and then try to print again.
  1. With the printer turned on, disconnect the power cord from the printer.
  2. Unplug the power cord from the power source.
  3. Wait 60 seconds.
  4. Reconnect the power cord to a wall outlet and to the printer.
    note:
    HP recommends plugging the printer directly into a wall outlet.
Try to print. If the error persists, continue to the next step.

Step 5: Service the printer

Service or replace your HP product if the issue persists after completing all the preceding steps.
Go to Contact HP Customer Support to schedule a product repair or replacement. If you are in Asia Pacific, you will be directed to a local service center in your area.
To confirm your warranty status, go to HP Product Warranty Check. Repair fees might apply for out-of-warranty products.