solution Contentsolution Content

HP LaserJet Pro CM1410, M1210, and M1530 Multifunction Printers Series - 'Document feeder mispick' Message Displays on the Control Panel and the ADF Does Not Pick Up Paper or Feeds Multiple Pages

Issue

When you scan, copy, or fax pages from the automatic document feeder (ADF), the printer does not pick up any pages. The following error message displays on the control panel: 'Document feeder mispick. Reload then press [OK] button to continue'. The ADF might also pick up multiple pages instead of single pages.
Try the following solutions in the order presented to resolve the issue. When one of the solutions resolves the issue, stop troubleshooting.

Video of fixing your printer when the ADF does not pick up or feed paper

The following video demonstrates what to do when your printer does not pick up, or feed, paper from the Automatic Document Feeder (ADF).
note:
This video shows an HP LaserJet M1212 printer, but the steps are the same for your printer.
Replacing a Cartridge - HP Deskjet 1510 All-in-One Printer
Learn how to replace a cartridge in the HP Deskjet 1510 All-in-One printer.
If you have trouble viewing the video or to view the video in a different size, click here to play the video on YouTube.

Solution one: Check the paper in the ADF

Paper feed issues in the ADF might result from dusty, torn, wrinkled, wet, or folded paper in the ADF tray. The quality of the paper can also make a difference. Use only good quality paper that meets printer specifications. Follow these steps to check the condition of the original paper.
  1. Remove the original document from the ADF.
  2. Examine the condition of the original, and then replace any ripped, dusty, curled, wrinkled, or bent pages.
  3. Make sure that the original is a supported paper type for the ADF.
  4. Make sure that all original pages are the same size and type. Never load mixed types of paper in the ADF. The printer can only process one type of paper at a time.
  5. Reload the original document print side up in the document feeder tray. Gently slide the document into the printer as far as it will go.
    note:
    Do not load more than 35 pages in the ADF. Larger stacks of paper can lead to pick problems.
  6. Adjust the paper guides until they are snug against the paper.
  7. Press OK to continue the current task.
  • If these steps resolved the issue, you do not need to continue troubleshooting.
  • If the issue persists, see the next solution.

Solution two: Clean the ADF rollers and the separator pad

Dust or paper residue on the rollers or separator pad inside the ADF can cause paper feed issues. Follow these steps to clean the ADF rollers and separator pad.
  1. Gather the following materials:
    • A clean, lint-free cloth, or any cloth that will not come apart or leave fibers
    • Distilled, filtered, or bottled water (tap water might damage the printer)
  2. Remove the originals from the ADF.
  3. Press the Power button to turn off the printer.
  4. Disconnect the power cord from the rear of the printer.
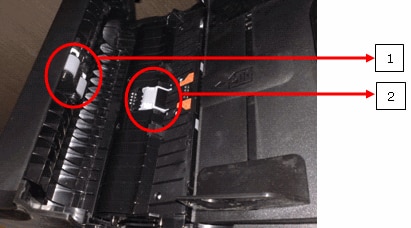
  5. Open the ADF cover, and then find the rollers and the separator pad.
      Figure : ADF rollers and separator pad
      Illustration showing locations of the ADF rollers and separator pad
    1. ADF rollers
    2. Separator pad
  6. Lightly dampen a clean, lint-free cloth with filtered or distilled water, and then squeeze anyexcess liquid from the cloth.
  7. Use the damp cloth to wipe any residue off the rollers and the separator pad.
  8. Leave the ADF open for two minutes to allow the pick rollers and separator pad to dry
  9. Close the ADF cover.
  10. Reload the original document print side up in the document feeder tray. Gently slide the document into the printer as far as it will go.
    note:
    Do not load more than 35 pages in the ADF. Larger stacks of paper can lead to pick problems.
  11. Adjust the paper guides until they are snug against the paper.
  12. Reconnect the power cord to the rear of the printer.
  13. Press the Power button to turn on the printer.
  14. Test the ADF. Press the Start Copy button () to make a copy.
  • If these steps resolved the issue, you do not need to continue troubleshooting.
  • If the issue persists, see the next solution.

Solution three: Service the printer

Service or replace your HP product if the issue persists after completing all the preceding steps.
Go to Contact HP Customer Support to schedule a product repair or replacement. If you are in Asia Pacific, you will be directed to a local service center in your area.
To confirm your warranty status, go to HP Product Warranty Check. Repair fees might apply for out-of-warranty products.