The product does not pick up or feed paper from the main paper tray, and the control panel might display an 'E' message.
HP Deskjet F4200 All-in-One Series - 'Out of Paper' Error Message and the Printer Does Not Pick Up or Feed Paper
Issue
How to use the solutions in this document
A paper feed issue can occur for several reasons, such as dusty or contaminated paper rollers, the condition of the paper in the tray, or even issues with the software.
To resolve the issue, try each solution in this document, and then use the steps in this section to print a self-test report. This step determines if the product hardware functions correctly. When you have resolved the issue, and the product successfully prints a self-test report, there is no need to continue troubleshooting.
|
How to print a self-test report
|
|
 ), and then press the Start Copy Color button (
 ) at the same time. The self-test report prints.
 IMPORTANT: Try to print a self-test report after every solution even if the solution resolves the issue.
Video of resolving a paper pick issue
The following video demonstrates the steps for resolving an Out of Paper error message on the HP Deskjet F4200 printer. The outside of the product might look different than your product, but the steps are similar for your product.

If you have trouble viewing the video or to view the video in a different size, click here to play the video on YouTube.
Solution one: Perform a reset
Sometimes, restarting the product can clear a paper feed issue. Follow these steps to perform a reset.
Step one: Reset the product
-
Press the Power button (
 ) to turn on the product.
-
With the product turned on, disconnect the power cord from the rear of the product.
-
Unplug the power cord from the wall outlet.
-
Wait at least 15 seconds.
-
Plug the power cord back into the wall outlet.
-
Reconnect the power cord to the rear of the product.
-
If the product does not turn on by itself, press the Power button () to turn it on.
Step two: Print a self-test report
Print a self-test report. See the section on how to use these solutions at the beginning of this document.
-
If the self-test report prints, try printing the original document again. If the issue is resolved, there is no need to continue troubleshooting.
-
If the issue persists, continue with the next solution.
-
If the self-test report does not print, continue with the next solution.
Solution two: Check the condition of the paper, and then reload it
Paper feed issues might result from dusty, torn, wrinkled, wet, or folded paper in the tray. The quality of the paper can also make a difference. Use only good quality paper that meets product specifications. Follow these steps to check the condition of the paper.
note:For the purposes of these troubleshooting steps, use only 10 to 25 sheets of plain white, unused paper.
Step one: Check the condition of the paper
-
Remove the stack of paper from the tray.
-
Check for obstructions inside the tray. Use a flashlight to view the mechanism inside the tray to make sure that nothing blocks the paper from engaging with the rollers. Even small pieces of paper can cause paper feed issues.
note:
If you find obstructions in the paper path, skip to the section on cleaning the rollers. -
Examine the condition of the paper, and then replace any ripped, dusty, curled, wrinkled, or bent paper.
-
Make sure that all the paper in the stack is the same size and type. Never load mixed types of paper in the tray. The product can only process one type of paper at a time.
-
Tap the stack of paper on a flat surface to align the edges.
-
Make sure that the stack of paper contains no fewer than 10 sheets and no more than 25 sheets of paper.
note:
You need to use 10 to 25 sheets of paper only for purposes of these troubleshooting steps. When the issue is resolved, you can resume loading paper according to the paper tray capacity specifications for your product.
Step two: Reload the paper
-
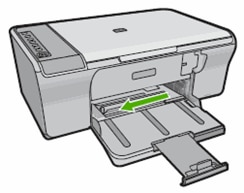
Pull out the tray extender, and then flip open the paper catch.Figure : Pull out the tray extender

-
Slide the paper width guide to its outermost position.Figure : Slide the paper width guide out
-
Load paper in the input tray with the short edge forward and the print side down. Slide the stack forward until it stops.Figure : Load the paper tray

note:
Make sure that all the paper in the stack is the same size and type and free from rips, dust, wrinkles, and curled or bent edges. -
Slide the paper width guide inward until it stops at the edge of the paper. Do not push the guides in so tightly that they bind against the paper.Figure : Slide paper width guide inward

Step two: Print a self-test report
Print a self-test report. See the section on how to use these solutions at the beginning of this document.
-
If the self-test report prints, try printing the original document again. If the issue is resolved, there is no need to continue troubleshooting.
-
If the issue persists, continue with the next solution.
-
If the self-test report does not print, continue with the next solution.
Solution three: Clean the rollers
Dust, paper fiber, and other debris might accumulate on the paper feed rollers and cause paper jams and paper feed issues. Follow these steps to clean the paper feed rollers.
Step one: Clean the rollers
The All-in-One software contains a utility you can use to clean the rollers and the paper path of the product. Use the following steps to run this automated utility.
-
Remove any paper from the input tray.
-
Open the Control Panel.
-
Windows XP: Click Start, and then click Control Panel. The Control Panel opens.
-
Windows Vista or Windows 7: Click the Windows icon (
 ), and then click Control Panel. The Control Panel opens.
-
-
Click Printers, and then right-click the appropriate product. The product drop-down menu displays.
-
In the drop-down menu, click Printer Preferences. The Printing Preferences window opens.
-
Click the Features tab, and then click Printer Services.
-
On the Printer Services tab, click Paper Feed Cleaning (
 ), and then click OK. The Paper Feed Cleaning dialog box displays.
-
Follow the instructions in the Paper Feed Cleaning dialog box, and then click OK. The cleaning process takes a few minutes.
Step two: Print a self-test report
Print a self-test report. See the section on how to use these solutions at the beginning of this document.
-
If the self-test report prints, try printing the original document again. If the issue is resolved, there is no need to continue troubleshooting.
-
If the self-test report prints, but the original document does not, continue to the next solution in this document.
-
If the self-test report does not print, try printing the report again. Listen for the rubber paper-pick rollers; you should be able to hear them rotating. Then, try slowly pushing the paper farther in until the roller engages to pick up the paper. Be careful not to push the paper in too far, which can cause paper jams.
-
If the self-test report does not print when slowly pushing the paper farther in, repeat the previous steps to clean the rollers again. If the issue continues after repeated cleaning, skip the next solution in this document, and then service the product.
-
If the self-test report prints when slowly pushing the paper farther in, try printing the original document again. The paper might not have been loaded far enough into the product. If the issue is resolved, there is no need to continue troubleshooting.
-
If the paper only feeds through the product when you slowly push it farther in, repeat the previous steps to clean the rollers again. If the issue continues after repeated cleaning, skip the next solution in this document, and then service the product.
-
Solution four: Adjust the paper settings in the print driver
The product might not pick up paper if the paper size and type in the paper tray do not match the size and type settings in the print driver.
-
Return to the document you were trying to print when the issue occurred.
-
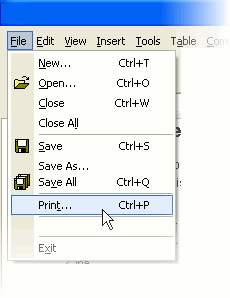
Click File, and then click Print. The Print window opens.Figure : Click File, and then click Print
-
Click the button that opens the Properties dialog box. Depending on the software program, the button might be Properties, Options, Printer Setup, Printer, or Preferences.
-
Click the Features tab.
-
From the Paper type drop-down list, select the paper type that matches the paper in the product.
-
From the Size drop-down list, select the paper size that matches the paper in the product.For example, if you have 101.6 x 152.4 mm (4 x 6 inch) photo paper loaded in the paper tray, select 4x6in. or 4x6in. (tab).If the required paper size is not in the drop-down list, follow these steps to create a custom paper size.
-
Select Custom from the Size drop-down list, or the Custom tab.
-
In the Name dialog box, type a name for the new custom size.
-
In the Width and Length boxes, type the dimensions.
-
Select the unit of measurement, and then click Save.
-
Click OK to close the Custom Paper Size dialog box, and then click OK again to close the Properties dialog box.
note:
You must exit the Properties dialog box to apply your changes. -
Open the Properties dialog box again, and then select the new custom size from the Size drop-down list.
-
-
Click OK, and then click OK again to print the document.
-
If the document prints, the issue is resolved, and there is no need to continue troubleshooting.
-
If the document prints on plain white paper, but not a special paper type, there is no need to continue troubleshooting. The problem is probably related to the paper that you were trying to print on, or possibly a connectivity problem. Review the Cause and Prevention sections at the end of this document to check other possibilities.
-
If the document does not print, continue with the next solution.
Solution five: Service the product
If the product printed a self-test report with plain white paper, the printer is functional and does not need to be replaced. Other issues, such as connectivity, print driver settings, special paper, photo paper facing shiny side up, or slick or damaged paper might cause the problem. Review the following sections to learn about the common causes and how to prevent the issue.
Service or replace your HP product if the issue persists after completing all the preceding steps.
Go to Contact HP Customer Support to schedule a product repair or replacement. If you are in Asia Pacific, you will be directed to a local service center in your area.
To confirm your warranty status, go to HP Product Warranty Check. Repair fees might apply for out-of-warranty products.
IMPORTANT: Only service the product if you have already tried all of the previous solutions and the product will not print a self-test page on plain white paper.
Prevent paper feed issues
Follow these guidelines to help prevent paper feed issues:
-
Load at least 10 sheets of paper into the tray, but do not overload the tray.
-
Load paper correctly, and then push the paper all the way into the tray.
-
Use only one type of paper at a time in the tray.
-
Store paper in a cool, dry place.
-
Use only clean unused paper in the tray.
-
Reload paper that has been in the photo tray for a time. Avoid printing on paper that is dusty.
-
Wait for the product to complete a job or to display an 'Out of paper' message before reloading paper.
Cause
Any of the following issues can cause this issue:
-
The paper trays are empty or overloaded.
-
The paper is curled.
-
The print side, or shiny side, of the paper is not loaded in the tray face down. For photo paper, always load the rougher side of the paper facing up.
-
The paper is too slick for the product.
-
The paper might not be engaged with the feed rollers.
-
The paper-width guide is pressed against the paper stack too tightly.
-
The paper tray is not completely inserted into the product.
-
The paper settings in the print driver do not match the paper loaded in the paper tray.
-
The rubber paper-feed rollers are dusty.
Enter a topic to search our knowledge library
What can we help you with?

Need Help?