This document is for HP LaserJet Pro P1102, P1102s, P1102w, P1106, P1108, P1109, and P1109w printers.
HP LaserJet Pro Printers - Printer Views
Front and left side view
-
Output bin
-
Foldable output tray extension
-
Input tray
-
Short media extender tool
-
Power button
-
Print-cartridge door lift-tab
-
Control panel
Figure : HP LaserJet Professional P1102, P1102s, P1106, P1108, P1109 front view

-
Output bin
-
Foldable output tray extension
-
Priority input slot
-
Main input tray
-
Power button
-
Print-cartridge door lift-tab
-
Control panel
Figure : HP LaserJet Professional P1102w, P1109w front view

Back view
-
USB port
-
Power connector
-
Kensington lock
Figure : Product back view

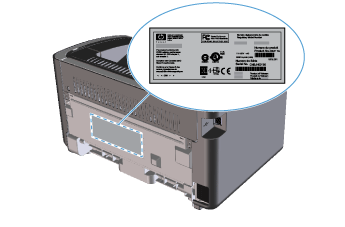
Serial number and product number location
The label that contains the product number and serial number is on the rear of the product.
Figure : Location of product number and serial number label
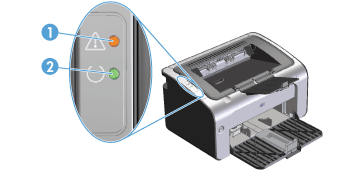
Control-panel layout
-
Attention
 light: Indicates that the print cartridge door is open or other errors exist.
-
Ready
 light: When the product is ready to print, the ready light is on. When the product is processing data, the ready light blinks.
Figure : HP LaserJet Professional P1102, P1102s, P1106, P1108, P1109 control panel layout
-
Wireless
 button: To detect wireless networks, press the wireless button. This button also enables and disables the wireless feature.
-
Wireless light: When the product is searching for a network, the wireless light blinks. When the product is connected to a wireless network, the wireless light is on.
-
Attention light: Indicates that the print cartridge door is open or other errors exist.
-
Ready light: When the product is ready to print, the ready light is on. When the product is processing data, the ready light blinks.
-
Cancel
 button: To cancel the print job, press the cancel button. Press and hold the button for 5 seconds to print a configuration page.
Figure : HP LaserJet Professional P1102w, P1109w control panel layout

Enter a topic to search our knowledge library
What can we help you with?

Need Help?