Dust, paper fiber, and other debris might accumulate on the paper feed rollers and cause paper jams and paper feed issues. Clean the rollers inside the printer, and then try to print again.
Gather the following materials:
Clean the rollers from inside the ink cartridge access area
Clean the rollers inside the ink cartridge access area.
-
Turn off the printer, and then disconnect the power cord and any other cables.
warning:
You must disconnect the power cord before reaching inside the
printer to avoid risk of injuries or electric shock.
-
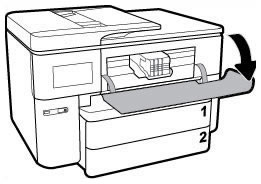
Open the ink cartridge access door.
Figure : Opening the ink cartridge access door
-
Lightly dampen a lint-free cloth with distilled water, and then squeeze any excess liquid from the cloth.
-
Move the carriage all the way to the right, if necessary.
-
Press the cloth against the rollers inside the printer, and then rotate the rollers upwards with your fingers. Apply a moderate amount of pressure to remove any dust or dirt buildup.
Figure : Cleaning the rollers in the ink cartridge access area

-
Allow the rollers to dry completely (approximately 10 minutes).
-
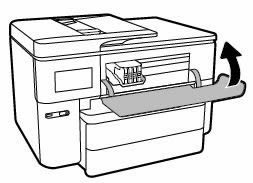
Close the ink cartridge access door.
Figure : Closing the ink cartridge access door
-
Reconnect the power cord and any other cables to the rear of the printer, and then turn on the printer.
Try to print. If the error persists, clean the rollers in another area of the printer.
Clean the rollers from inside the rear of the printer
Clean the rollers inside the rear of the printer.
-
Turn off the printer, and then disconnect the power cord and any other cables.
warning:
You must disconnect the power cord before reaching inside theprinter to avoid risk of injuries or electric shock.
-
Turn the printer so that the rear access door faces you.
-
Press the two tabs inward on the rear access door, and then lower the rear access door to open it.
Figure : Opening the rear access door

-
Press the two buttons inward on the paper path cover, and then pull the cover out of the printer.
Figure : Removing the paper path cover

-
Lightly dampen a clean, lint-free cloth with bottled or distilled water, and then squeeze any excess liquid from the cloth.
-
Press the cloth against the rollers, and then rotate them upward with your fingers. Apply a moderate amount of pressure to remove any dust or dirt buildup.
Figure : Cleaning the rollers in the rear of the printer

-
Repeat the cleaning steps on the paper path cover rollers.
Figure : Cleaning the paper path cover rollers

-
Allow the rollers to dry completely (approximately 10 minutes).
-
Insert the paper path cover back into the printer.
-
Close the rear access door.
-
Reconnect the power cord and any other cables to the rear of the printer, and then turn on the printer.
Try to print. If the error persists, clean the rollers in another area of the printer.
Clean the rollers in the ADF
Clean the paper feed rollers in the automatic document feeder (ADF).
-
Lift the cover of the ADF.
Figure : Lifting the ADF cover

-
Lightly dampen a clean, lint-free cloth with bottled or distilled water, and then squeeze any excess liquid from the cloth.
-
Press the cloth against the rollers, and then rotate them upward with your fingers. Apply a moderate amount of pressure to remove any dust or dirt buildup.
Figure : Cleaning the rollers and separator pad

-
Allow the rollers to dry completely (approximately 10 minutes).
-
Close the ADF cover tightly at both ends.