solution Contentsolution Content

HP ENVY 5640, 5660, 7640, OfficeJet 5740 Printers - 'A paper tray is open. Close the tray to continue.' Message

This document is for HP ENVY 5640, 5642, 5643, 5644, 5646, 5660, 5661, 5663, 5664, 5665, ENVY 7640, 7643, 7644, 7645, OfficeJet 5740, 5741, 5742, 5743, 5744, 5745, 5746, and Officejet 8040 e-All-in-One printers.
After loading paper into the input tray or photo tray, or when you try to print, the printer does not print, and the Close Tray screen displays on the printer control panel with the following error message:
'A paper tray is open. Close the tray to continue. Touch to view paper loading instructions.'
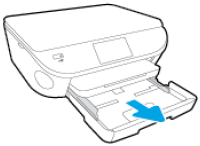
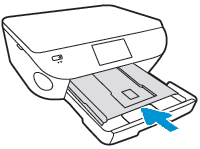
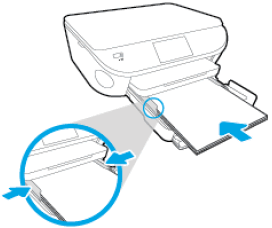
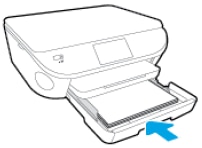
This error message displays when the main input tray is not completely closed. Follow the troubleshooting steps to resolve the issue. When the error message no longer displays on the control panel, the issue is resolved.

Solution one: Make sure that the input tray is completely closed

Make sure that you have properly closed the main input tray by pushing the tray into the printer as far as possible.
  1. Grasp the handle on the input tray, and then pull the tray toward you to open it.
    Figure : Pull out the input tray
    Image: Pull out the input tray
  2. Close the input tray by pushing it into the printer until it locks into place.
    Figure : Push in the input tray
    Image: Push in the input tray
    note:
    The tray clicks into place when it is completely closed, and the printer makes noise.
  3. Check the control panel for the Have You Changed the Paper? message. If you see it and do not touch an option, the message fades after several seconds, and the printer returns to the Home screen. If you do not see the message, continue to the next solution.

Solution two: Reload the paper in the input tray

Paper that is loaded incorrectly in the input tray might prevent the tray from closing completely. Remove any paper from the input tray, and then reload the paper correctly before closing the input tray.
  1. Grasp the handle on the input tray, and then pull the tray toward you to open it.
    Figure : Pull to open the paper tray
    Image: Pull to open the paper tray
  2. With the paper tray pulled out, push in the photo tray as far as possible.
    Figure : Push in the photo tray
    Image: Push in the photo tray
  3. Remove any paper that is loaded into the input tray, and then slide out the paper width guides as far as possible.
    Figure : Slide out the paper width guides
    Image: Slide out the paper width guides
  4. With both hands, hold the stack of paper that you removed from the input tray, or a new stack of paper that you want to load, and then tap the bottom edge of the stack on a flat surface so that the stack is even on all sides.
    note:
    Load only one type of paper at a time. Do not mix different types, weights, or sizes of paper.
  5. Insert the stack of paper into the input tray.
  6. Push the stack of paper toward the rear of the input tray until the paper stops, and then gently slide in the paper width guides until they lightly rest against the edges of the paper.
    Figure : Slide the paper back and the paper width guides in
    Image: Slide the paper back and the paper width guides in
    note:
    Make sure that the stack of paper is not higher than the top edges of the paper width guides.
  7. Close the input tray by pushing it into the printer until it locks into place.
    Figure : Push in the paper tray
    Image: Push in the paper tray
    note:
    The tray clicks into place when it is completely closed, and the printer makes noise.
  8. Check the control panel for the Have You Changed the Paper? message. If you do not touch an option, the message fades after several seconds, and the printer uses the previous paper settings. Adjust the paper settings as needed.
    • If you did not change the paper size or type in the input tray or the photo tray, touch OK to return to the Home screen.
    • If you did change the paper size or type in the input tray or photo tray, adjust the paper settings:
      • For the input tray: Touch Main Tray, Paper Size, and then your paper size. Touch Paper Type, and then touch your paper type. Touch Done, and then touch OK to return to the Home screen.
      • For the photo tray: Make sure that 4x6 in., Photo Paper displays in the Photo Tray field. Touch OK to return to the Home screen.
      note:
      You can also use the 3x5 in., Photo Paper setting for the HP Officejet 8040 e-All-in-One Printer series.

Solution three: Check for obstructions that prevent the input tray from closing

Remove any paper or other obstructions from underneath the printer and inside the gap where the input tray slides into.
  1. Press the Power button to turn off the printer.
  2. Grasp the handle on the input tray, and then pull the tray toward you to open it.
    Figure : Pull to open the paper tray
    Image: Pull to open the paper tray
  3. Remove any loose sheets of paper from the input tray or any paper that blocks the photo tray.
  4. Remove the output tray, and then set it aside.
    Figure : Remove the output tray
    Image: Remove the output tray
  5. Turn the printer onto its right side so you can access its underside.
  6. Check the gap where the input tray was. Remove any loose paper or other obstructions in the gap. If any paper is jammed inside the gap, grasp the paper with both hands, and then pull the paper slowly but firmly toward you to remove it. Gently remove any jammed paper and bits of torn paper.
    Figure : Turn the printer onto its right side, and then remove any obstructions
    Image: Turn the printer onto its right side,  and then remove any obstructions
      caution:
    Remove paper from the gap as carefully as possible. If any torn pieces of paper remain inside the printer, a paper jam is likely to occur, which could damage the print mechanism.
  7. Turn the printer back over to its normal position, and then reinsert the input tray, pushing it into the printer until it locks into place.
    Figure : Push in the paper tray
    Image: Push in the paper tray
    note:
    The tray clicks into place when it is completely closed, and the printer makes noise.
  8. Grasp the output tray by the sides, and then replace the output tray onto the input tray.
  9. Press the Power button to turn on the printer.
  10. Wait until the printer finishes warming up, and then check the control panel to see if the error message has cleared.

Solution four: Restart the printer

Turning the printer off and then on again can reset the printer and clear the message from the control panel.
  1. Press the power button to turn off the printer. If the printer does not turn off, disconnect the power cord from the printer.
  2. Unplug the power cord from the power source.
  3. Wait 60 seconds.
  4. Connect the power cord directly to a wall outlet and to the printer.
  5. Turn on the printer to complete the reset.

Solution five: Service the printer

Service or replace your HP product if the issue persists after completing all the preceding steps.
Go to Contact HP Customer Support to schedule a product repair or replacement. If you are in Asia Pacific, you will be directed to a local service center in your area.
To confirm your warranty status, go to HP Product Warranty Check. Repair fees might apply for out-of-warranty products.